Index Background

Hat Hairstyles: Braided Pigtails

by Remington Ready January 16, 2015


Braided pigtails aren’t just for little girls anymore; it’s actually a super cute boho-chic braided style! It’s easy to do and the braids start low, so no need to worry about the hat getting in the way!


Style Tip: If you have a lot of layers, start the braids a little higher than right under the ear and keep it tighter as you braid. 


Tools: Double Knit Elastics 


    1.  Start with natural hair, and divide hair down the back of your head into two                    sections.


    2.  Begin on one side, dividing hair into three uneven sections. It’s best to have the            smallest section be from the back.


    3.  Braid the strands, keeping it tight for now. You can loosen them up later!


    4.  Repeat steps one and two on the other side.


    5.  Loosen up the braid to desired look. They may loosen up throughout the day, so            don’t make it too loose!


    6.  You’re all finished with this boho braid style! Just add finishing spray as needed            and top off with your winter hat. Pull it down so that it ends right where the braids          begin! 


Hat Hairstyles: Messy Waves

by Remington Ready January 16, 2015


Hats are natural teasers, so try this look to let the hat work for you! The natural messy waves are a perfect pair with the hat-teased roots.


Style Tip: Use root booster product or hairspray once the styling is finished. This will keep volume in the roots, while not letting the hat mess get too out-of-hand!


Tools: TStudio Pink Silk Waving Wand


    1.  Start with natural hair, adding texture spray if needed.

 
    2.  Gather hair into ponytail on top of head.

 
    3.  Curl a 1” section of hair with the TStudio Pink Silk Waving Wand. Remember to             not wrap the hair all the way to the end, leave the ast 1-2” end straight.


    4.  Continue curling until the whole ponytail is curled. 


    5.  Spray hair with hairspray, and then take out pony tail as gently as possible.


    6.  Separate curls and tease as needed. Do not tease too much, since the hat will             do a lot of that for you during the day! 


    7.  Your messy waves are ready to go! Just add finishing spray as needed and your           favorite winter hat. Enjoy the all-day messy look without a worry!


Trend Alert: Bold Stripes

by Remington Ready January 12, 2015


The Trend


The stripe trend is transitioning from the simplistic nautical feel to bold mod prints. Instead of even stripes, widths are varying and mixed from pinstripe to wide bands. Colors expand beyond just white with black or navy. We’re seeing bolder combinations with reds, blues and greens.


Stripes For You


If you’re not quite ready to fill your wardrobe with stripes, then start simple. Add stripes to your handbags and shoes for a pop of print. Try a striped top under a solid colored blazer or cardigan so the striped print doesn’t feel overwhelming. You could also look for pieces that mix in a striped print with solid color blocks, like the black and white sweater above.


If you want a bolder stripe style, then have fun with it! Look for varying stripe widths and colors. Your striped piece should be the focus, so remember to keep all other items and accessories classic and simple in colors that complement the striped pattern. 

Find Your Perfect Winter Coat

by Remington Ready January 5, 2015


You know what kinds of clothes look good on your body type, and your winter coat should be no different. So you’ll need something that looks fabulous, flatters your favorite features, and complements your stylish clothing. Check out the coats below along with tips for finding the perfect one for your body type!


1. Dress Trench Coat

Body Type: Hourglass

A dress trench coat is a great fit for a more curvy shape. The key is to find something that highlights your waist and doesn’t cling to your curves. Try a longer coat with feminine feel that is soft-fitting. Flatter your assets, don’t flatten them!


2. Cocoon Coat

Body Type: Apple

This black coat slims by drawing attention to the waist without cinching up. Try something with details around the waist like zippers or pockets. This coat works perfectly with a color block line across the center and the lapels that point to the waist.


3: Furl Collar Coat

Body Type: Pear

If your body is pear shaped, draw attention to your chest and shoulders with large lapels or a fur collar. Bright colors also bring attention to the upper body. Try something with a soft fit that still shows off your curves!


4: Trench Coat

Body Type: Athletic

A tailored coat belted at the waist is a great fit for those with a slender build or wider shoulders. A longer coat is usually best, but focus on one that gives you an hourglass shape. Try lapels or raised-necks, a belted waist, and an A line shape below the waist like this trench coat.


5: Parka

Body Type: Busty

Slim your top half by avoiding large lapels or buttons and a belt at the waist. This parka lies flat across the chest and adds length, but still shows some shape to the body. A coat with more of an A line below the waist works well too!


6: Cape Coat

Body Type: Any/Pregnant

A cape coat looks fabulous on every shape, but it’s especially flattering if you’re pregnant. This trendy coat fits nicely over a growing baby-bump. Or if a fitted coat is more your style, just look for one that can be belted above the waist!


7: Mid-length Coat

Body Type: Tall

There isn’t a certain type of coat for tall body types— it’s all about the features. Look for something with a looser fit and mid-length with a straight shape. Color blocking or details around the waist break up the coat’s length. Try to stay away from single color coats!


8: Long Pea Coat

Body Type: Petite

If the goal is to elongate your body, stick to a single color coat that cuts at the knee. You don’t want the coat to be too tight-fitted, but make sure not to drown your lovely frame! A straight fit works best and the line that runs down this coat is a great extra detail.

New Years' Hairstyles

by Remington Ready December 29, 2014


You may have your New Year’s Eve outfit planned, but what about something special for your hair? Try one of these new styles to complete your look for a fun night out celebrating the New Year. You’ll make an elegant statement without too much work— just follow the steps below!


Braided Twist


Braids are all the rage and they can even create a classy up-do! It will look like you spent all morning doing your hair, but it only takes a few minutes.


Style tip: create this style on first-day hair, then let the braids down on day two for some fun waves!
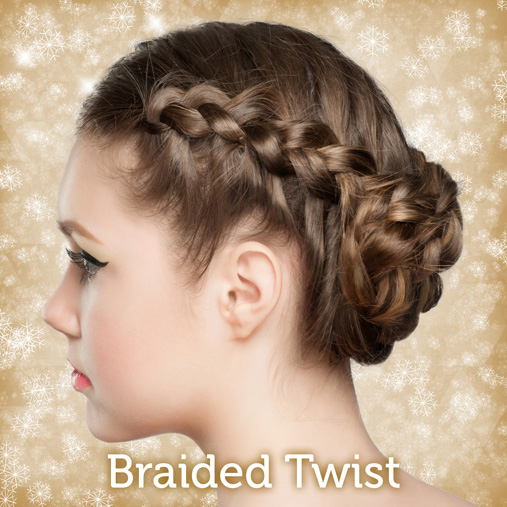


Tools: ElasticsBobby Pins


    1.  Create a center part and divide the hair in two sections.


    2.  Starting on one side near the forehead, French braid hair by crossing each                    section under the other, instead of over the other like normal braiding. Secure                end of braid with an elastic.


    3.  Repeat step one on the other side section of hair.


    4.  Wrap the braids around each other into a low bun, tucking the ends in and                    securing with bobby pins. 


    5.  Set the style with finishing spray to complete this braided twist!


Side Sweep Curls


The side sweep look is gorgeous with curls, but elastics and bobby pins can’t quite handle the task. The Simple Twist pin makes it easy to create this elegant look and will securely hold it all day long!


Style Tip: dress up this look even more by adding a decorative headband!
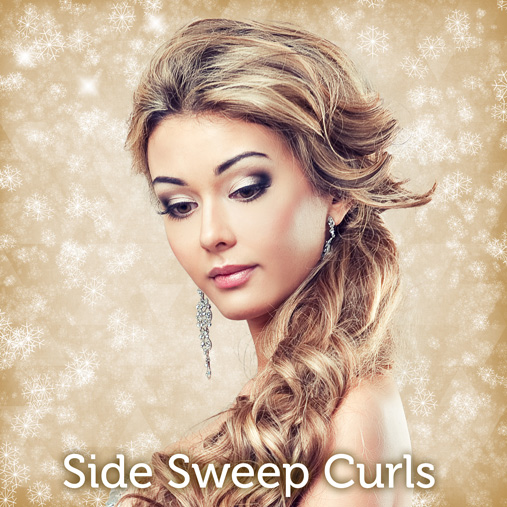


Tools: TStudio Silk Oval Wand, Simple Twist 


    1.  Section hair and curl 1-2” sections with the TStudio Silk Oval Wand.


    2.  Tease hair lightly around the crown, adding hair spray. 


    3.  Gather hair to the side and twist hair towards the ear.


    4.  Push the Simple Twist pin through and twist towards the ear, then flip it back into          the twist to secure. Pin should be close to the scalp when pushed back in.


    5.  Loosen a few curls around the face and set with finishing spray to complete                  these side sweep curls!


Headwrap Ringlets


This headwrap look works with any style or party! Use a boho braided headwrap for casual occasions or a beaded headwrap to really dress it up.


Style Tip: just like the braided twist, this look can be let down on day two hair for awesome curls!
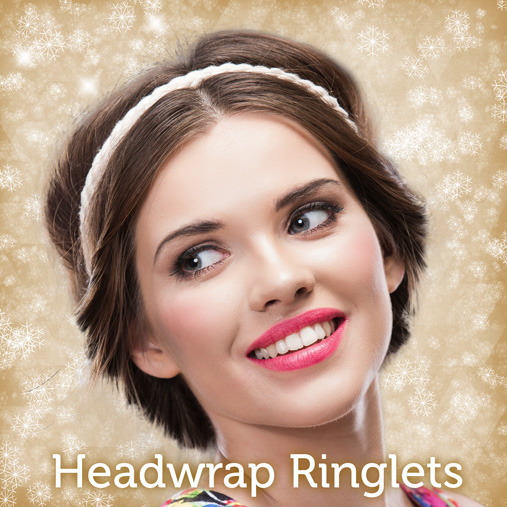


Tools: TStudio Silk Oval WandBraided HeadwrapBeaded Headwrap


    1.  Section hair and curl 1-2” sections with the T|Studio Silk Oval Wand.


    2.  Slide a skinny headwrap over the head, so it is across or right above the                      forehead.


    3.  Starting on one side, loop a 2” section of hair around the headwrap until it creates          a ringlet, then secure the end of the strand in the headwrap band. 


    4.  Continue looping sections until all hair is secured around the headwrap. 


    5.  Add bobby pins as needed and set with finishing spray for this headwrap ringlet            style!


Richard Marin: My Favorite Styling Tool and How to Use It

by Richard Marin December 25, 2014


I am loving my Remington T|Studio Silk straight irons and clipless curling irons. I can do a variation of looks with the straight iron, from stick straight to easy waves, by rocking the iron back and forth. I can make a random bend in the hair to a spiral curl by wrapping it around the straight plates. When I'm doing curls, I really enjoy working with the T|Studio Silk clipless wand series because it makes the curls come out looser than a traditional curling iron. I usually leave the ends out of the hair from the iron to make the waves and curls look more relaxed. With clipless you make that look happen easily.


I'm addicted to the Remington T|Studio Oval Waving Wand! I can create several looks with this one tool from smooth and straight to just a little bend on the ends of the hair or irregular waves throughout the hair. The variety of styles you can create with this one tool is endless!                              


Here is my favorite technique for curling hair:


    1.  Section off the head into three sections 1) top of head 2) left side 3) right side.              Sectioning makes curling your hair faster and easier.


    2. I start at the bottom neck area usually with a smaller barrel iron to begin (I prefer           the Remington T|Studio Silk slim conical iron). I do a tighter curl at the neckline             which gives support to hold up the other waves that will be sitting on top of this             section of hair. 


    3.  Wrap hair around iron and repeat. When you get to the mid section of your hair              begin to wrap your hair around the center section if the conical iron.


    4.  Finish ironing the top section and your bang area with a variation of the largest              section of the barrel and then the next section with the middle section of the                barrel. This will give the overall look of a variation of texture in your curls which            always look more natural and not a uniformed curl.

Richard Marin: How to Combat Common Hair Mistakes

by Richard Marin December 21, 2014


The most common hair mistake I see is over-styling! Remember K.I.S.S.! With the proper cut for you and the correct products and tools, maintaining your hair will be a pleasure. People often remember people for their hair, how it's cut, the health and the sheen of it. I know it's my work, but I often hear people say they didn't recognize someone because they changed their hair. Be gentle to your hair, keep overuse of product to a minimum, ease up on teasing or over chemically processing and give it the ionic tools it deserves to keep it as healthy as possible. I'm all for a good all-out glam look, but keep that for special occasions. Keep your day-to-day life hair beautiful and simple, which leaves a long lasting impression.  


This especially true for today’s busy women looking for quick and easy ways to turn a day look into a night look. I always recommend what I call "convertible hair" (changeable easy styles). If you wear your hair long and straight to the office or school, in the evening do a ponytail or a loose bun or even a loose French twist. Curly and wavy hair girls can do the opposite because they have natural texture on their side. Try a loose bun by day, down and wavy by night. Options are always what you want to strive for with minimum maintenance.                                  

Wavy Looks Made Easy

by Remington Ready December 18, 2014


Traditional curling irons create small, tight curls that can leave you with the Shirley Temple look. That might work for your grandma, but you need a more modern style—something like free-flowing, vibrant waves!


That’s where the Remington Oval Waving Wand comes in.  The unique shape of the wand forms natural-looking waves that add a perfectly subtle touch to your fresh look.


You’ll get salon-quality results from the 410-degree digital heat that reaches temperature in just 30 seconds. And as part of the T|Studio line of styling products, the wand is equipped with a ceramic coating that’s infused with silk proteins to keep frizz to a minimum and reduce damage to keep your hair looking and feeling its best. 


So throw away the old curler and embrace the wavy look! The simple wrap-and-go convenience of the Remington Waving Wand makes it easy to craft long-lasting beach waves for the modern style you want!  

Richard Marin: What It’s Like To Be A Celebrity Stylist

by Remington Ready December 17, 2014


Hair, camera, action! We sat down with celebrity stylist Richard Marin to get the inside scoop on some of the fabulous hairstyles he’s created for world-famous actresses. His remarkable work has graced the pages of some of the most elite fashion magazines, including Vogue, Allure and Vanity Fair. In this exclusive interview he shares his favorite part of the job, styling tips, and some of the hot trending hairstyles! 


What is the best part about being a celebrity hairstylist?


"The best part of my job is the access I have to the most creative people in their fields from fashion designers to wardrobe stylists who start the fashion trends. From here I see what my peers are doing and how we relate hair trends to salon clients to celebrities on the red carpet. It's fun to see what trends really catch on and become every day hairstyles that everyone wants to emulate."


What is the difference between styling hair for television and movies versus everyday wear?


"With TV or movies you're working with a variety of elements from lighting, what a scene calls for, or a director and actress wishes. Hair usually expands on screen so it's a balance of getting the hair right for the character and what is right for each particular scenario. In real life it's all about getting it right for YOU! In any case, I can't do my job correctly if I don't have the right products, a good haircut and most importantly the right tools. I've become very reliant on my Remington T|Studio Silk products because they just make the hair look and feel shiny, soft and beautiful. That’s where I start and hopefully maintain that in working with a client at the salon or an actress in a movie or on the red carpet."  


In your mind, what has been the best red-carpet runway hairstyle?


"What works on the runway necessarily doesn't transfer to the red carpet so what I always look at is what is big on the runway and how will I translate the look on a celebrity for the red carpet to make them look the best they possibly can. I take into consideration who the person I'm working with is and what hairstyle will be best them, the event they are going to and the dress they are wearing for the red carpet." 


What is your favorite runway look and how do you create it?


"I'm really liking all of the new layered Bob's that are happening for the season, These looks all have great texture. Begin by adding a texturizing spray into your dry hair or a thermal active spray that will work with your T|Studio Silk Slim Conical wrap and go wand. I like the Remington T|Studio 1/2 inch to 1 inch conical iron to achieve the best texture. Wrap your hair around the large portion of the conical iron, and the next section of hair use the smaller section of the conical iron. What this does is it creates a variation of texture throughout your hairstyle. Once you've completely wrapped all of your hair in various textures, shake, shake, shake your hair and you're ready to go! Have a lot of fun with this look. The messier and the more texture, the better!"                                      


Whose hair style is trending the most in Hollywood?


"Whoever does the most dramatic change! Trending hair comes in all forms. Everyone has an opinion about hair, whether they love it or hate it, but this past year we really owe all the short hair resurgence to Miley Cyrus. It shot a whole new energy in cropping the hair short from the model Coco Rocha to the Big Bang Theory's Kaley Cuoco. Also, last few seasons "BOB" trend will now be the "Shaggy Layered Lob (long bob)" for spring 2015."

Get this Iconic Look: Classic Low Bun

by Remington Ready December 10, 2014


Whether it’s a casual work day or a night out, this up-do is simply perfect. Get this classic style with the steps below!


Tools: TStudio Silk Oval Wand, TStudio Slim Straightener, Beaded Headwrap, and The Simple Twist 


    1.  Add mousse or hairspray to hair to add texture


    2.  Section hair and curl a 1-2” section of hair with Oval wand.


    3.  Continue curling the sections, alternating the direction of the curl each time.


    4.  Leaving bangs down, gather hair to back of head and twist into low bun 


    5.  Push Simple Twist pin up into bun, then flip pin and push back down towards                nape of neck. Pin should be close to scalp when pushed back down, to better              secure look.


    6.  Sweep bangs to the side and add a slight flip with a straightener.


    7.  End Look 1: Add a beaded headwrap across the forehead to dress it up.


    8.  End Look 2: Just put on your favorite pair of earrings for a more classic look.