Index Background

Teasing Hair Tutorial

by Remington Ready February 22, 2016


All it takes to tease is a good brush and some hairspray! Teasing (or backcombing) is an awesome way to create texture and build volume for everyday styles or updos. The Remington Teasing Brush features a pointed end that helps with parting and sectioning hair during styling. This is one tool that can do it all!


Steps:

1. Section the hair around the crown of your head using the sectioning end of the teasing brush.

2. Starting with a 2” section, lightly hairspray focusing on the area you will be teasing.

3. Using the teasing brush, gently backcomb the hair while holding the section straight up. You should start about 3-5” above the scalp, depending on your hair length. Then brush the hair down towards your scalp several times until you reach your desired volume.
Tip: To avoid breaking your hair, don’t be too aggressive when backcombing and don’t brush hair quickly.

4. Repeat steps 2-3 on all hair sections around the crown of your head.

5. Once all sections are teased, part your hair as usual and lightly brush top layer of hair, making sure to not flatten out the teased hair underneath.
Tip: To have a smooth finish without brushing, keep a thin layer of hair around your part separate during teasing. Then when you are done teasing, let that section down to be a smooth layer over the teased hair. 

6. Scrunch your hair at the roots with your fingers for additional volume and look for any areas that may need additional teasing.

7. Smooth down your hair again using your hands and a shine serum or hairspray. Now your teasing is complete and it’s on to the styling.

8. Leave your hair down for natural big hair or bring hair up into a bun or ponytail.

Hair Brush Guide

by Remington Ready February 11, 2016


Anyone who’s had a bad hair day (who hasn’t?!) knows the value of owning a good brush. But one brush does not fit all styling needs. Remington has you covered on everything from building volume to drying hair faster. Check out the guide below and find the perfect brush for you!


1. Men’s Brush Set
The ideal set for the man in your life. The cushion brush smooths out short or long hair and the comb works best for detail styling any difficult areas.

2. Mini Brush and Comb Set
This brush and comb are the perfect size to keep in your purse for on-the-go styling. You’ll be prepared for any windy day.

3. Cushion Brush
The cushion brush is essential for medium to long hair. The nylon bristles detangle and smooth out hair and are also great for scalp stimulation.


4. Looped Bristle Brush
The ends of regular brush bristles can snag and pull on wigs, extensions and weaves. This brush has looped bristles, so you can smooth and detangle your hair with no worries!

5. Teasing Brush
This brush is sure to pump up the volume. It was specially designed for backcombing, teasing, and finishing, hair. It also has a special handle for sectioning hair or creating the perfect part.

6. Vented Brush
With a vented base, this brush can actually save you time getting ready. It was designed for use with a blow dryer, speeding up drying times and providing maximum volume.


#GlamBlowOut Tutorial

by Kim December 11, 2015


Hello everyone and welcome!

I am introducing my self to you all as Remington's Guest Blogger, Kimberly from the youtube channel, Kimkreations P. This look features the Glamorous Me #GlamBlowOut hairstyle, a vibrant red lip and a classic winged liner that will suit everyone! It's definitely what I like to consider a staple look for any occasion whether it be festive or even casual! Hope you enjoy and have fun recreating this look! Happy Holidays! xoxo


Learn more about the T|Studio Silk Dryer


Healthy, Shiny Hair Care Routine

by Amanda Lee October 23, 2015


Who doesn't want shiny and healthy hair? Here's what I do to make sure my hair is on point everyday.  In this video, I show you my showering tricks and conditioning tips, so be sure to check it out!   If you want to see more fashion and beauty videos from me, I can be found on my Youtube channel, amandarachlee.


Get your own Shower Conditioning Brush


Shower Conditioning Brush Review

by Sonja September 11, 2015


I remember back when I would comb my hair in the shower after applying conditioner in an attempt to thoroughly saturate it. But that wasn't so great for my tresses because the comb put a lot of stress on my hair and pulled some of it out with every use. But with a comfortable detangling brush like this that also dispenses my favorite conditioner, my hair-cleaning process has never been easier. My hair looks and feels better than ever! Read more below to see how this great new product can improve your daily routine.


About The Product


The Shower Conditioning Brush is a convenient way to condition your hair and detangle it at the same time. Just put your favorite conditioner into the reservoir and press the dispensing button while you work the silicon bristles effortlessly through your hair. It might look intimidating or even completely foreign to some, but if you're familiar with the Tangle Teezer, you'll definitely love this one because the silicon bristles are much softer and more spread apart, which allows you to brush your hair gently but also effectively.


How to Use


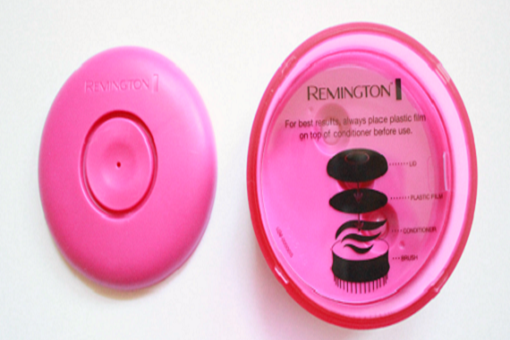
To fill the reservoir with conditioner, remove the cap by simply turning it to the right as you would open a regular bottle or dispenser. The first thing you see should be a plastic film with instructions. Don't throw it away, it's got important information for you! As stated in the instructions, remove the film first, then fill the reservoir with a conditioner of your choice, then place the plastic film on top of the conditioner and reattach the lid. Once that's done, all you have to do is push the soft grip button on the lid to dispense the conditioner through the three small ports shown above.


Thoughts


I've been using this for the past couple weeks whenever I apply conditioner and I'd say that it has certainly become a permanent addition to my hair care routine. The smooth silicon teeth of the brush make detangling super painless and easy, and since the bristles are quite far apart, there's very little fallout which minimizes the possibility of hair damage. The three ports inside the brush also help dispense the conditioner evenly and saturate all of my hair completely, which can't always be accomplished with just my fingers. In my experience, it works best to fill the brush fully with conditioner so that the product can escape the dispenser easily, and that's also why the plastic film is necessary - so that once you push the dispense button, the conditioner comes out straight through the ports evenly.

In a nutshell, I'm truly pleased with this innovative and efficient product. It's an easy and much more effective way to evenly distribute conditioner to your hair and provide maximum moisture for a healthy, radiant look. My hair feels incredibly silky and smooth every time I use this brush!


The Shower Conditioning Brush launches at Walmart and Target on September 1st for $9.99, so grab yours when you get the chance!


As always, thanks for stopping by. 'Til next time! xoxo,

Sonja Delicana


Back to Basics: Cleaning Your Styling Tools

by Remington Ready October 15, 2012

Listen up lovely ladies (and gents)! When you stop and think of how funky and gross some of your styling tools can get and all of the dust, oils, and germs that accumulates, you’ll start looking at those hairballs differently. No worries – we’re here to help! Cleaning your styling tools will not only give you more control while styling, but also smoother, shiner hair. No germs and shiny hair? WIN!  


NOTE: Make sure your styling tools are unplugged and cooled before cleaning!!!


Hair Dryer – Simply remove the air vent (circular area located in back) and clean lint off the filter with an old toothbrush. Replace the filter and put the air vent back on! Lastly, wipe down the exterior of your dryer with an anti-bacterial wipe. Voila! Remember to clean the vent area about once a month to help with air circulation through your blow dryer. It also extends the life of your blow dryer by preventing it from overheating!


Straightener – Take a damp washcloth and gently wash off the plates from any build-up. If the straightener has floating plates, take a small pin and gently run it under the plates to remove any build-up. If you still have stubborn, try using rubbing alcohol on a soft rag. Make sure that you squeeze out the excess alcohol from your rag before cleaning your flat iron to prevent alcohol from getting inside. 


Brush Grab a pen or pencil and slide the pointed end under the hair build-up from the bottom of the brush to the top. Pull up until the hair starts to loosen. Then take a scissors and carefully cut straight down the middle. Pull the clumps apart and discard any hairballs. To clean the rest of the brush, use shampoo on a toothbrush with warm water to scrub the base of the brush between the bristles. Rinse the brush, and then lay it face down to dry.


Curling Iron/Wand Wipe the barrel and handle with a damp cloth. To remove heavy build-up, use rubbing alcohol instead of water. Another secret tip is to mix 1 part warm water with 1 part liquid fabric softener and put mixture on a cloth or q-tip. Wipe down your curling iron with the cloth or use a q-tip to get those small, hard to reach areas. 


i-LIGHT Pro Spring Break Contest

by Remington Ready March 1, 2012

i-LIGHT Pro Spring Break Contest


THIS CONTEST IS CLOSED.

Congratulations to the winners:

1st place: Sara Snyder

2nd place: Julie Lawrence

3rd place: Lisa Grassetti


We are so excited for Spring Break that we are starting the celebration early by giving away some pretty amazing loot to help you get ready! But first…we want to hear what you’re dream spring break vacation is!


To enter…

1. Create a board on Pinterest called “i-LIGHT Pro Spring Break Contest”

2. Pin the above image to your board.

3. Pin your dream Spring Break vacation! It can be anything from clothing ideas and hair styles to your dream destination and fun activities.

4. Email your board’s link to remingtonready@gmail.com.

*1 board per person. Limit each board to 25 pins.


Top three boards with the largest combined total of repins and likes wins…

1st place: i-LIGHT Pro Intense Pulsed Light Hair Removal System


2nd place: Keratin Therapy Gift Set including a Keratin Therapy Hair Dryer, Flat Iron, and Cushion Brush


3rd place: TStudio Pearl Gift Set including a TStudio Pearl Hair Dryer, Curling Wand, and Cushion Brush


The contest ends March 7th, so check out the Official Rules here* and start pinning!


*By pinning and/or repinning this image as well as entering the contest via the stipulations above, you are agreeing with the terms and conditions of the contest.


For the latest in hair-spiration and style ideas follow Remington Ready's Pinterest page!


Pin It


♥ Remington Ready

Your Hair Gets Healthier With Styling

by Tammy Gibson January 30, 2012

Keratin Therapy: Strengthen While You Style


Who would have guessed that the day would come when your hair would actually get healthier with heat styling? Well, the day is here thanks to Remington's new Keratin Therapy line! These styling tools offer up all kinds of great benefits for your hair!

READ MORE read more