Index Background

T|Studio Silk Oval Waving Wand Tutorial

by Remington Ready July 2, 2015


Hey guys! My name is Jessica.  I hope you guys enjoy this makeup look and hair tutorial.  Like many, I have struggled to find beauty gurus that have the same natural wavy hair as me.  I have based my channel on how to style my hair and to give tips to what products to use.  The T|Studio Pink Silk Oval Waving Wand is one of my favorites to use on my natural wavy hair.  I hope this video is helpful to everyone!


See more from Jessica on her Youtube Channel Jessica P.

Easy Breezy Summer Hair

by Remington Ready June 22, 2015


Hello everyone! I'm excited to be your Remington Ready Guest Blogger bringing you several summer ready hairstyles that could easily be achieved by using the Remington Teardrop Wand. Whether it be from beachy waves to a casual wavy half-up hairstyle, your hair will be ready to hit the waves this summer! 


See more from Labelle Mel on her Youtube Channel


Summer Hairstyles Tutorial

by Naturally Devin June 15, 2015


Hi guys! I’m Devin, from NaturallyDevin on YouTube. I’m so happy to have been give the chance to be a guest blogger for Remington! I know in the summer time when the weather gets hotter the last thing you want is your hair in your face or on you back! In this video I’m going to show you all some really cute and simple heat proof hairstyles for this Spring/Summer! Remington has a TON of adorable accessories that will make you look fabulous, whether it be relaxing by the pool or a date night!

I hope you enjoy this tutorial!


See more from Devin on her Youtube Channel NaturallyDevin


Get your own Remington Hair Accessories here


The Simple Twist Styling Tool Hairstyles

by Beauty by Tiani June 8, 2015


Hi everyone! My name is Tiani from "Beauty By Tiani" on YouTube. I am so happy to be a Remington Ready Guest Blogger! In this video, I will show you five simple and easy hairstyles that you can achieve by using Remington's Simple Twist Styling Tool. I hope you enjoy!


See more videos from Tiani on her Youtube Channel


Get your own Simple Twist Styling Tool


Creating the Perfect Beachy Waves

by Taylor May 27, 2015


Hello beauties! My names Taylor, also known as trendingtaylor on YouTube, and I'm so excited to be a Guest Blogger for Remington! I hope you enjoy this video showing you how I curl my hair using the T|Studio Pink Silk Oval Waving Wand and some cute, easy, and fun hairstyles as well.


-Taylor


See more from Taylor on her Youtube Channel Trending Taylor


Learn more about the T|Studio Pink Silk Oval Waving Wand


Messy Ballerina Bun

by Megan Joy May 14, 2015


Hi there! I'm Megan from meganjoy.ca and I am so excited to be a guest blogger. I wanted to show you this simple and quick way to style your hair. A ballerina bun is perfect for hot summer days because it keeps your hair off your neck and it's also great for those "second day" hair days when you just want your hair up and out of your face.

I used the Remington Perfect Bun in Blonde to create this look. I have fine and layered hair so it can be tricky getting all the stray pieces into a bun. I've learned that if it looks a little messy it's ok! It doesn't need to be perfect and it still looks pretty even if you have a few stray hairs.


• Step 1: Pull your hair into a ponytail. Use your hands (not a brush) to give it a more casual look.

• Step 2: Once your hair is in a ponytail slightly tease your hair to give it more volume

• Step 3: Push the ends of your hair through the opening of the Perfect Bun with about an inch of your hair sticking out

• Step 4: Roll the bun towards your head and twist the ends of the Perfect Bun around the hair elastic (there is wire inside so it holds it's shape when you wrap the ends of it around your ponytail)

• Step 5: Spread your hair out around the bun to hide the Perfect Bun and add bobby pins if needed

• Step 6: Use hair spray or styling product to smooth over the bun and tuck in any stray hairs. If there are a few pieces hanging out, don't sweat it. The messier the better!


That's it for this super easy hairstyle. I like the Remington Perfect Bun because you can adjust the size of it depending on how tightly you wrap the ends around your hair elastic. So if you have thin hair like me you don't have to worry about having enough hair to spread across a giant hair donut. And if you have thicker (or long) hair you can create a larger bun too!

I hope you enjoyed this tutorial!

Quick Hairstyle with Double Knit and Active Style

by Remington Ready March 27, 2015


Kim from KimKreations shows how to create 3 quick hairstyles using Double Knit Elastics and Active Style Just Stay Bobbies. Try one of these styles for an easy look for work or school!


See more from Kim here


Learn more about Double Knit and Active Style here


T|Studio PROtect Straightener: How To Get Straight, Sleek, Healthy-Looking Hair

by Remington Ready March 2, 2015


Hello my loves! Today's vid is on getting healthy, straight & sleek hair! It's a review/demo of the Remington PROtect flat iron, which I am absolutely in love with! I'm usually not a fan of straightening my hair because of the damage, however this flat iron just makes my hair feel so nourished and moisturized that I absolutely love it! If you have super curly or frizzy hair, this flat iron will get rid of all of that!

I feel that this iron works best with the vapor feature turned on, however you can use it without and get great results too. Remember that if you run out of the Macadamia Treatment, DISTILLED water is the right substitute. Regular tap water shouldn't be used.

You can purchase the PROtect in Target and Walmart stores beginning March 1st! You can't miss out on this high quality flat iron for the drugstore price.. I'm literally so in love, and I know you will be too!


-Isabel

For more videos on hair, makeup and beauty, head over to Isabel Victoria on Youtube.


Find out more about the T|Studio PROtect Straightener Here


Hat Hairstyles: Knotted Up-Do

by Remington Ready January 21, 2015


This up-do is more of a “low-do”, keeping the style below hat level! It’s Dutch-styled and unique, making you look like a skilled trendsetter without all the work.


Style Tip: If you have layered hair, pieces may fall out during the day. Just keep bobby pins handy to pin in any strays. It only adds to the look!
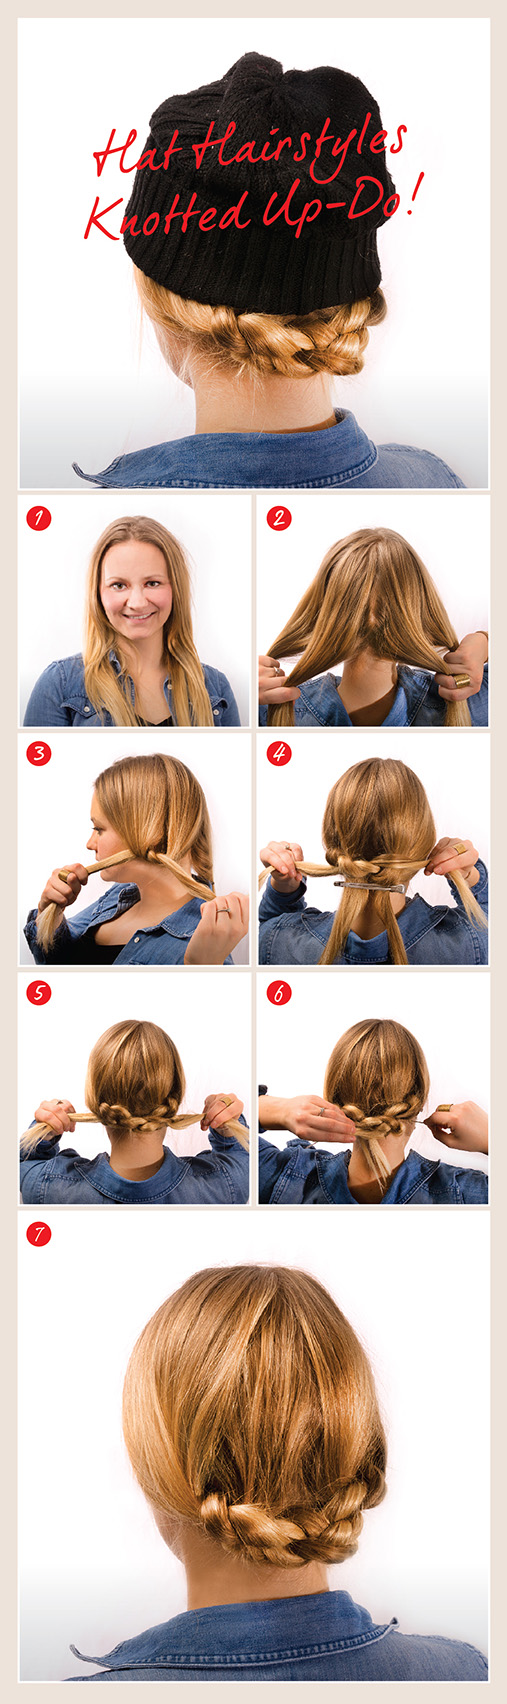


Tools: Bobby Pins


    1.  Start with natural hair, adding texture spray if needed.


    2.  Divide hair into four even sections.


    3.  Tie sections A and B together into a tight knot and secure with clip, then knot                sections C and D and clip.


    4.  Tie the center two strands, B and C, into a knot using a clip to hold sections A              and D in place.


    5.  Continue knotting each side and then the center until about 3-4” of ends are left.            Make sure to keep each knot tight!


    6.  Use bobby pins to secure the ends of the sections under the braided area.


    7.  Voila! Your knotted up-do is complete. Just add finishing spray as needed                   and throw on your hat! Pull the hat down so it’s just above the knotted hair.


Hat Hairstyles: Braided Pigtails

by Remington Ready January 16, 2015


Braided pigtails aren’t just for little girls anymore; it’s actually a super cute boho-chic braided style! It’s easy to do and the braids start low, so no need to worry about the hat getting in the way!


Style Tip: If you have a lot of layers, start the braids a little higher than right under the ear and keep it tighter as you braid. 


Tools: Double Knit Elastics 


    1.  Start with natural hair, and divide hair down the back of your head into two                    sections.


    2.  Begin on one side, dividing hair into three uneven sections. It’s best to have the            smallest section be from the back.


    3.  Braid the strands, keeping it tight for now. You can loosen them up later!


    4.  Repeat steps one and two on the other side.


    5.  Loosen up the braid to desired look. They may loosen up throughout the day, so            don’t make it too loose!


    6.  You’re all finished with this boho braid style! Just add finishing spray as needed            and top off with your winter hat. Pull it down so that it ends right where the braids          begin!