Index Background

#SmokeySleek Tutorial

by Evie December 16, 2015


Hey Everyone! This Evie from LongHairPrettyNails and I'm today's guest blogger for Remington. In this video, I'm going to show you how I created this #GlamorousMe sultry smokey eye makeup look with nude lip. I'm also going to show you guys I achieved this side braid sleek hairstyle using the T|Studio Protect Straightener. It's easy and perfect for the holidays! I really hope you guys enjoy this tutorial. To see more beauty content and tutorials, head over to my blog LongHairPrettyNails and my YouTube channel LongHairPrettyNails


Learn more about the T|Studio PROtect Flat Iron


#GlamBlowOut Tutorial

by Kim December 11, 2015


Hello everyone and welcome!

I am introducing my self to you all as Remington's Guest Blogger, Kimberly from the youtube channel, Kimkreations P. This look features the Glamorous Me #GlamBlowOut hairstyle, a vibrant red lip and a classic winged liner that will suit everyone! It's definitely what I like to consider a staple look for any occasion whether it be festive or even casual! Hope you enjoy and have fun recreating this look! Happy Holidays! xoxo


Learn more about the T|Studio Silk Dryer


#SmokeySleek Tutorial

by Sonja December 7, 2015


I partnered with Remington once again as part of their Glamorous Me campaign for the holidays! This campaign is all about getting glammed up for the season, so I came up with an edgy, sleek hairstyle and smokey makeup look for you guys to rock at Christmas parties and New Year's Eve, so keep reading for a quick hair and makeup tutorial, as well as my thoughts on Remington's Ultimate Finish Straightener!
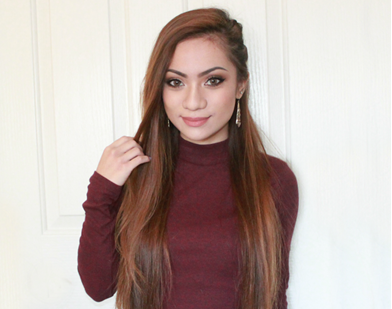


The Remington Ultimate Finish Straightener® has double the tourmaline, which combines with the ceramic plates to reduce frizz and keep your hair soft and healthy. The plates provide heat protection as well and enhanced shine with micro-conditioners that transfer to your hair during straightening. 
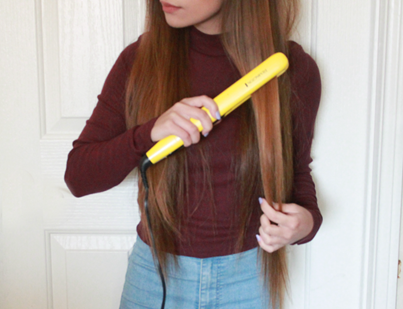


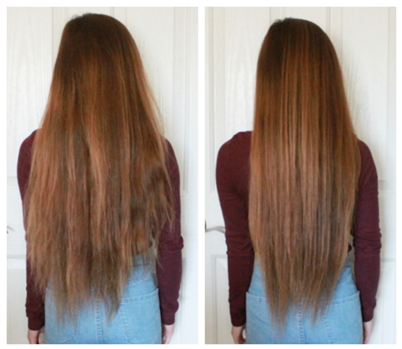
I've been using Remington flat irons way before this collaboration, but this one definitely beats all the ones I've owned. It heats up super quickly and really does leave my hair soft and shiny, which is difficult to achieve with heating tools given how damaged my hair is. As you can see, my natural hair is incredibly dry and frizzy, but the straightener makes it look as if I applied an oil-replenishing product!


Since I didn't want to just keep my hair straight for such a special occasion, I did a little side twist-braid to add an edgier touch to the look. You simply take 3-4 small sections on either side of your hair and twist each section as tightly as you can to achieve a faux side shave. Now onto the makeup!

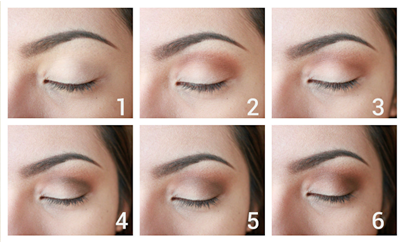


1. Start with a skin-toned base eyeshadow and apply it all over the lid and brow bone.


2. Use a fluffy brush to apply a burgundy eyeshadow all over the crease.


3. Blend harsh edges using another clean eyeshadow brush.


4. Define the crease with a dark brown shade.


5. Blend harsh edges, making sure to stay right on the crease.


6. Apply the same burgundy eyeshadow previously to intensify the color.


7. Draw your usual winged eyeliner.


8. Apply gel eyeliner on the top and bottom waterline and add the same dark brown eyeshadow right under the lash line.


9. Curl and apply mascara to lashes and add a highlight shade on the inner corners and brow bone.


10. Apply your favorite set of falsies (optional).


I also went for a matte nude lip color (NYX Matte Lip Cream in Stockholm) to draw attention more to the smokey eyes.


And there you have it - a smokey & sleek look that's perfect for the holidays! Feel free to try it out for whatever special occasion you'll attend this month, and most definitely have a great time during this season with loved ones! If you haven't already, check out my previous collaboration with Remington here.  


'Til next time!

xoxo,


http://simplestylings.blogspot.com/

Fall Hair and Makeup Tutorial

by Becca Leah November 23, 2015


Hi everyone!

I'm Becca and I'm a guest blogger here on the Remington Channel. I create beauty and fashion videos over on my Youtube channel (Becca Leah). In this video I show you how I get ready for a Fall day by using my 2-in-1 Curling Iron by Remington. For this look, I created a smoky eye with a bold dark purple lip to add some fall colors into my normal makeup routine. This 2-in-1 Curling Iron is so easy to use and it leaves my hair looking voluminous. The curls last all day!


Buy your own 2-in-1 Curling Iron here


Sleek & Smokey Tutorial

by Amanda Lee October 30, 2015


Hey everyone! It's Amanda again as the guest blogger for Remington this week.  In this video, I show you how to achieve a makeup and hair look that's perfect for fall.  The makeup is a simple and subtle smoky eye paired with a bold red lip.  For the hair, I decided to do a sleek and straight pulled back hairstyle that has been very popular lately with celebrities and on the runway.  This hairstyle is even easier to do because of the Remington UV-Baked Ceramic Straightener! This straightener is amazing because of it heats up fast and it adds shine to your hair!


Hope you find this tutorial helpful! Make sure to check out my Youtube channel AmandaRachLee for more beauty and fashion tips.


Get your own UV-Baked Ceramic Straightener

T|Studio Silk Oval Waving Wand Tutorial

by Remington Ready July 2, 2015


Hey guys! My name is Jessica.  I hope you guys enjoy this makeup look and hair tutorial.  Like many, I have struggled to find beauty gurus that have the same natural wavy hair as me.  I have based my channel on how to style my hair and to give tips to what products to use.  The T|Studio Pink Silk Oval Waving Wand is one of my favorites to use on my natural wavy hair.  I hope this video is helpful to everyone!


See more from Jessica on her Youtube Channel Jessica P.

Quick Curls and Bold Lips

by Remington Ready May 7, 2015


What's up everyone! I’m excited to be a Guest Blogger this week on the Remington Ready blog! Hope you enjoy this quick easy "Get ready with me!" look that features a quick, flattering eye look, bold lips, & some fun, flirty curls!


-ox Kim.


See more hairstyling and beauty videos from Kim on her Youtube Channel KimKreationsP


Get your own T|Studio Pink Silk Setter here


Makeup Trends For The Summer

by Jessica Fay June 10, 2014


When we think of summer makeup, we think fresh, neutral and natural. That being said—the winged liner look is very in trend right now and just because you want to look natural doesn’t mean you have to cut it out. Today’s tutorial shows you how to keep the skills you have worked so hard to master, as in the wing, but keeping it understated and beautiful! Having such minimal eye shadow actually makes your wing stand out even more! It also tends to look a little bit cleaner! Spice up your neutral look with a bright lip for a pop and your ready to go!


For more makeup and fashion advice, head on over to Lipstick, Heels, and a Baby!


Creating a Wearable Orange Eye

by Remington Ready May 13, 2013


If you follow makeup trends you’ve probably noticed that orange is one of the hottest cosmetic colors this spring/summer season. While many color-enthusiasts love working with this fun, eye-catching shade, there are also many out there wondering—is it wearable for me? Personally, I think it is! Whether you’re a little color-shy or simply concerned it won’t work well on your skin tone, I think almost any color can be made wearable through proper application and the right complementary products and colors. I’ve created this “wearable” orange eye look to help anyone that wants to get their feet wet so to speak when it comes to wearing orange on their eyes. In my opinion, if you couple a seemingly “un-wearable” color with neutral, complementary shades you can often make almost any color work for you!


What you’ll need (I’ve included what I used in parentheses): Orange eyeshadow (mixed MAC Pink Opal with Fyrinnae Electro-Koi Medium Chocolate Brown matte eyeshadow (MAC Texture) Dark Brown matte eyeshadow (Make Up For Ever #17) Light Taupe matte eyeshadow (Inglot #358) Ivory eyeshadow (Inglot #395) Black eyeliner (Mirenesse Inside Out 27HR Kohl in Osiris) False lashes and/or Mascara (Faux lashes in Colette and Revlon Grow Luscious mascara in Blackest Black).


I always recommend starting out with a clean, moisturized, and primed eye. I personally like Benefit Stay Don’t Stray for many of the daily eye looks I create unless I’m working with loose pigments, but use whatever works best for you.


Step 1: Pat orange shadow on 2/3 of your upper lid working from the inner corner out. Sweep a little under the inner lower corner as well.


Step 2: Create a “C” shape with a medium chocolate brown shadow that frames the orange shadow by starting at the outer corner of your upper lid with a sweeping motion up and around the crease towards the inner corner.


Step 3: Use a dark brown shadow to darken the outer “V” of your upper lid and create more depth. With a light hand, sweep this shade under your lower lashline as well.


Step 4: Using a super light brown or light taupe, blend out the edges of the crease color up towards your orbital bone. Sheer it out as you blend upwards towards your brow.


Step 5: Using a cream or ivory colored eyeshadow, highlight right below your brow and the inner corner of your eye with a light hand.


Step 6: Make sure you blend in the ivory eyeshadow so it catches the light, but doesn’t create a stark contrast.


Step 7: Tight-line or line your upper lashline in a manner that best defines your eye and line your lower lashline.


Step 8: Curl your upper lashes and apply mascara and/or falsies. Remember to apply mascara to your lower lashes as well.


Voila! A wearable orange eye look! If this is your first time working with orange eyeshadow don’t worry if you’re not completely thrilled with your first attempt! Practice makes perfect and half of perfecting how to apply shadow in general to your eye is simply doing it over and over. Good luck!


By Doria Murphy Freelance Makeup Artist and Beauty Blogger at BeautyPopStop.com Beauty Blog


A Daily Hair and Make-Up Routine

by Melissa Uy May 6, 2013

What’s an ideal hairstyle & makeup look for everyday? Neutral eyes & a simple hair look is ideal when you’re on the go and don’t have the time to do complicated looks. I love eye palettes because they are compact and really easy to use on the go.


In this video I did a Taupe eye makeup look applying: a light eyeshadow on the brow bone, light taupe color all over the lid and a dark brownish eyeshadow on the outer crease.


Products used in this video: Flower Cosmetics Foundation “All About Face” mixed with Kat Von D Lock it Foundation. Rimmel Eyebrow pencil in black brown. Sonia Kashuk Spooly to brush the eyebrows. For the eyes I used the E.l.f. Tantilizing Taupe Eye Palette. Maybelline The Rocket Mascara in Waterproof formula. Milani lipstick in Teddy Bear. Benefit Cosmetics Hoola Bronzer.

 
Check out more videos from Melissa on her YouTube channel, here.