How often have you wished for a cute and sexy cover-up….something fitting for both poolside as well as grabbing a nice lunch, dining inside? At this time of year with all of us headed out for beach vacations, this “In an Instant” wrap style cover-up is just the thing. Inspired by a similar style at our fav lingerie boutique, our DIY version can be customized to match YOUR style and swimsuit.
Best of all, there are no complicated sewing skills involved, as there are only a couple of edges to turn under and stitch (straight stitch on a sewing machine or by hand). With the right knit fabric this drapey wrap has the front and hem edges left unfinished—knits do not ravel! Or, if you want to make a similar version from a beach towel (great for the littler girls) the towel edges are already pre-finished.
Supplies Needed:
¾ yard of soft polyester or rayon knit fabric, 60” wide
1 1/2 yard of 3/8” wide ribbon or cord for “straps”
Matching sewing thread
Instructions:
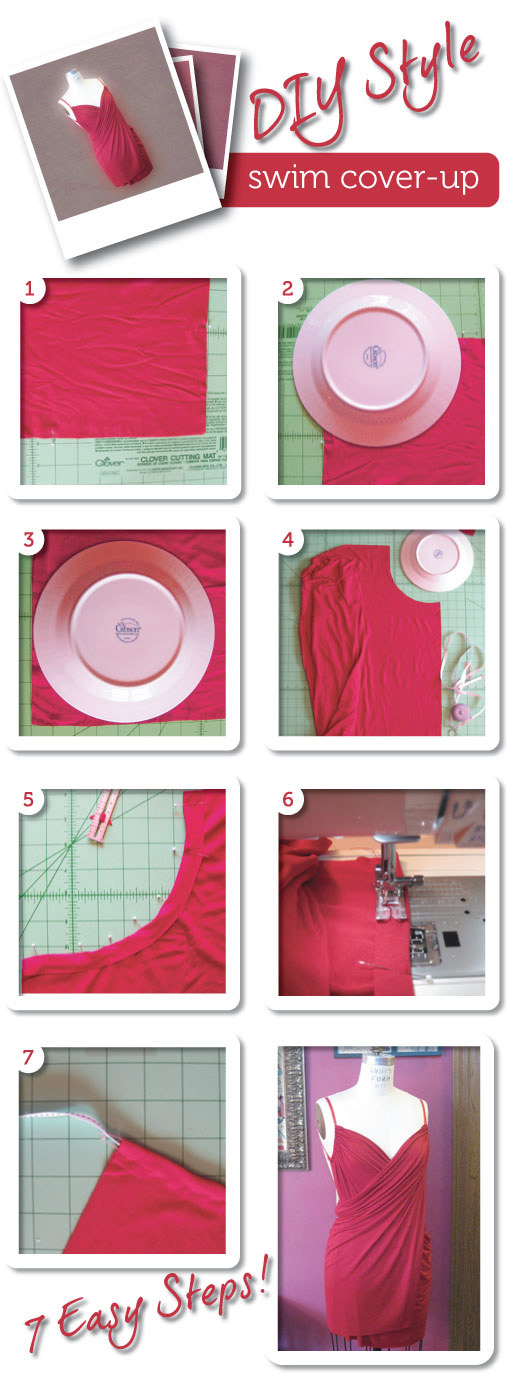
1. Measure the distance between your arms outstretched (get a friend to help with a tape measure). This is how wide you will cut your fabric. This is the part that will wrap around you. Trim off any excess fabric from the 60” width to match this measurement. Example: Allyce measured 58”” with her arms outstretched. So we trimmed 2” off of our 60” wide fabric to be 58” wide.
2. Measure the length from right above your bust (where a strapless dress or top would hit) to the length you want the wrap to be. We did ours so it hit about 6” above the knee. Trim off any excess from the 27” or ¾ yard length so that it is the desired finished length. Our trimmed fabric was 58” x 26”.
3. Grab a 7-8” saucer from the kitchen cabinet to use as the armhole template. On upper right and left corner, mark 5” in on top and 7” down on side. Place saucer over the upper right and upper left corner. Using about ¼ of the saucer edge, align the saucer with the top and side markings and trace an arc. Trim following the markings, creating the armhole area. (Photos 1 & 2)
4. Using the same saucer as template, place saucer over the lower right and left corners and use saucer to mark and round the bottom edges. Trim following the markings. Note: trim as neat as possible—this IS your finished hem edge! (Photos 3 & 4)
5. On armhole edges, turn under ¾” and pin in place, stretching fabric as needed to make a casing or tunnel for the straps to thread into. (Photo 5)
6. Using the straight stitch on your sewing machine stitch close to the unfinished edge, secure both ends with backstitching. If you do not have a sewing machine you can stitch this part by hand, taking small running stitches, and knot the threads at each end. (Photo 6)
7. Create the straps from ribbon, cable cord or other strap type trims and cord—use your creativity here! Cut the trim into two equal pieces. Using a safety pin, thread the trim thru the casing tunnels you just stitched for the arm holes. Tie the trim ends together in an overhand knot, trim the ends close to the knot. Turn the strap so that the knot is hidden back into the casing and adjust the gathers. Note: You can adjust the straps shorter if you need them after trying on, just knot again and trim. (Photo 7)
8. To wear, hold cover-up behind you, arms outstretched. Bring one side around to your front slipping arm into strap. Bring opposite side across front, slipping other arm into strap. Adjust gathers and draping, and Viola! Instant cover-up!
Cindy Cummins of DIYStyle.net has been designing, sewing, creating and crafting for what seems like forever! As the “Mother Hen” to the group of DIYStyle’s Creative Chicks, she leads the flock in whipping up easy, fun, and on-trend fashion DIY projects. Check out DIYStyle on Facebook.