Index Background

Braided Top Knot Tutorial

by Remington Ready May 27, 2016


Hi everyone! Diana from 204 Park here today and I’m really excited to be partnering with Remington to share with you my go-to hairstyle for those hot summer days. As soon as the temperature rises I immediately gravitate towards top knots to stay cool. Today I’m sharing a braided twist on the top knot that’s sweet, simple and seriously elevates your look. Here’s what you’ll need:


Remington Glitter Vent Brush, Remington Teasing Brush, Remington Bow Clip, Bobby Pins, 2-3 Elastics, Hairspray


This hairstyle is easiest on second or third day hair. To start, brush your hair with the glitter vent brush to make sure you’re starting with a smooth base. Then, using the end of the teasing brush, separate the bottom ⅓ of your hair straight across and secure the top portion of your hair with an elastic.


To get a bit of volume, use the teasing brush to add some texture to the bottom ⅓ of your hair. Then, separate the bottom section of hair and begin braiding. You might find it easier to flip your head upside down to do this. Once the braid is complete, secure with an elastic. For a fuller braided look, gently pull the braid with your fingers to make the braid a bit looser and wider.


Once your braid is complete, secure the top portion of your hair into a ponytail, tucking the braid into the elastic. You’ll then create a bun with your ponytail using an elastic or bobby pins or both. To keep any flyaways at bay use a spritz of hairspray.


Lastly, finish the look with a sweet bow clip and your braided top knot is complete! With a bit of practice this look is easy to master and is a major upgrade from your basic topknot. Now you’re ready to look cute and stay cool all summer long! Thanks for having me!


Xo, Diana - 204 Park


Loose Waves and Dutch Braid Tutorial

by Chaney May 18, 2016


Hello everyone, my name is Chaney!
I have a YouTube channel where I share my love for life, hair, makeup, and music. With summer quickly approaching, I want to show you guys how I like to use the Remington T Studio Silk Ceramic Flat Iron to create loose curls along with an easy way to braid back the front of your hair to keep it out of your face for the hot summer months. Enjoy!


See more from Chaney on her Youtube Channel

Beach-Ready Waves

by Sonja May 6, 2016


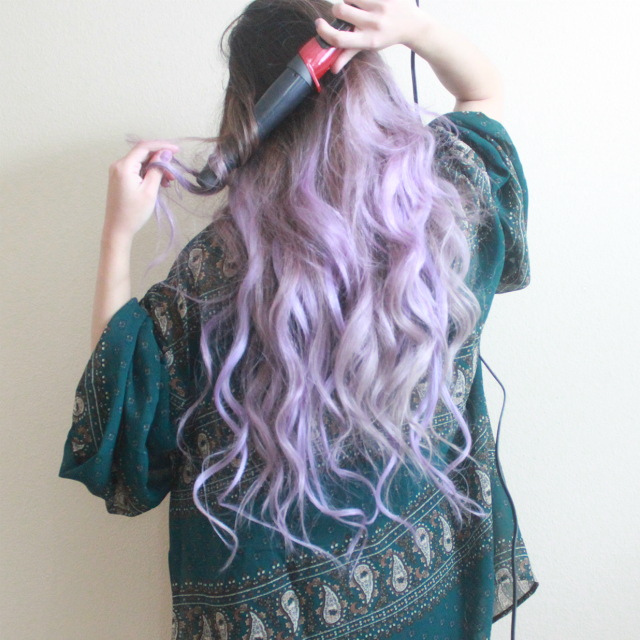
I've partnered with Remington once again to bring you this beach-ready look using their amazing T|Studio SILK Ceramic Slim Styling Wand. To see how to achieve this quick and easy look, keep reading!


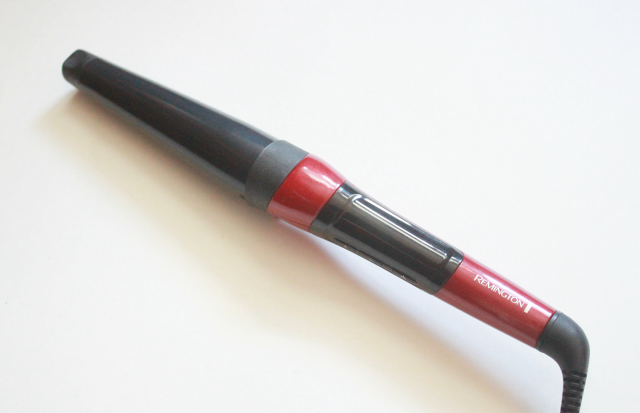
The T|Studio SILK Ceramic Slim Styling Wand is the most advanced ceramic curling iron featuring a coating with real SILK proteins and provides more ceramic content than traditional curling tools, giving you a healthy, effortless, long-lasting curl with less frizz and damage. Silk ceramic combined with 410-degree high heat and professional performance creates smooth, beautiful and fast salon results.


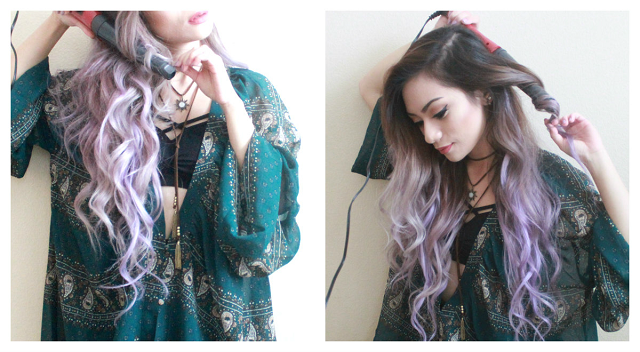
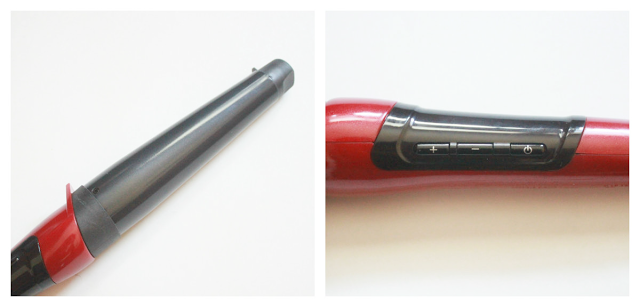
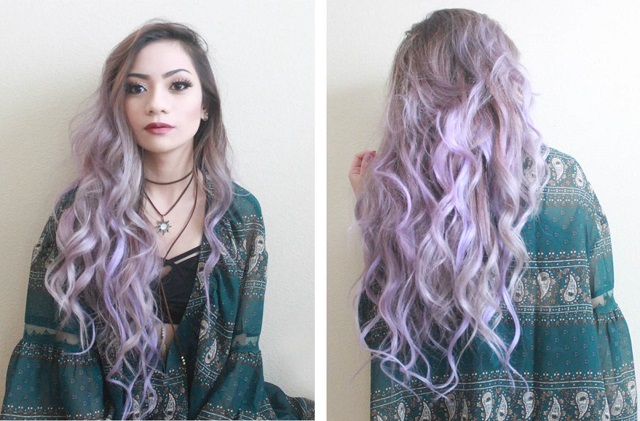
What I find really unique about this curling iron is the tapered end - the barrel goes from 1/2" to 1", which allows you to achieve loose waves, tight bouncy curls, or even both! In this case, I went for a combination of loose and tight curls for a messy hairstyle that's perfect for the beach or just about any spring or summer outing.

It also comes with a glove to protect your hands from the heat, but if you're careful enough, this styling wand is quite user-friendly and I was able to achieve this look in just under 15 minutes. With a little bit of hair serum and heat protectant, you don't have to worry about it damaging your hair like most curling wands tend to do.


To accompany these sultry loose waves, I came up with a relatively simple beach-ready makeup tutorial. Since the intense summer heat calls for minimal makeup, I went for a natural-finish foundation with SPF, my usual winged eyeliner, a pair of natural-looking wispy falsies, a "my lips but better" liquid lipstick, and a whole lot of golden highlight for that striking summer glow.

Here's a quick walk-through:


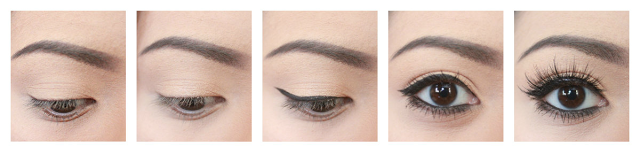
1. Apply a light peach eye eyeshadow base all over the eyelid, extending it to the brow bone.
2. Add a touch of gold shimmer on the lids.
3. Wing your eyeliner and draw it as close to the lash line as possible.
4. Apply gel liner on the waterline and smoke out the bottom lash line with a dark brown eyeshadow.
5. Curl lashes, apply mascara, and glue on your favorite pair of falsies (I used House of Lashes in Leatherette).

And there you have it - a summer-friendly hair and makeup look that's perfect for a stroll on the beach or the pier. Be sure to check out Remington's T|Studio SILK Ceramic Slim Styling Wand if you want to achieve these loose messy waves! Also, stay tuned for yet another collaboration with Remington that will feature some really exciting products!

'Til next time.
xoxo,


Coachella Inspired Hairstyle

by Alex Gaboury April 22, 2016


Hi my name is Alex, (just Alex, my parents kept it short and sweet) and I have a channel here on Youtube where I share my love for hair, beauty, and my pup named Sophie. Since festival season is amongst us I thought I would share with you a simple Coachella inspired braided hairstyle that can be easily personalized to reflect your style with fun hair accessories. Now this hairstyle would not be possible without the help of my Wet2Dry straightener which has easily become one of my favourite hot tools for my hair. I would love to hear which hair accessory was your favourite, or even better, if you will be attending any festivals this year, let me know in the comments below.
xo Alex


See more from Alex on her Youtube Channel


Learn more about the Wet2Straight Straightener

Easy Flat Iron Curls

by Lauren April 12, 2016

Hi my name is Lauren and I am obsessed with beauty, all kinds of beauty not just skin deep but all of it. Today I show you how I style shoulder length hair, more commonly known these days as the lob. What I will be doing is a messy look using the Remington UV Ceramic Flat Iron to achieve very effortless curls. I hope you guys like it and are inspired to try it.


See more from Lauren on her blog Lauren O Lauren

Straightening Natural Hair Tutorial

by Naomi March 28, 2016


Hey Everyone! I'm Naomi from the YouTube channel liveloveGlam and I'll be showing you how I flat iron my natural hair. I have super curly hair and getting it straight has been a trial and error process. So it's nice to have found a method and products that work really great! I hope you enjoy this video and find it to be helpful! xo


Learn more about the UV Ceramic Flat Iron


Teasing Hair Tutorial

by Remington Ready February 22, 2016


All it takes to tease is a good brush and some hairspray! Teasing (or backcombing) is an awesome way to create texture and build volume for everyday styles or updos. The Remington Teasing Brush features a pointed end that helps with parting and sectioning hair during styling. This is one tool that can do it all!


Steps:

1. Section the hair around the crown of your head using the sectioning end of the teasing brush.

2. Starting with a 2” section, lightly hairspray focusing on the area you will be teasing.

3. Using the teasing brush, gently backcomb the hair while holding the section straight up. You should start about 3-5” above the scalp, depending on your hair length. Then brush the hair down towards your scalp several times until you reach your desired volume.
Tip: To avoid breaking your hair, don’t be too aggressive when backcombing and don’t brush hair quickly.

4. Repeat steps 2-3 on all hair sections around the crown of your head.

5. Once all sections are teased, part your hair as usual and lightly brush top layer of hair, making sure to not flatten out the teased hair underneath.
Tip: To have a smooth finish without brushing, keep a thin layer of hair around your part separate during teasing. Then when you are done teasing, let that section down to be a smooth layer over the teased hair. 

6. Scrunch your hair at the roots with your fingers for additional volume and look for any areas that may need additional teasing.

7. Smooth down your hair again using your hands and a shine serum or hairspray. Now your teasing is complete and it’s on to the styling.

8. Leave your hair down for natural big hair or bring hair up into a bun or ponytail.

Elegant Updo Tutorial

by Tiffany Lee February 1, 2016


I’m Tiffany Lee, a celebrity hairstylist and makeup artist, taking a moment as a Remington Ready Guest Blogger! On my channel, you will find anything beauty related such as makeup tutorials, hair tutorials, swatches and reviews, and fashion related videos! Today, I’m sharing the how to create a Romantic Loose Updo using the Simply Wrap n Go Curling Wand.


See more from Tiffany on her Youtube Channel


Learn more about the T|Studio Silk Curling Wand


Bohemian Curls Tutorial

by Busola January 15, 2016


Happy New Year everyone! My name is Busola Coutts and i am a guest blogger today on Remington. It is a new year and that always marks a time for new beginnings, new changes or just an excuse to have something new.
Hair is always one of those things i consider when i want a significant change, especially with my look. So today, i will be sharing a few quick and easy steps of how i went from straight hair to medium shag curls with a bohemian touch to it.


What you need:
1. Remington 2-in-1 Curling Iron
2. Remington Hair Clips. This is a complete set with two different hair clips and bobby pins in gold and silver.


Step 1: First, turn on the curling iron to start getting hot while you work on your hair. Pull out a few strands of hair on both sides and braid. Hold up hair that may be in the way while you braid by using the Remington bobby pins in the hair clip pack.


Step 2: You can either start from the sides or the back twisting a few strands of hair together. Then curl the twist with Remington curling iron set on 30 degrees.

Continue with this step by working your way to the top. Remember to leave out the fringe if you have one and if you don't you can easily get one by trimming your hair in front (only if you are comfortable with that) or you may just leave it as is.


Step 3: Once you have curled the entire hair except for the fringe start taking the curled up twists apart with your fingers. If you don't have a fringe you can always curl your entire the same way.

Then simply run your fingers downwards through your hair to loosen the curls to achieve that shag do. For more loose curls, gently brush it out with a wide comb hair brush.


Step 4: Time to pin down the individual braids on both sides to the back of the hair. You can have the braids slightly below the center of the back of your head which I prefer...

Or you can pull it even further down low. It depends on how long and how far your braids can go to meet in the middle.

After securing the braids in place, I pulled out a little bit of hair over the point where the braids meet and I locked them down with the Remington triangle hair clip for a trendy and stylish look.


The Final Result


The shag hairstyle has been and will always be a hot and trendy hair-do especially now. It is easy to maintain, very daring and great for a night out with friends or for that every day chic look. For more helpful hair tips, check out my blog in www.thefashionstirfry.com


Learn more about the 2-in-1 Curling Iron

The hair clips are available at Target


Bouncy Curls Tutorial

by Lauren January 13, 2016


Hi my name is Lauren, I'M from the beautiful island of Jamaica. I'm beauty and lifestyle blogger. This is a tutorial on how I curl my hair, so that I can have big voluminous curls using the Remington two in one curling iron. I have always used Remington products in the past and I am very impressed with this product it's pure genius. The iron gets hot very quickly and cools down fairly quickly also after plugging it out, it gives your hair springy curls after only a couple seconds and the curls last all day. I will be using the wand to give my hair lasting curls and then attaching the second part of the wand that turns it into a regular curling iron to curl the front of my hair. I hope you enjoy this tutorial and definitely give it a try.


See more from Lauren on her blog Lauren O Lauren


Learn more about the 2-in-1 Curling Iron