Index Background

3 Back-to-School Hairstyles

by Rachel August 22, 2016


Hey there, everyone! My name is Rachel and I’m a fashion/lifestyle blogger over at my website, Rachel Lynn. I don’t know about you, but I am so excited for the upcoming school year. There’s always something magical in the air this time of year. Everyone is buying new clothes, school supplies and crafting the perfect back to school haircut, which brings me to the topic of this post. Today I will be discussing my top 3 favorite hairstyles featuring the Remington curling wand, perfect for back to school!

I know when I’m trying to get work done I need my hair out of my face. If I’m constantly touching my hair because it’s in my face, I immediately start wondering if my hair still looks good and then it all goes downhill from there!

Productivity- 0
Hair- 1,237

So without further ado, my top 3 favorite hairstyles featuring a curling wand, perfect for back to school!
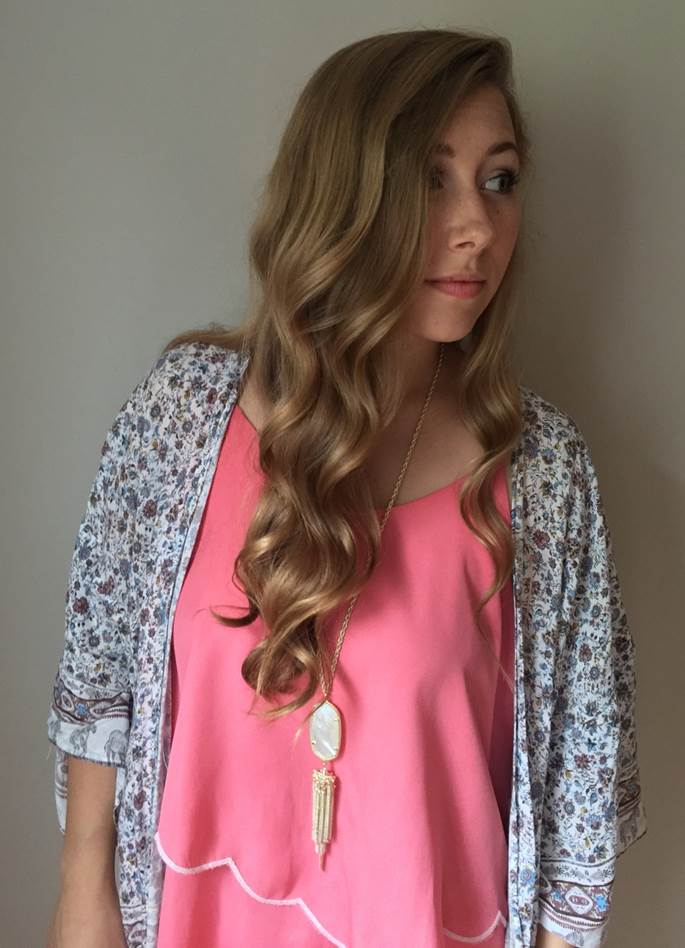


CURLS WITH BRAID

When I was in high school I wore this style braid all of the time and recently it’s made quite a comeback.

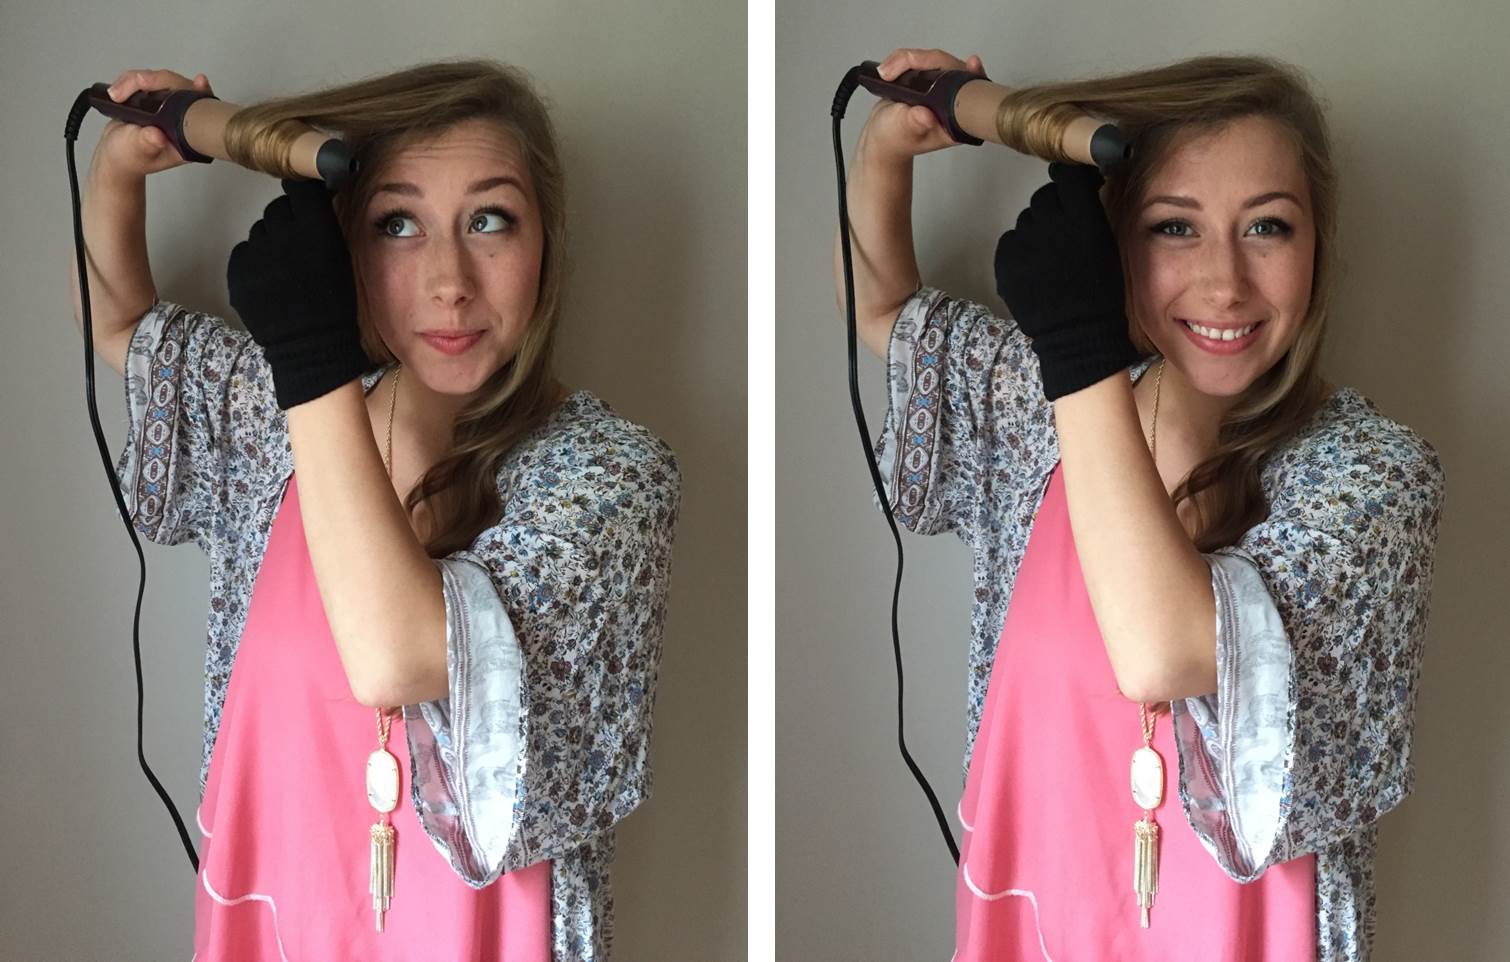
I start by curling my hair using the Remington T|Studio Thermaluxe Curling Wand. This wand is amazing because it heats up in only 30 seconds and curls hair even faster. Talk about fast results! I always curl my hair away from my face. This gives the look a more wind blow, beachy effect—very flattering!


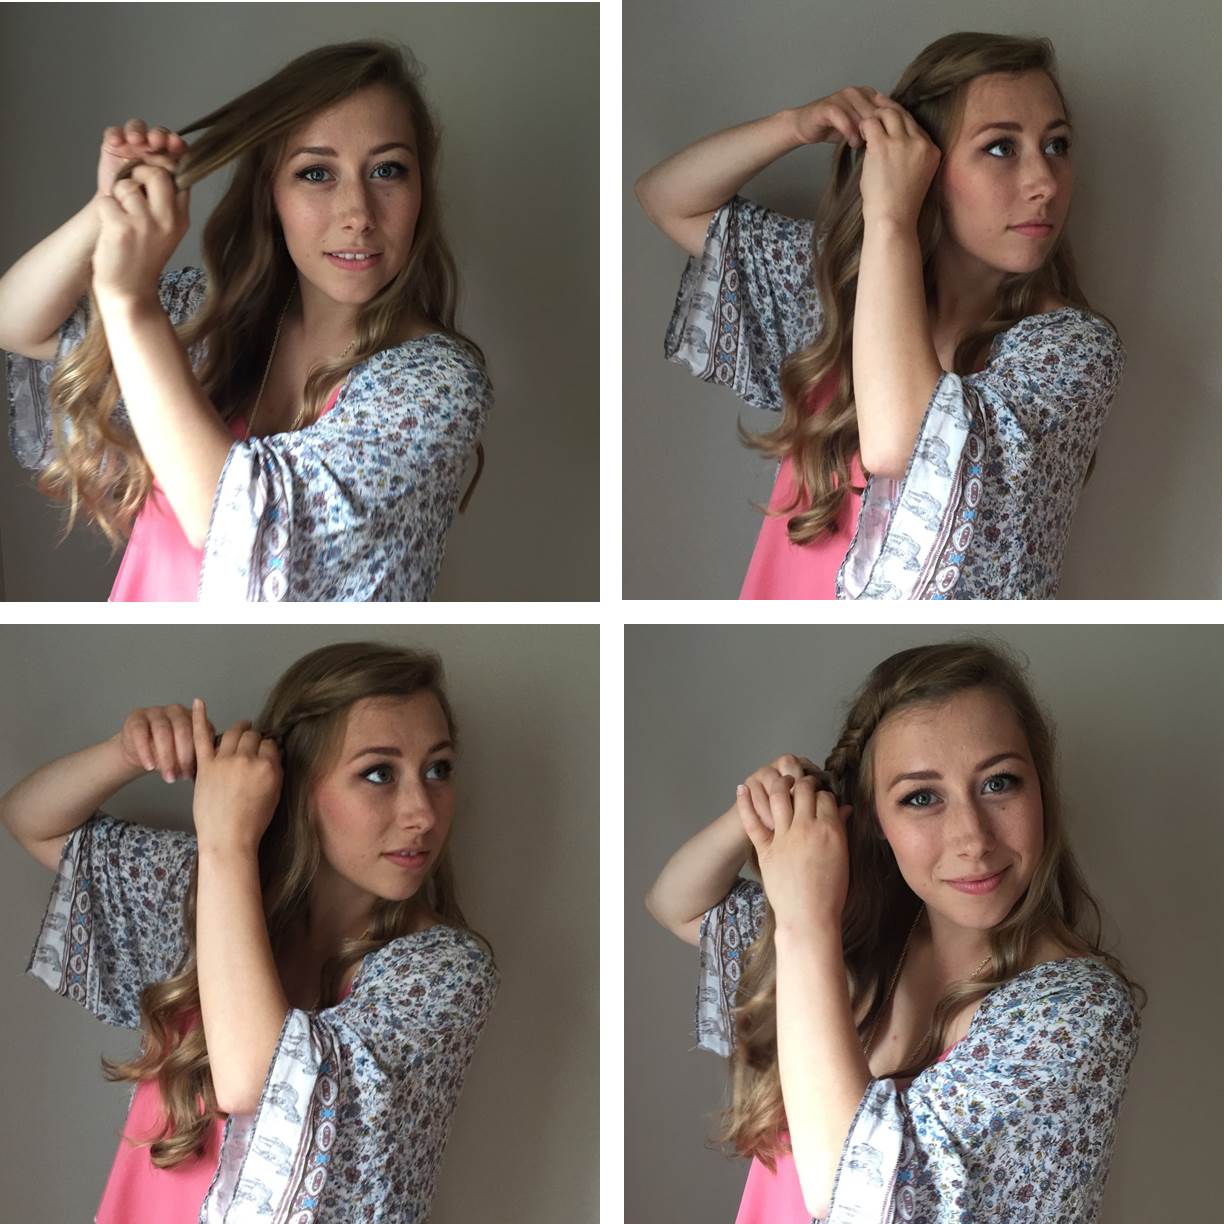
After that, I grab a section of hair from the front of my head and separate that into three equal parts. For this style, a Dutch braid is best. Take the two end pieces and braid them under the center piece. This gives the braid a more 3D effect.


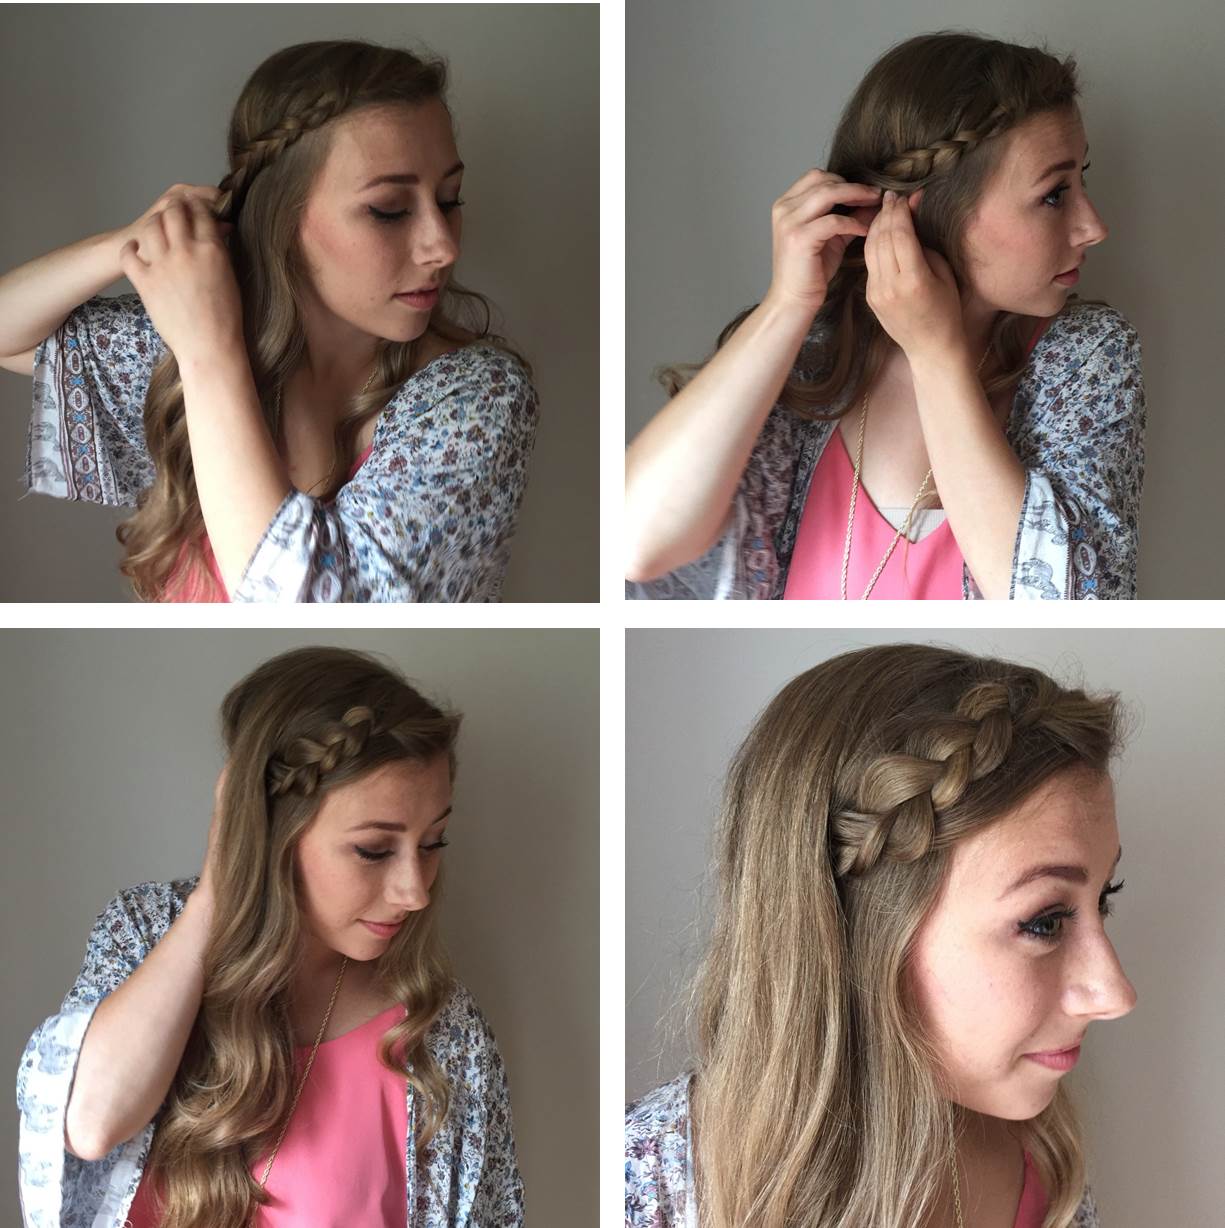
Stop braiding once you reach your ear and secure the braid behind it. Now, all you need is a spritz of hairspray and you’re ready to go!


HALF-UP BUN

This is another quick and easy hairstyle, ideal for those lazy mornings you don’t want to put too much effort in, but still want to look cute!


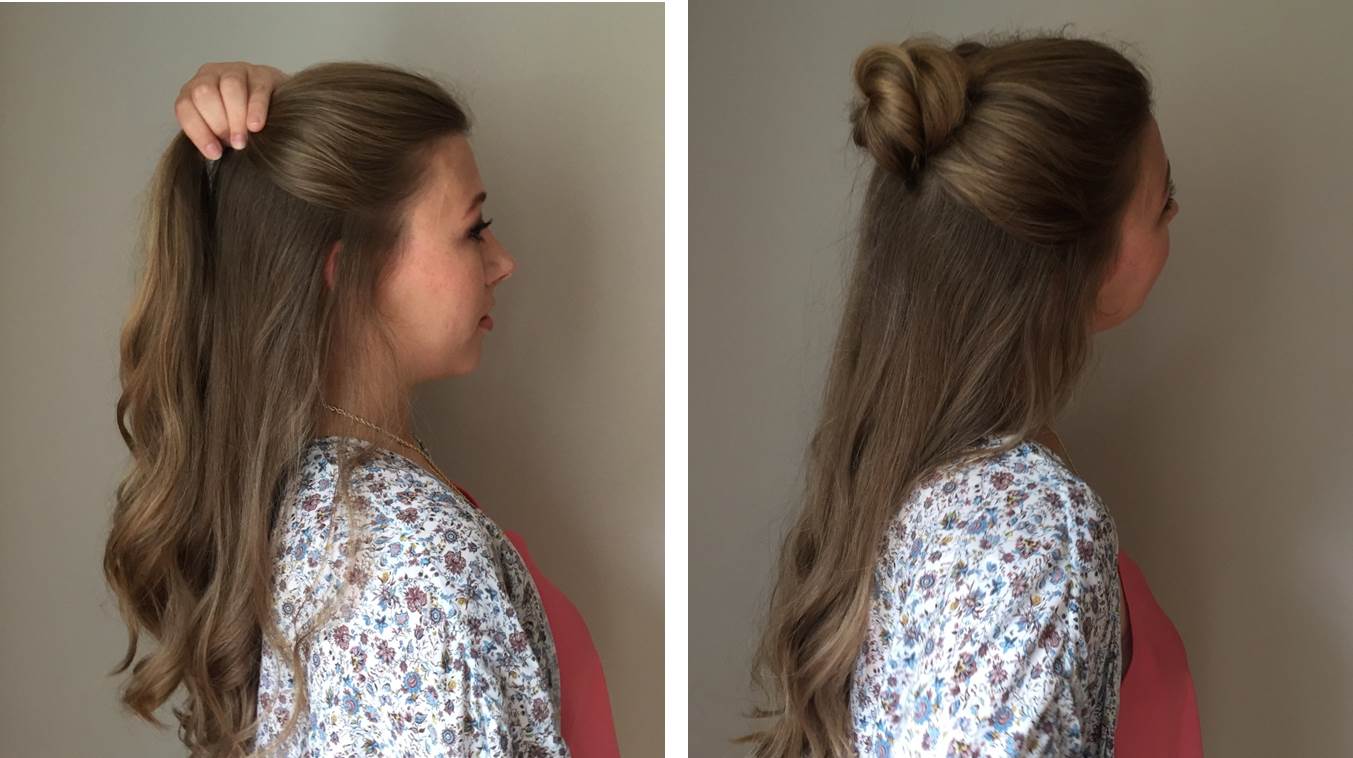
I always start off this style by putting my hair up. Section off the top half of your hair and put it in a tight, messy bun. This is a lifesaver on mornings when you want to look cute and save time doing it. You only need to curl the bottom half of your hair. Believe me, if you’re anything like me and most mornings are a blur of foundation and toothpaste, the quicker the hair style, the better!
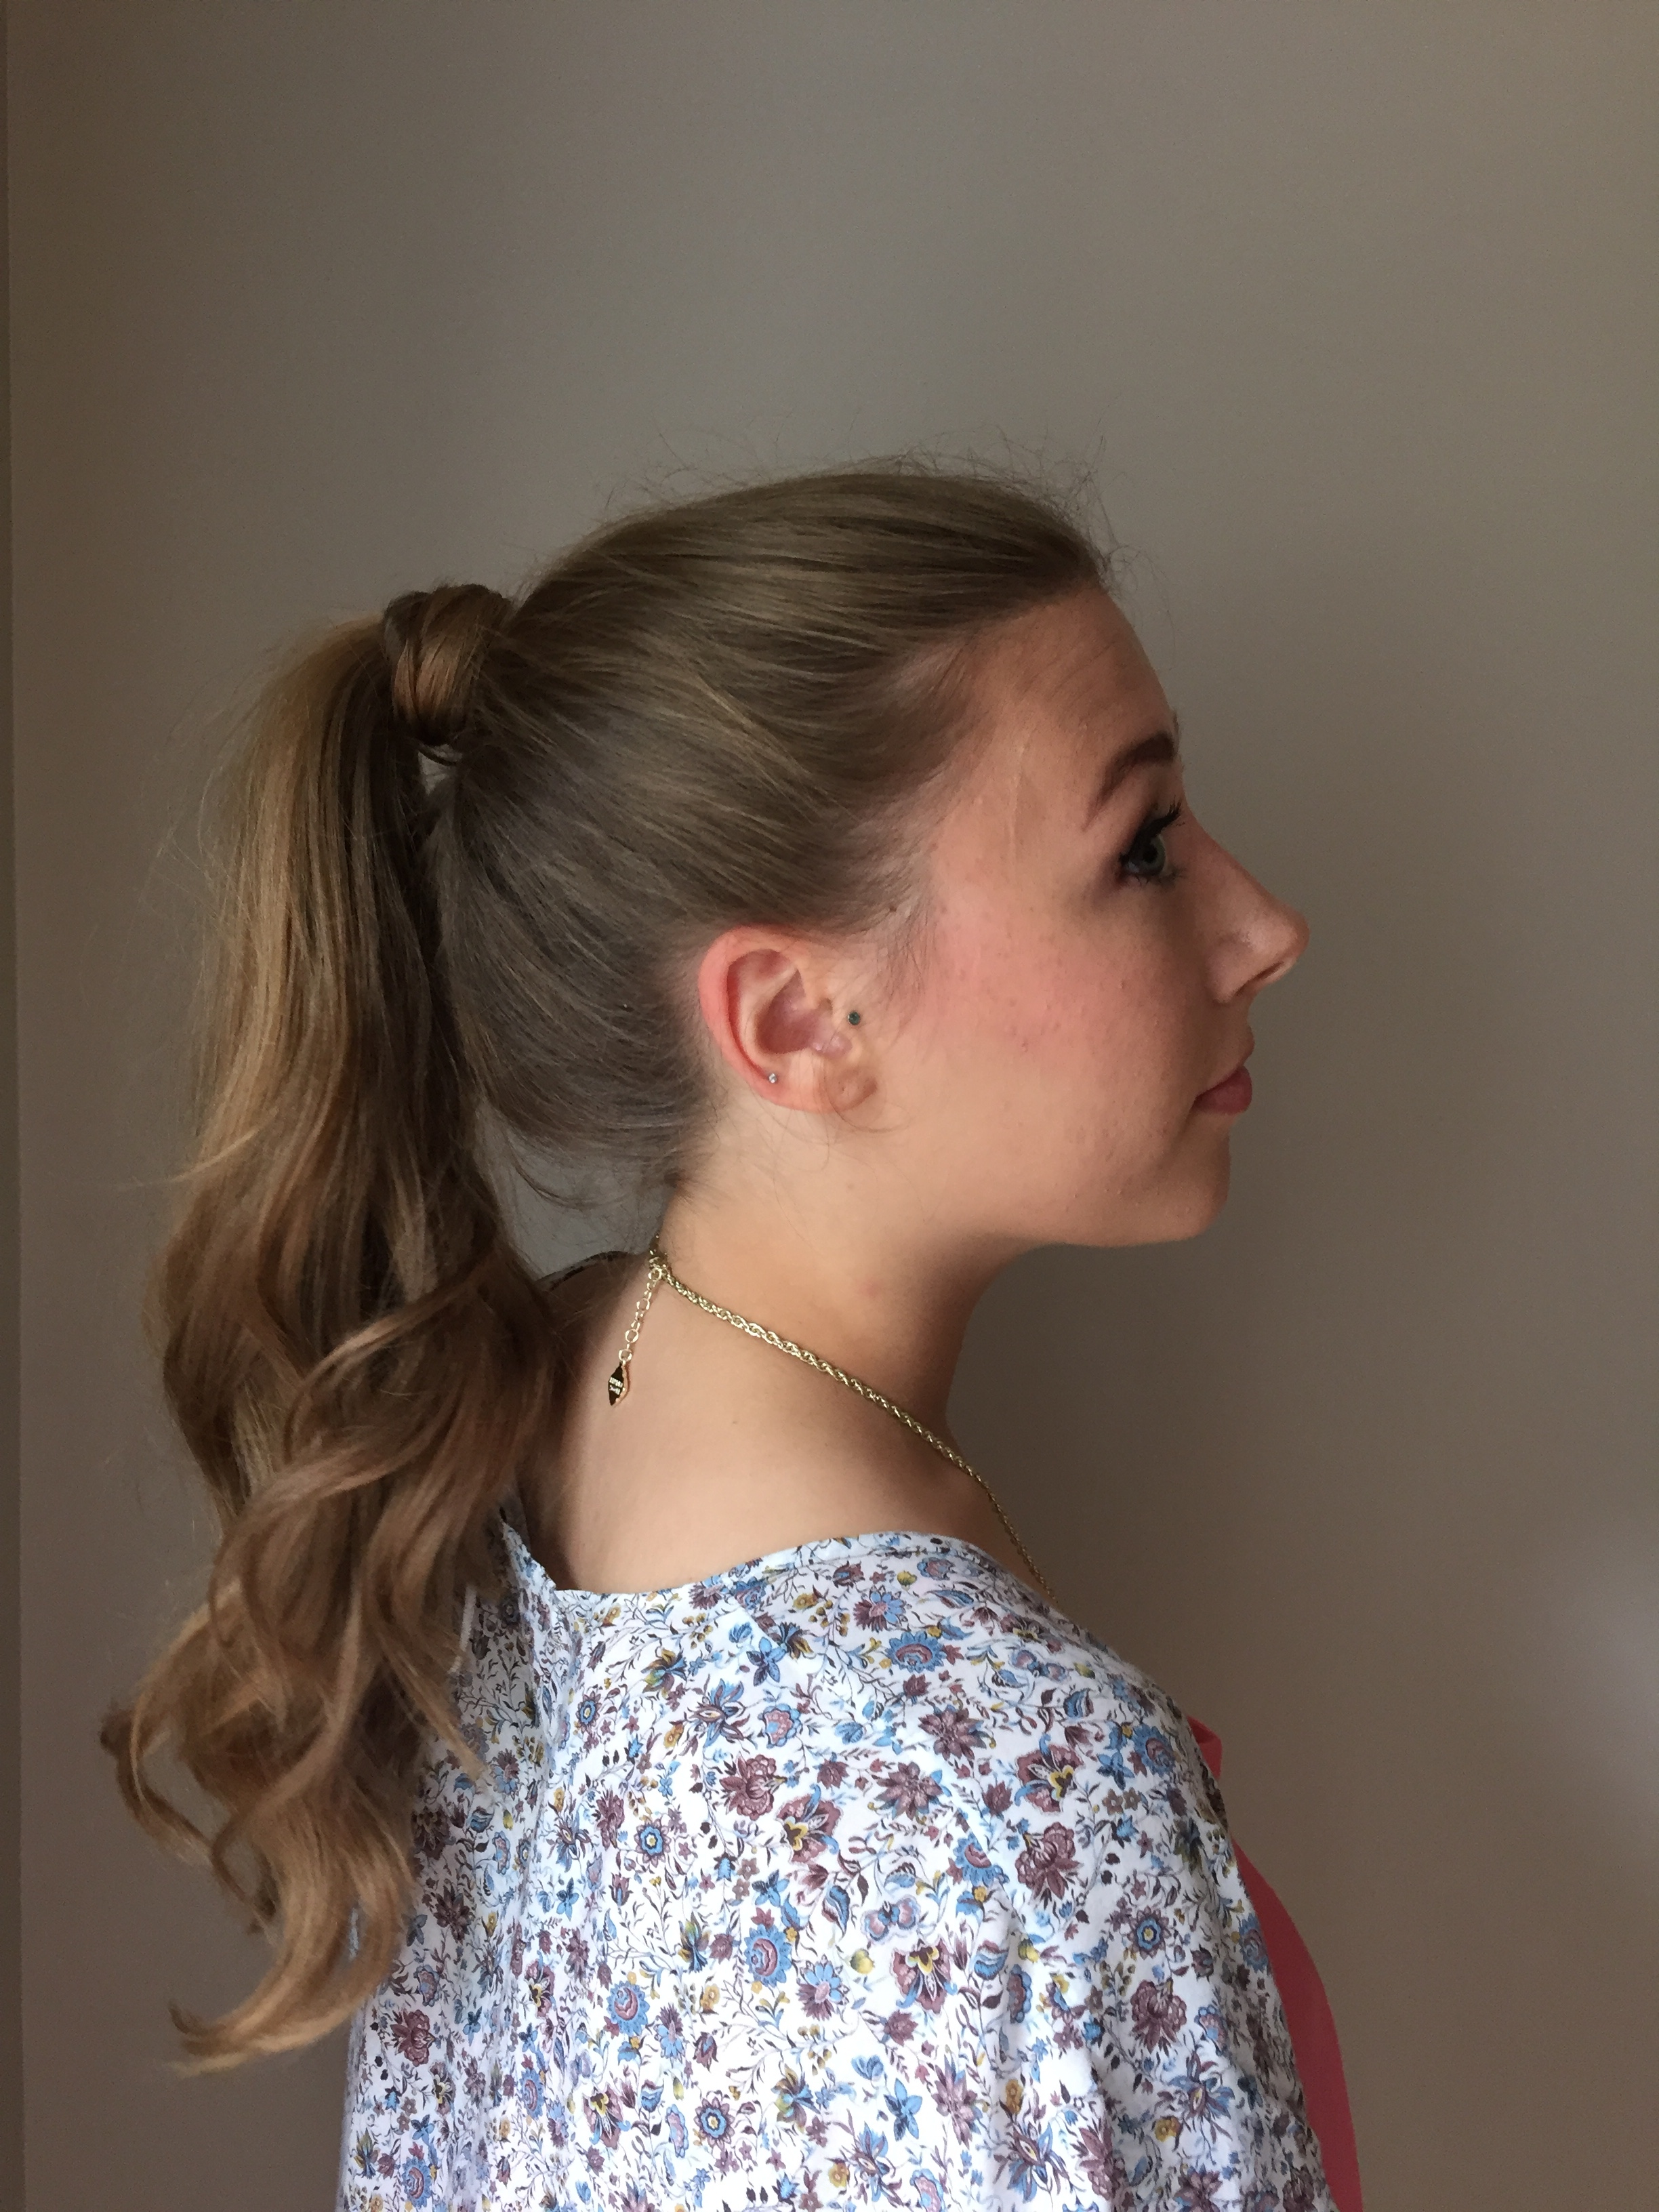
 

DAY 2 PONYTAIL

Okay, lets be real. I could wear this style any and every day, regardless of when the last time I showered was. However, if you were up late studying the night before and didn’t have time to wash your hair, DON’T PANIC! On mornings like these, I spritz a little dry shampoo into my hair before throwing it up into a high ponytail. If this is your second day of curls then a light touch up and a cute headband is all you need before you’re ready to walk out the door!

Even if you’re starting fresh, this style is super fast and easy. I don’t know why, but curling my hair when it’s in a ponytail is always quicker for me to do than otherwise!


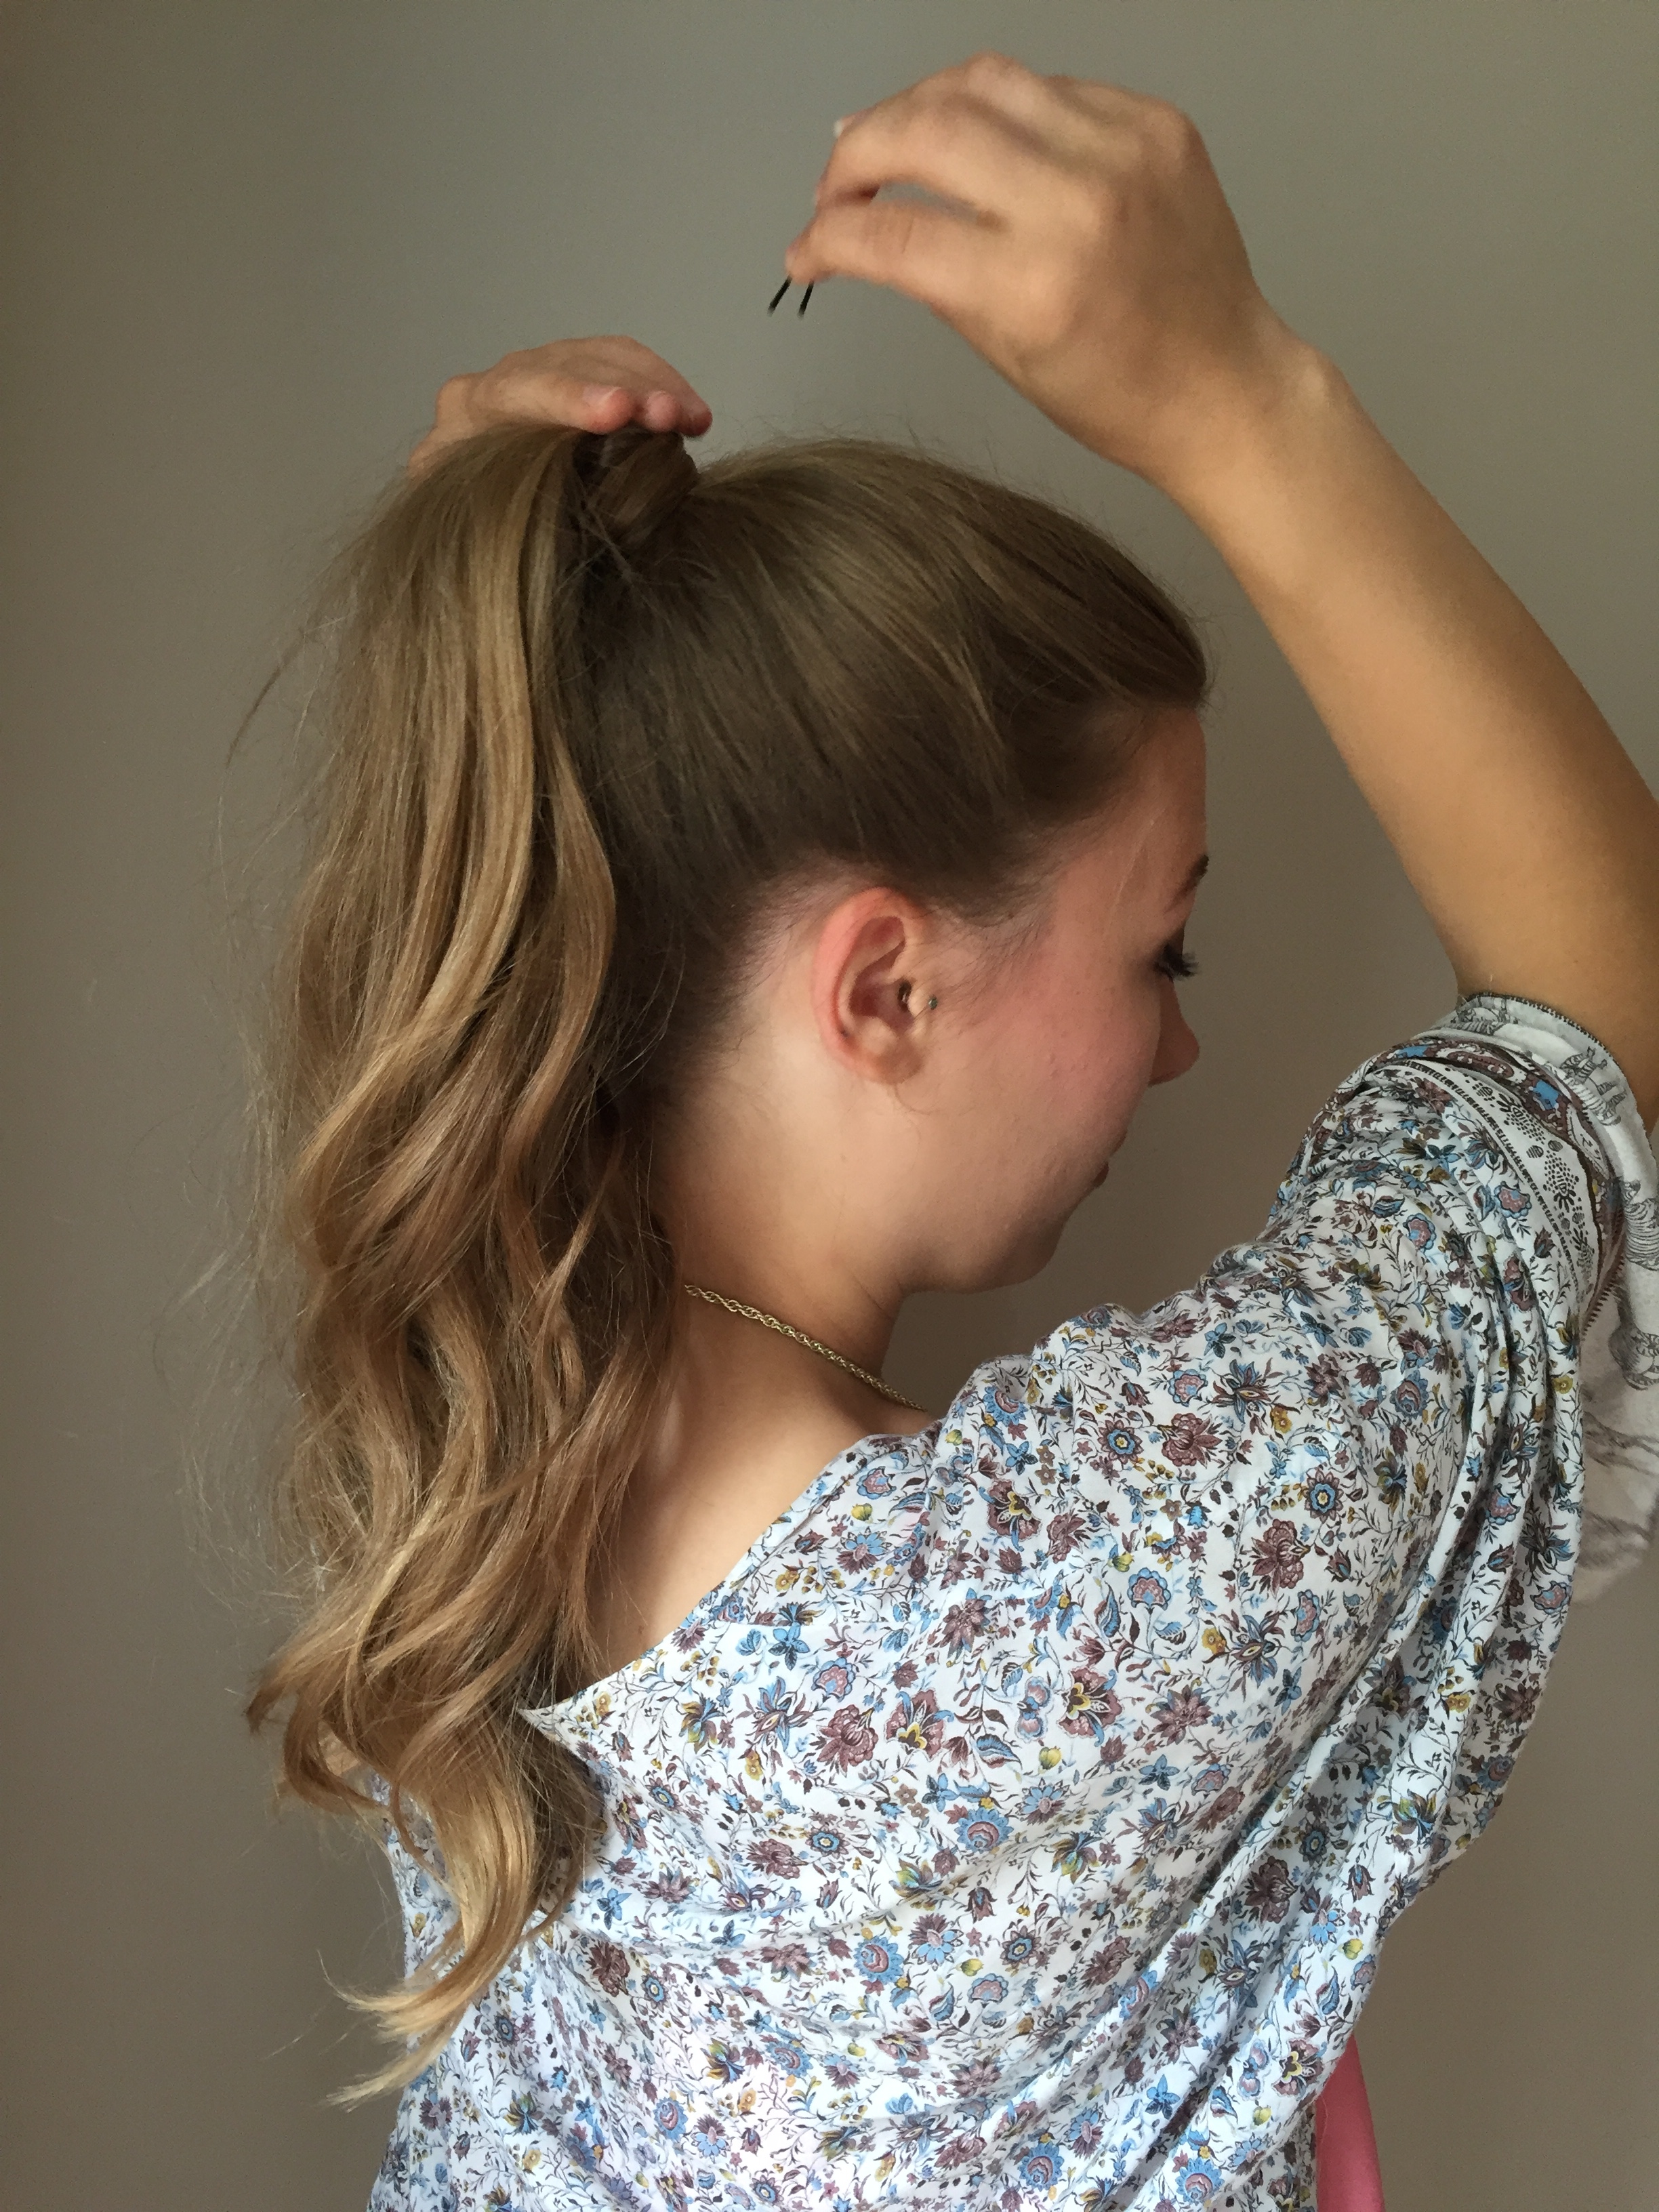
For a clean look, take a piece of the ponytail, wrap it around your hair tie, and secure firmly. Now you have a look that took less than 10 minutes, is chic, but also effortless. Sounds like a win-win to me!


xoxo,
Rachel Lynn


3 Different Curls from 1 Styling Tool

by Kelsey August 15, 2016


Hey Ya’ll! Kelsey from Chasing Cinderella Blog here and I’m excited to partner with Remington® to show you how you can get three different curls from one styling tool!

Remington sent me the T|Studio™ Thermaluxe™ Curling Wand and I am amazed at the quality! The ultimate ceramic barrel is cone shaped, sized from ¾” to 1”, and produces medium to large sized curls. My favorite part about this curling wand may be the fact that it has a 30-second heat-up time and a 60-minute auto shutoff! This is perfect for those of us who always forget if they remembered to turn off their iron!

The best part about the Remington Thermaluxe Curling Wand is that you can create three different looks using the same iron! Because this wand has non-slip ceramic barrel, your hair won’t slide off the rod, making it super easy to create different style curls! Below I am going to show you three different ways to curl your hair using this Remington curling wand: full curls, combo curls, and spiral curls.


Full Curls

This is the way that I usually curl my hair every day. It gives you more of a “Shirley Temple” look, with full, loose curls. To create this look, wrap your hair around the rod, keeping it flat against the barrel the whole way.


Combo Curls

This will give your curls a more textured look. You want to wrap your hair flatly at the top, wrap it around a few times, and then twist your hair the rest of the way around the rod. This will give the curls two different looks that combine for an awesome style.


Spiral Curls

This way will give you a twisted curl look. When creating this look, you want to first twist your hair tightly, spray some hairspray onto it, and then wrap the twisted hair around the curling wand! When you are finished twisting and curling all of your hair, you may think you look a bit scary- the trick is to brush out these curls with your fingers!


There you have it—getting three different curls by using one styling tool! Thanks so much for reading!

Xo Kelsey, www.chasingcinderellablog.com


Thermaluxe™ Dryer

by Remington Ready August 9, 2016


Had enough of frizzy, dried out hair?

It’s time for Thermaluxe!

The Thermaluxe Hair Dryer optimizes heat levels to dry hair quickly without damaging it. The hair-saving heat protection comes from the ceramic-coated grill, which releases tons of negative ions during drying to prevent heat damage and reduce frizz. You’ll love the range of speeds and heat settings that let you find the perfect performance for your hair type. Plus, Thermaluxe reduces styling times with a powerful airflow that dries hair 50% faster than standard Remington dryers. Here’s what else you’ll get with the Thermaluxe Hair Dryer: concentrator and diffuser attachments, cool shot button, tangle-free fabric cord, removable filter, and a 4-year limited warranty.

Stop drying out your hair and start safely drying it with the Thermaluxe Hair Dryer! It’s the perfect styling tool for creating all-day hairstyles that keep up with your nonstop lifestyle.


Effortless Hairstyles with Accessories

by Remington Ready June 24, 2016


Hi! Sonja here and I'm back again with another collaboration with Remington, but this time I'm featuring a handful of their super cute hair accessories for the summer. I actually braided my hair the night before hence the wavy look, but you can style it however you like. Here are just some tips on how to do super easy hairstyles with these dainty accessories that are perfect for festivals, barbecues, or any outdoor events that you plan on having in the summertime!


Remington 5 ct Clips/Barrettes, Remington Flower Headwrap (Available at Target), Decorative Headwrap, Metal Arrow Headband


Hair Extensions Looped Bristle Brush, Teasing Brush

Here are the tools and accessories that Remington sent me to test out, all of which I'll be using for this post except for the Hair Extensions Looped Bristle Brush since I won't be wearing my hair extensions today.


Starting off with the easiest look, I teased the crown of my hair for a little bit of volume using the Remington Teasing Brush. I then took about a 1" section from both sides of my hair, twisted them loosely, and secured them with the triangle clip. If you want a more effortless look, leave little sections in the front to frame your face. The clip won't budge, so you don't have to worry about it falling off when you're rocking out to your favorite bands!


Here's something that requires a little bit more work but still totally simple and doable. I took 1-2" sections right above my ears and did two regular braids. A few inches above those sections, I took another 1-2" sections and did the same thing. I then brought all 4 braids together to the back of my head as centered as possible, and secured them with the infinity clip. This one feels even more secure than the triangle clip, so these little braids surely won't fall apart! If you want, you could loosen the braids for a messier look as well.


Remington Flower Headwrap, Decorative Headwrap, Metal Arrow Headband

For the photos above, I styled a braided crown using three vastly different hair bands that you can use for various occasions. First off, to do this ethereal bohemian hairstyle, start off by braiding pigtails and securing them with elastics. Bring one side of the pigtail all the way around the other side and bobby pin securely. Do the same thing on the other side by positioning the braid however you like - it can be on top of the other braid or right next to it. You may also want to leave thin curled sections in the front to frame your face.

Now you're ready to soak up the sun with your hair looking super chic and summer-ready!

xoxo,

Simple Stylings

Loose Waves and Dutch Braid Tutorial

by Chaney May 18, 2016


Hello everyone, my name is Chaney!
I have a YouTube channel where I share my love for life, hair, makeup, and music. With summer quickly approaching, I want to show you guys how I like to use the Remington T Studio Silk Ceramic Flat Iron to create loose curls along with an easy way to braid back the front of your hair to keep it out of your face for the hot summer months. Enjoy!


See more from Chaney on her Youtube Channel

Beach-Ready Waves

by Sonja May 6, 2016


I've partnered with Remington once again to bring you this beach-ready look using their amazing T|Studio SILK Ceramic Slim Styling Wand. To see how to achieve this quick and easy look, keep reading!


The T|Studio SILK Ceramic Slim Styling Wand is the most advanced ceramic curling iron featuring a coating with real SILK proteins and provides more ceramic content than traditional curling tools, giving you a healthy, effortless, long-lasting curl with less frizz and damage. Silk ceramic combined with 410-degree high heat and professional performance creates smooth, beautiful and fast salon results.


What I find really unique about this curling iron is the tapered end - the barrel goes from 1/2" to 1", which allows you to achieve loose waves, tight bouncy curls, or even both! In this case, I went for a combination of loose and tight curls for a messy hairstyle that's perfect for the beach or just about any spring or summer outing.

It also comes with a glove to protect your hands from the heat, but if you're careful enough, this styling wand is quite user-friendly and I was able to achieve this look in just under 15 minutes. With a little bit of hair serum and heat protectant, you don't have to worry about it damaging your hair like most curling wands tend to do.


To accompany these sultry loose waves, I came up with a relatively simple beach-ready makeup tutorial. Since the intense summer heat calls for minimal makeup, I went for a natural-finish foundation with SPF, my usual winged eyeliner, a pair of natural-looking wispy falsies, a "my lips but better" liquid lipstick, and a whole lot of golden highlight for that striking summer glow.

Here's a quick walk-through:


1. Apply a light peach eye eyeshadow base all over the eyelid, extending it to the brow bone.
2. Add a touch of gold shimmer on the lids.
3. Wing your eyeliner and draw it as close to the lash line as possible.
4. Apply gel liner on the waterline and smoke out the bottom lash line with a dark brown eyeshadow.
5. Curl lashes, apply mascara, and glue on your favorite pair of falsies (I used House of Lashes in Leatherette).

And there you have it - a summer-friendly hair and makeup look that's perfect for a stroll on the beach or the pier. Be sure to check out Remington's T|Studio SILK Ceramic Slim Styling Wand if you want to achieve these loose messy waves! Also, stay tuned for yet another collaboration with Remington that will feature some really exciting products!

'Til next time.
xoxo,


Coachella Inspired Hairstyle

by Alex Gaboury April 22, 2016


Hi my name is Alex, (just Alex, my parents kept it short and sweet) and I have a channel here on Youtube where I share my love for hair, beauty, and my pup named Sophie. Since festival season is amongst us I thought I would share with you a simple Coachella inspired braided hairstyle that can be easily personalized to reflect your style with fun hair accessories. Now this hairstyle would not be possible without the help of my Wet2Dry straightener which has easily become one of my favourite hot tools for my hair. I would love to hear which hair accessory was your favourite, or even better, if you will be attending any festivals this year, let me know in the comments below.
xo Alex


See more from Alex on her Youtube Channel


Learn more about the Wet2Straight Straightener

Straightening Natural Hair Tutorial

by Naomi March 28, 2016


Hey Everyone! I'm Naomi from the YouTube channel liveloveGlam and I'll be showing you how I flat iron my natural hair. I have super curly hair and getting it straight has been a trial and error process. So it's nice to have found a method and products that work really great! I hope you enjoy this video and find it to be helpful! xo


Learn more about the UV Ceramic Flat Iron


Teasing Hair Tutorial

by Remington Ready February 22, 2016


All it takes to tease is a good brush and some hairspray! Teasing (or backcombing) is an awesome way to create texture and build volume for everyday styles or updos. The Remington Teasing Brush features a pointed end that helps with parting and sectioning hair during styling. This is one tool that can do it all!


Steps:

1. Section the hair around the crown of your head using the sectioning end of the teasing brush.

2. Starting with a 2” section, lightly hairspray focusing on the area you will be teasing.

3. Using the teasing brush, gently backcomb the hair while holding the section straight up. You should start about 3-5” above the scalp, depending on your hair length. Then brush the hair down towards your scalp several times until you reach your desired volume.
Tip: To avoid breaking your hair, don’t be too aggressive when backcombing and don’t brush hair quickly.

4. Repeat steps 2-3 on all hair sections around the crown of your head.

5. Once all sections are teased, part your hair as usual and lightly brush top layer of hair, making sure to not flatten out the teased hair underneath.
Tip: To have a smooth finish without brushing, keep a thin layer of hair around your part separate during teasing. Then when you are done teasing, let that section down to be a smooth layer over the teased hair. 

6. Scrunch your hair at the roots with your fingers for additional volume and look for any areas that may need additional teasing.

7. Smooth down your hair again using your hands and a shine serum or hairspray. Now your teasing is complete and it’s on to the styling.

8. Leave your hair down for natural big hair or bring hair up into a bun or ponytail.

Hair Brush Guide

by Remington Ready February 11, 2016


Anyone who’s had a bad hair day (who hasn’t?!) knows the value of owning a good brush. But one brush does not fit all styling needs. Remington has you covered on everything from building volume to drying hair faster. Check out the guide below and find the perfect brush for you!


1. Men’s Brush Set
The ideal set for the man in your life. The cushion brush smooths out short or long hair and the comb works best for detail styling any difficult areas.

2. Mini Brush and Comb Set
This brush and comb are the perfect size to keep in your purse for on-the-go styling. You’ll be prepared for any windy day.

3. Cushion Brush
The cushion brush is essential for medium to long hair. The nylon bristles detangle and smooth out hair and are also great for scalp stimulation.


4. Looped Bristle Brush
The ends of regular brush bristles can snag and pull on wigs, extensions and weaves. This brush has looped bristles, so you can smooth and detangle your hair with no worries!

5. Teasing Brush
This brush is sure to pump up the volume. It was specially designed for backcombing, teasing, and finishing, hair. It also has a special handle for sectioning hair or creating the perfect part.

6. Vented Brush
With a vented base, this brush can actually save you time getting ready. It was designed for use with a blow dryer, speeding up drying times and providing maximum volume.