Index Background

4 Fall Hairstyles to do with a Curling Wand and Accessories

by Rachel September 16, 2016


Hey there, everyone! My name is Rachel and I’m a fashion/lifestyle blogger over at my website, Rachel Lynn.  I’m back to bring you more fun hairstyles perfect for the crisp Fall weather that is quickly approaching. I don’t know about you, but lately I’ve been so excited for Fall! Apple cider, Halloween, changing leaves and pumpkin everything has got me ready to say goodbye to summer and hello to Fall. So today I’m bringing you 4 of my favorite Fall Hairstyles to do with a curling wand. For these tutorials I’ll be using my Remington T|Studio Thermaluxe Curling Wand. I love how fast this wand heats up and how quickly it actually curls my hair! For a girl on the go, this wand is a must.


Curls & Volume

Everywhere I look lately, people are all about voluptuous hair. Not that people haven’t been dying for volume since the beginning of time, but lately I’ve been seeing volume on top of volume—especially on the runway! This hairstyle is super easy to create. Start with your basic curl using your Thermaluxe curling wand. Wrap your hair around the wand, leaving as much space in between each strand on the barrel as possible. When there’s more space on the barrel, your  curls will turn out looser and fuller! 


After that, I take my hands, hold small sections of my hair and push up on the rest of it. This isn't quite like teasing hair - although if you want even more volume that will definitely work - but it will still get the job done!


Greek-Inspired Twist

This style is even easier than the last! I like to start with a curled base, because the curls give my hair more volume. Who doesn't want more volume in their hair?! After the curl, place the hair band on top of your hair - not underneath it. Then, simply take sections of your hair and curl them up, over and then underneath of the hair band. This gives the circular twist look. 


 I always mess around with mine a bit, pulling some strands looser here and others tighter in order to give the desired effect. 


Pony Tail Twist

This look is very similar to the Greek-inspired twist, but with a ponytail. I start by sectioning off section of hair towards the front of my head and twisting it back towards the base of my head. You can make this twist as tight or loose as you want. I usually add in hair as I get closer to the base of my head.


Once you do this to both sides secure tightly with a hair tie. Low ponytails are HUGE this fall. I've seen them all over the runway, and this look would be perfect with a sweater and a scarf. I always like to take a piece of hair and wrap it around the hair tie. I feel like this gives the look a cleaner effect - much more chic!


Knots, Knots and More Knots!

If there's one thing that the runway is crazy about - besides vintage accents and 80's inspired hair - it's knots! Any and every type of knot! Some of them look super crazy and messy and other a very prim and proper. I'm the personality that loves a little craziness. Maybe that's because I'm always in a rush when I'm doing my hair, but if I can pull off the 'chic mess' then it's a good day! Again, I curled my hair before hand to give my knot more volume. For this style, I simply took my hair and twisted it into a ballerina-esque bun on the lower part of my head.        


I secured it with my Remington Large Sweep and Style Barrette and was good to go!  


I love having my hair curled with this style, because then I can pull out a few strands of curled hair and give off that 'messy' vibe.


I hope these fall-inspired hairstyles bring you as much joy as any pumpkin spice latte could give you! Happy Fall! 


xoxo,

Rachel Lynn

Elegant Updo Tutorial

by Tiffany Lee February 1, 2016


I’m Tiffany Lee, a celebrity hairstylist and makeup artist, taking a moment as a Remington Ready Guest Blogger! On my channel, you will find anything beauty related such as makeup tutorials, hair tutorials, swatches and reviews, and fashion related videos! Today, I’m sharing the how to create a Romantic Loose Updo using the Simply Wrap n Go Curling Wand.


See more from Tiffany on her Youtube Channel


Learn more about the T|Studio Silk Curling Wand


Hat Hairstyles: Knotted Up-Do

by Remington Ready January 21, 2015


This up-do is more of a “low-do”, keeping the style below hat level! It’s Dutch-styled and unique, making you look like a skilled trendsetter without all the work.


Style Tip: If you have layered hair, pieces may fall out during the day. Just keep bobby pins handy to pin in any strays. It only adds to the look!


Tools: Bobby Pins


    1.  Start with natural hair, adding texture spray if needed.


    2.  Divide hair into four even sections.


    3.  Tie sections A and B together into a tight knot and secure with clip, then knot                sections C and D and clip.


    4.  Tie the center two strands, B and C, into a knot using a clip to hold sections A              and D in place.


    5.  Continue knotting each side and then the center until about 3-4” of ends are left.            Make sure to keep each knot tight!


    6.  Use bobby pins to secure the ends of the sections under the braided area.


    7.  Voila! Your knotted up-do is complete. Just add finishing spray as needed                   and throw on your hat! Pull the hat down so it’s just above the knotted hair.


New Years' Hairstyles

by Remington Ready December 29, 2014


You may have your New Year’s Eve outfit planned, but what about something special for your hair? Try one of these new styles to complete your look for a fun night out celebrating the New Year. You’ll make an elegant statement without too much work— just follow the steps below!


Braided Twist


Braids are all the rage and they can even create a classy up-do! It will look like you spent all morning doing your hair, but it only takes a few minutes.


Style tip: create this style on first-day hair, then let the braids down on day two for some fun waves!
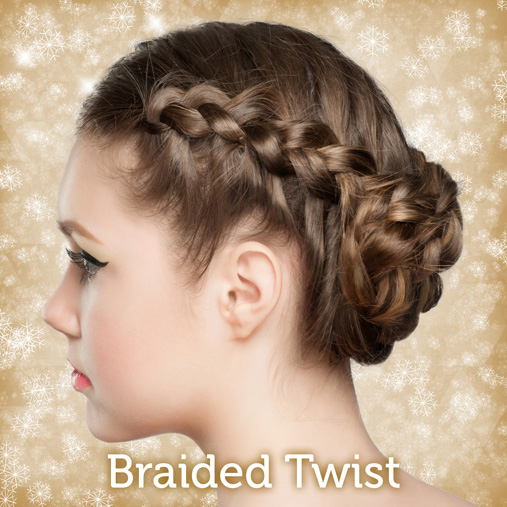


Tools: ElasticsBobby Pins


    1.  Create a center part and divide the hair in two sections.


    2.  Starting on one side near the forehead, French braid hair by crossing each                    section under the other, instead of over the other like normal braiding. Secure                end of braid with an elastic.


    3.  Repeat step one on the other side section of hair.


    4.  Wrap the braids around each other into a low bun, tucking the ends in and                    securing with bobby pins. 


    5.  Set the style with finishing spray to complete this braided twist!


Side Sweep Curls


The side sweep look is gorgeous with curls, but elastics and bobby pins can’t quite handle the task. The Simple Twist pin makes it easy to create this elegant look and will securely hold it all day long!


Style Tip: dress up this look even more by adding a decorative headband!
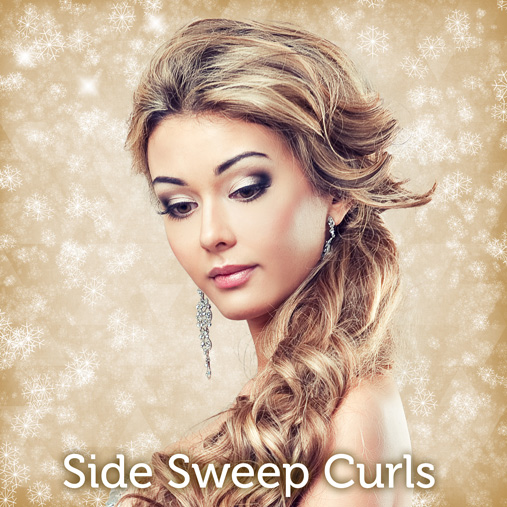


Tools: TStudio Silk Oval Wand, Simple Twist 


    1.  Section hair and curl 1-2” sections with the TStudio Silk Oval Wand.


    2.  Tease hair lightly around the crown, adding hair spray. 


    3.  Gather hair to the side and twist hair towards the ear.


    4.  Push the Simple Twist pin through and twist towards the ear, then flip it back into          the twist to secure. Pin should be close to the scalp when pushed back in.


    5.  Loosen a few curls around the face and set with finishing spray to complete                  these side sweep curls!


Headwrap Ringlets


This headwrap look works with any style or party! Use a boho braided headwrap for casual occasions or a beaded headwrap to really dress it up.


Style Tip: just like the braided twist, this look can be let down on day two hair for awesome curls!


Tools: TStudio Silk Oval WandBraided HeadwrapBeaded Headwrap


    1.  Section hair and curl 1-2” sections with the T|Studio Silk Oval Wand.


    2.  Slide a skinny headwrap over the head, so it is across or right above the                      forehead.


    3.  Starting on one side, loop a 2” section of hair around the headwrap until it creates          a ringlet, then secure the end of the strand in the headwrap band. 


    4.  Continue looping sections until all hair is secured around the headwrap. 


    5.  Add bobby pins as needed and set with finishing spray for this headwrap ringlet            style!


Get this Iconic Look: Elegant Up-Do

by Remington Ready December 8, 2014


Turn heads at your next holiday party with this chic and elegant hairstyle. Follow the steps below to get the look!


Tools: Simple Twist, Bobby Pins


    1.  Start with your natural hair and add hairspray. If you have straight or fine hair add          volume by curling or teasing. 


    2.  Section bangs from hair and tease. Then comb back bangs and pin, smoothing            the top while keeping volume.


    3.  Gather hair at nape of neck and twist hair, guiding it upwards while keeping hair            tight and smooth.


    4.  Tuck ends of hair back down into twist. Push pin up into the twist, then flip pin              and push back down. Pin should be close to scalp when pushed back down, to            better secure look.


    5.  Set the style with finishing spray and your elegant look is ready for any occasion!