Index Background

The Hottest Swimsuit Styles for 2014

by Kristi Stalter March 26, 2014


 #1- South Beach swimsuit- Savasana Grey Bikini

 
I jumped on the athletic inspired swimwear trend last summer and was glad to see that it is still in the limelight. If you are like me, you have days where you like to be active around the pool or beach.  This suit is made for swimming, playing volleyball or diving into the pool. It will stand out among the feminine cuts and the bold color blocking of the suit is always in style.


#2- Urban Outfitters- High waist swimsuit


High waist bottoms are back in again this summer. The cut can be flattering on most women and provides a great alternative to a boy-cut bikini bottom. The high waist is slimming in case you are worried about what you had for lunch or about your figure. If you haven’t already, be sure to try this retro trend.


#3- Robin Piccone- Portrait back one piece suit


I am all about modesty and usually prefer a bit more coverage when I go to the beach or pool. There have always been a fair share of one-piece suits but there are so many more high fashioned ones that are being designed.  This one piece suit by Robin Piccone is one of my favorite suits that I have ever owned am all It has a high neckline that ties around the neck and features a low scooped back. It is very flattering and is a great pick if you want something elegant and stylish.


#4- BP cage cutouts


A cutout one-piece is a great edgy and modesty, especially if you’re not ready to bare it all in a bikini. It has a wearable peekaboo effect while still being a sophisticated swimsuit choice. Pair them with a bare of flat sandals and a simple beach bag and you are ready to go.


#5-VS bandeau top


It is impossible to talk about swimsuits without mentioning Victoria’s Secret. I’m not going to mention how many swimsuits I have from them but it is probably too many.  I usually end up buying separates and pairing them with tops or bottoms that I already own.  You can mix and match so many different ways and VS almost always has some type of promotion going on so you never have to pay full price!


See more from Kristi on her blog, The Coral Court!

3 Bold Beauty Trends to Try

by Remington Ready March 12, 2014

In the past, thin eyebrows were all the rage. But this season, the thicker the better. There’s no better way for you to channel spring’s return to all things natural than by sporting bold brows! Pointed arches, darkened tones and filled-in effects define the eye without overpowering it.


Coral lipstick is the new spring and summer lip shade! It’s bright and fresh look leaves a polished look that flatters all complexions and offers a juicy pop of color. Coral lipstick suits perfectly to nearly all skin tone’s. However, the key on applying full makeup with coral lipstick relies on simplicity. Don't over do it! 


Liven up any everyday ensemble with a heavy hand of liner, and you're sure to be the center of attention. When you're rocking dramatic eye makeup during the day, be sure to balance it with other natural makeup. When going from day to night, add even more finesse to your fab eyeliner with a sweep of shimmery shadow, and now you're set!


Category: Beauty

Tags: , , ,

How To Create The Perfect Natural Waves

by Jessica Fay March 3, 2014


As a hairstylist for 7+ years I have tried almost every curling iron and wand out there at least once! The Tear Drop Remington Iron has completely blown me away! I closed-mindedly thought that my curls would turn out the same from this wand, as they do most other wands, but thankfully I was very wrong! They had such a beachy and textured effect to them, I absolutely loved it! They steps to achieve this look are as followed:


What you will need:


Tear Drop Remington Wand

Boar Bristle Brush

Teasing Brush (optional)

Small clips


1. Spray a heat protectant all over hair and brush out any product left from the day before.

2. Take the Remington Teardrop Wand to begin curling. Make sure to use glove, to avoid burns. Start in the front of your face and curl one inch sections away from your face.

3. Catch curl as you remove it from the wand in gloved hand and roll back up to your scalp.Use a small clip to secure it in the roll to your scalp until it is completely cool.

4. Remove the pins and brush out the curls with a boar bristle brush.

5. Place your hair where you want it to stay and spray with a medium to strong hold hairspray.

6. Go outside with your beachy curls and enjoy the warm sunshine!


You can see more from Jessica on her blog, Lipstick, Heels, and a Baby

How to Achieve a Perfect Pout

by Doria Murphy September 9, 2013


Are you dying to achieve a perfect pout? Here are some tips to help you create a lip that looks fabulous and wears well throughout the day or evening!

Exfoliate

Exfoliating your lips will remove any dead or dry skin, making them the perfect surface for lip products to adhere to. Mixing organic coconut oil with raw sugar makes a quick and easy lip scrub. Simply apply it to your lips in a circular motion, then gently wipe it away with a damp cloth.

Moisturize

Moisturizing your lips prior to applying lip products will give you a smoother, more hydrated surface to work with. It will also prevent your lips from feeling super dehydrated as the day or evening goes on.

Prime

There are a number of amazing primers out there, which are meant to help your lippies stay budge-proof and bright. MAC’s Prep + Prime Lip is an effective colorless ones.

Line & Fill

Lining and filling your lips with a complementary lip pencil will prevent your lipstick from feathering or bleeding, while helping it to maintain a more even appearance as it wears. When filling in your lips it’s easiest to shade them in using the side of the pencil rather than drawing on them with the point, as shown here using MAC Magenta lip pencil.

Line the Perimeter

If you struggle with bleeding and feathering, using a colorless lip pencil to line the outer perimeter of your lips can be extremely effective—such as Urban Decay Ozone. This creates a barrier, preventing lipstick from straying from your lips. 

Apply Lipstick

Now that you’ve fully prepped your lips, apply your lipstick. Using a lip brush will enable you to apply even, thin coats, which will help you to build the color and create longer wear-time. MAC RiRi Boy was used here.

Gloss

If you’re using a matte lipstick and wish to maintain a matte look, skip this step. Otherwise, apply a layer of gloss to your look. This will give you an ultra-smooth, glossy finish while also helping to promote the longevity of your lip look! Butter LONDON Lippy in Frilly Knickers was used.

The Finished Look

Now that you’ve created the perfect, long-wearing lip look you’re ready to take on whatever the day (or evening) 
throws your way without worrying about your pout!


See more by Doria Murphy on her blog:

www.beautypopstop.com 


Creating a Wearable Orange Eye

by Remington Ready May 13, 2013


If you follow makeup trends you’ve probably noticed that orange is one of the hottest cosmetic colors this spring/summer season. While many color-enthusiasts love working with this fun, eye-catching shade, there are also many out there wondering—is it wearable for me? Personally, I think it is! Whether you’re a little color-shy or simply concerned it won’t work well on your skin tone, I think almost any color can be made wearable through proper application and the right complementary products and colors. I’ve created this “wearable” orange eye look to help anyone that wants to get their feet wet so to speak when it comes to wearing orange on their eyes. In my opinion, if you couple a seemingly “un-wearable” color with neutral, complementary shades you can often make almost any color work for you!


What you’ll need (I’ve included what I used in parentheses): Orange eyeshadow (mixed MAC Pink Opal with Fyrinnae Electro-Koi Medium Chocolate Brown matte eyeshadow (MAC Texture) Dark Brown matte eyeshadow (Make Up For Ever #17) Light Taupe matte eyeshadow (Inglot #358) Ivory eyeshadow (Inglot #395) Black eyeliner (Mirenesse Inside Out 27HR Kohl in Osiris) False lashes and/or Mascara (Faux lashes in Colette and Revlon Grow Luscious mascara in Blackest Black).


I always recommend starting out with a clean, moisturized, and primed eye. I personally like Benefit Stay Don’t Stray for many of the daily eye looks I create unless I’m working with loose pigments, but use whatever works best for you.


Step 1: Pat orange shadow on 2/3 of your upper lid working from the inner corner out. Sweep a little under the inner lower corner as well.


Step 2: Create a “C” shape with a medium chocolate brown shadow that frames the orange shadow by starting at the outer corner of your upper lid with a sweeping motion up and around the crease towards the inner corner.


Step 3: Use a dark brown shadow to darken the outer “V” of your upper lid and create more depth. With a light hand, sweep this shade under your lower lashline as well.


Step 4: Using a super light brown or light taupe, blend out the edges of the crease color up towards your orbital bone. Sheer it out as you blend upwards towards your brow.


Step 5: Using a cream or ivory colored eyeshadow, highlight right below your brow and the inner corner of your eye with a light hand.


Step 6: Make sure you blend in the ivory eyeshadow so it catches the light, but doesn’t create a stark contrast.


Step 7: Tight-line or line your upper lashline in a manner that best defines your eye and line your lower lashline.


Step 8: Curl your upper lashes and apply mascara and/or falsies. Remember to apply mascara to your lower lashes as well.


Voila! A wearable orange eye look! If this is your first time working with orange eyeshadow don’t worry if you’re not completely thrilled with your first attempt! Practice makes perfect and half of perfecting how to apply shadow in general to your eye is simply doing it over and over. Good luck!


By Doria Murphy Freelance Makeup Artist and Beauty Blogger at BeautyPopStop.com Beauty Blog


A Daily Hair and Make-Up Routine

by Melissa Uy May 6, 2013

What’s an ideal hairstyle & makeup look for everyday? Neutral eyes & a simple hair look is ideal when you’re on the go and don’t have the time to do complicated looks. I love eye palettes because they are compact and really easy to use on the go.


In this video I did a Taupe eye makeup look applying: a light eyeshadow on the brow bone, light taupe color all over the lid and a dark brownish eyeshadow on the outer crease.


Products used in this video: Flower Cosmetics Foundation “All About Face” mixed with Kat Von D Lock it Foundation. Rimmel Eyebrow pencil in black brown. Sonia Kashuk Spooly to brush the eyebrows. For the eyes I used the E.l.f. Tantilizing Taupe Eye Palette. Maybelline The Rocket Mascara in Waterproof formula. Milani lipstick in Teddy Bear. Benefit Cosmetics Hoola Bronzer.

 
Check out more videos from Melissa on her YouTube channel, here.

Spring Beauty - Lip Colors!

by Lauren Wickman April 15, 2013

Hi there! This is Lauren from L.A. in the bay, back again to share one of my favorite things about Spring Beauty - the lip colors! If you read my blog, you would know that I have sort of an obsession with lipstick. Bright pinks, bold reds, punchy corals - no matter the occasion, you can find me wearing them!


One of Spring's biggest makeup trends is combining a fresh face (dewy or matte) with bold brows and an even bolder lip. See here. This is one look I will definitely be sporting this Spring. Another Spring trend that I am particularly fond of is the combination of bold lashes with a soft tangerine or peachy lip. So incredibly fresh. 


Makeup is all about trying new things, so what better way to start than with your lips. Here are some of my favorite lipsticks and lip colors that are sure to make you look Spring-ready. 


1. Radiant Cosmetics Lipstick in Daphne $22

This lipstick is without-a-doubt one of my favorites. In a pinky fuchsia shade, this lipstick provides the bold effect you want for Spring and is incredibly hydrating all at the same time. And the best part about it - with every lipstick that you buy, you will be helping in the fight to end human trafficking. Beauty at its best, if you ask me.


2. MAC Lipstick in Candy Yum Yum $15

This lipstick is a definite statement maker. It is one of the hottest pink lip colors out on the market right now and works well with any skin tone.


3. Obsessive Compulsive Cosmetics Pro's Picks Lip Tar Set $49 

Obsessive Compulsive Cosmetics are becoming one of the most popular makeup brands. With a wide selection of "lip tars" to choose from, this combo set helps narrow the choices down by combining all of Spring's gorgeous shades.


4. Revlon Creme Lipstick in Hot Coral $7.99 

This has long been one of my favorite, go-to shades. It is the perfect coral and is so incredibly hydrating. People will definitely be stopping you when you're wearing this shade!


5. Revlon ColorBurst Lip Butter in Sweet Tart $5.99 

Revlon Lip Butter's are definitely the lip colors you are going to want to stalk up on for Spring. To say that they are incredibly moisturizing would be an understatement. This is one of my favorite shades of the bunch. It has the prettiest peachy undertone. 


6. NARS Satin Lip Pencil in Biscayne Park $25 

If NARS' Matte Lip Pencils didn't already gain enough popularity, the satin lip pencils surely will. With a subdued look, this pink guava shade will act as the perfect everyday lip color.


7. Estee Lauder Pure Color Crystal Lipstick in Mandarin Pop $25 

Take yourself to the Bahamas with this tropical shade. With a touch of shimmer, you will be looking like a bronzed goddess in no time.


Will you be adding any of these gorgeous shades to your Spring makeup bag?

xoxo L


Spring Nail Inspiration

by Dana Fox March 18, 2013

Spring is finally knocking on your door. Answer it with some fun, fresh, and colourful nails! I love spring and summer nail polish shades because there are so many different ways to wear them. A solid pastel tone or ten little artistic masterpieces bursting with brights can both work for this season!


It's that time of year when you can pull out all of your corals and mints and sport them proudly... and why not have a little fun with your fingertips at the same time? Here are a few of my favourite looks for spring:


Floral: I created this floral nail art with a simple nail art brush and shades from the upcoming China Glaze collection, fittingly called Avant Garden. Start with your base colour, add the coral flowers, then dot on some white centers and green leaves!


Fairy: Gradients and marble effects are back in full swing. You can easily recreate this look with the use of a makeup sponge and complementing colours!


Fruity: I love graphic nails like these! They are so sweet you just want to eat them up! These would be super easy to do as well with a nail brush and dotting tool


Chevron: I like this funky take on the typical chevron pattern. Add some outlines and some dots to your candy coloured polishes for an almost tribal look! Fun!


What colours are your favourites for spring? You can read more from me on my blog, Wonder Forest. 


Introducing Remington’s NEW line of hair tools – Pearl Pro!

by Remington Ready March 11, 2013
Introducing Remington’s NEW line of hair tools – Pearl Pro! Experience high-end tools and salon-quality results, proven by stylists from all over the US.
 

The Pearl Pro Flat Iron delivers high grade salon performance. With 1” floating plates, it will give your hair a sleek and shiny result every time. The temperature lock and ready temperature alert will allow you to straighten your hair, at the right temperature for your hair type, avoiding any excess damage.


The Pearl Pro Hair Dryer is complete with a quality AC motor that lasts up to 3 times longer than traditional motors. This dryer has ionic conditioning capabilities that give you a shiny finish in a shorter drying time. With its narrow concentrator and lightweight and ergonomic design you can get a salon quality blow out in record time!


Learn more about our Pearl Pro line in the video below:


Must Haves for a Perfectly Primped and Polished Valentine’s Day

by Erica Jones February 11, 2013

When asked what my Valentine’s Day must have were, I had no idea! We are lucky if we can catch a meal at the local Olive Garden, let alone get dressed up and go out. Then I thought, how about I do something easy, something that would take the same amount of time as a regular look, but that had a little something extra. I feel as though when I’ve done something a little special, I feel more attractive, and whether he’s responding to the look or my feelings of attractiveness, I get a response from my honey.


I have been having a lack of confidence lately, as with the stress of grad school, I have been having significant hair loss (not fun or sexy, but true!) Luckily, about the time I’m having this very specific issue, L’Oreal comes out with a product for just that. The L’Oreal Paris Advanced Haircare Triple Resist Ultimate Strength Solution promises nourish hair and reduce hair loss due to breakage by 64%.


I love the smell of these products and that all three smell the same. The scent is not overly floral or fruity, but clean and not overpowering. The leave-in Treatment has a nozzle that allows you to get right into the roots and, to me, feels a little cooling. It also recommends that you massage the leave-in product into the scalp to encourage micro-circulation, which is a good tip for anyone suffering from hair loss.


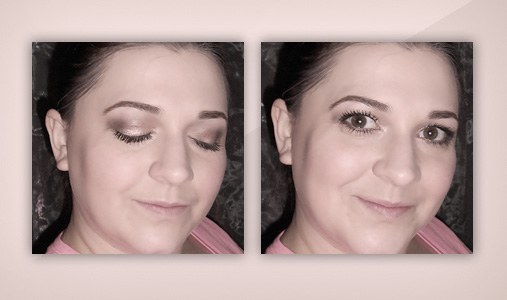
After I get out of the shower, I put the leave-in product in and then pull my hair into a loose bun while I do my makeup. The makeup I chose for this look couldn’t be easier.


I started with my Revlon Colorstay Whipped Crème Makeup in 200 Sand Beige (my winter color,) which I chose because it applies like a dream, has wonderful staying power and doesn’t need powder to set it or keep it looking great through the night. I then used a brand new product, the Starlooks blush in Cuty Peach, which is the perfect peach for a sweet, sexy flush on the cheek. I then did my brows with my new favorite brow product, the Tarte emphasEYES Waterproof Amazonian clay brow mousse, which I applied with the SOHO eyeliner brush that is the perfect strait edge for getting a uniform and neat brow line. The best part of this look is the eye palette, which I discovered recently and absolutely fell in love with.


This is the Lorac Unzipped Eye Shadow Palette. I have been obsessed with putting a midtone shimmering shade all over the lid and blending a dark matte shade into the outer corner and deep crease, and this palette gave me so many options to do just that. For this look I used Unreal all over the lid, blended Unspoken through the crease and Untamed into the outer V and lower lashline for a smokier look.  I topped off the look with two coats of Tarte Gifted Amazonian Clay Mascara and Revlon Balm Stain in Honey. The finished look came out better than I hoped!


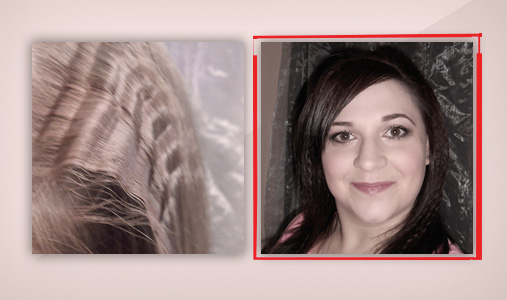
Finally, I took to the task of finishing my hair. I started by applying my Big Sexy Hair Root Pump to the roots of my damp hair and drying with a round brush. Then, employing a trick I learned from my stylist, Jacob Rodriguez at Alicia’s Salon who is Sexy Hair Demo Cut Certified and a Genius. He came back from a Sexy Hair event in LA with some awesome ideas, not the least of which was the return of an old friend from the 90’s – the crimper!  


Jacob told me how another stylist had used the crimper at the roots of various sections to add body and from root to tip on strand sporadically as a sort of accessory.  The crimped pieces in between strait pieces look almost like when we were doing hair feathers, but cooler!  


As you can see, the crimp really pulls the hair away from the scalp and adds body.


While the interspersed crimped pieces add variety of texture and looks amazing!  So here is the final look with hair an makeup!  I love how everything came together and it looks totally fresh, romantic and a little edgy!


A huge thanks again to Jacob for not only the cool hair idea but for the amazing color!


You can read more from Erica on her blog, Erica's Primp and Polish