Index Background

What’s In My Makeup Bag

by Adina Zilberman January 28, 2013


If there is one question that I am always asked as both a makeup artist and beauty blogger, it’s what items I simply can’t leave my house without. From too many lipglosses, to the odd ball essentials, here are my purse must-haves.


L’Occitane Shea Butter Hand Creme

Especially during these cold, dry months of winter, a great hand cream is a purse essential. I love L’Occitane’s original shea for its ability to leave my hands baby-smooth, supple, and ready to tackle whatever the weather may throw my way. 


Murad Pomegranate SPF Moisturizer

No matter the season, two things that are essential to this visage of mine are hydration and spf protection. No matter that it isn’t hot out, and that I spend most of my day indoors, I need sun protection for this pale face, to not only protect against aging and sunspots, but also against those harmful rays of the sun. 


Urban Decay 24/7 Liner in Perversion

If there is one cosmetic item I always have handy, it’s a great pencil eyeliner in blackest black. On those days when I want to go from work to play, a swipe of black liner is all it takes to get me party ready. 


Hair Ties

When your hair is curly and near waist-length, as mine is, things can quickly get out of hand. Enter the classic hair tie, which becomes an invaluable tool in the fight against wayward strands.


Other items may come and go, but these are my tried and true purse staples. 


Read more from Adina on her blog, Krasey Beauty 

2012 Year in Review

by Remington Ready December 31, 2012

As the year winds down today, it is always fun to look back on the year and all the trends that surrounded us. With fashion and hair always revolutionizing, each year brings us new and exciting things to look forward to. Here are the trends that defined 2012, and next week look for our guest blogger from Vanilla Fringe, giving us some insight into the trends that are here to stay for 2013. 


The Ballerina Bun: the ballerina bun defined hair in 2012. With its simple and sleek look, every girl tried this style out a few times. It even got trendy renditions as the year went on.


The Peplum Top: this girly and flirty top seemed to be all the rage this year. The trend floated over to skirts and dresses, making it a must have in any girl’s closet.


Faux Fur: whether it’s a fur vest, a fur coat, or a fur scarf. Fur was everywhere this year!


Loafers: loafers definitely made a comeback. From Target to Gap, every major store was carrying loafers in solid colors, patterned designs, and crazy textures. 


Ankle Booties: ankle booties are all the rage. Every store had so many styles to choose from it was hard to find a go-to pair! 


How to Protect Nails, Hair & Skin from Winter Dry Out

by Beth Hamilton December 3, 2012

While San Francisco doesn’t get the coldest of cold winters, we definitely had a temperature drop around mid November that called for a beauty regime change. This year, one day it was 80 degrees, and the next it was 50. Brrr. The cooler, dryer temperatures call for a switch to thicker lotions and creams and a careful exfoliation of that dry, flakey skin. Here are a few of my favorite winter products to protect your nails, hair and skin:


1. Bliss 24-'Heaven' High Intensity Healing Balm

This powerful body butter is all you need to cure dry hands, feet, legs, elbows, knees, and everything in between. It is super thick and luxurious, sure to banish your winter blues. I slather it on my feet and hands before bed and wake to soft, subtle skin. The secret is that it not only has strong moisturizers like oatmeal, shea and cocoa butter, but it also has lactic acid, to help exfoliate and slough off those dead, dry skin cells. Bliss 24-'heaven' high intensity healing balm is available at Sephora, sephora.com, Bliss Spas and on blissworld.com for $35 for 8 oz.


2. Davines MOMO Shampoo and Conditioner

This pair of Davines’ MOMO shampoo and conditioner is sure to banish any dry, brittle locks you might experience during the winter months. I love this Italian line of hair products and dyes because they are not only natural but aimed at performance, not just being earth friendly. Davines’ moisture-rich MOMO shampoo and conditioner contain natural ingredients to restore the depleted elements dry hair needs. The shampoo contains vitamins C, B, and PP to protect hair, sweet almond proteins to hydrate and restore body, and olive ampho acetate to non-aggressively clean, leaving it soft and silky. The MOMO Conditioner contains milk thistle oil, panthenol and jojoba oil to moisturize, soften and add shine without weighing down your hair. MOMO is available at fine salons or on barneys.com for $24 for 250ml  for the shampoo and $10 for 75ml for the conditioner.


3. l’Occitane Shea Butter Hand Cream

One of the first signs of winter for me is using lots and lots of hand cream. I find come mid November, my consumption of the stuff goes up two or three fold. The hand cream I continue to buy over and over again is l’Occitane’s original Shea Butter Hand Cream. It is my standby, no matter how many new and fancy hand creams I try. I love the size of the tube, since it fits easily into a small or large purse. But just because it is small, doesn’t mean it doesn’t last, a little of this rick cream goes a long way to soften my hands and cuticles. I am always tempted by the variety of scents l’Occitane releases each year in their hand cream collection, but I always end of preferring the original shea butter formula. It smells hardly at all, so your cubicle mate won’t be offended, and it seems to be the thickest and longest lasting of the bunch. You can buy l’Occitane Shea Butter Hand Cream at your local L’Occitane or Sephora store or online at loccitane.com or sephora.com. It is $10 for 1 oz.


4. Lumene Sensitive Touch Instant Relief Serum

If you are like me, colder weather brings irritated skin. No one looks good with a red blotchy face, often due to constant temperature changes (inside warm, outside brrrr) and dryness. Lumene’s Sensitive Touch Instant Relief Serum is my answer. I use this serum every morning, after I wash my face and before I put on a moisturizer (with sunscreen of course… even in the winter you can’t forget your SPF!). It calms any irritation my face might be experiencing and feels gentle and soothing in the process. No to mention this serum is free from alcohol, colourants, perfumes, parabens, paraffins and silicones. You can find Lumene Sensitive Touch Instant Relief Serum at your local drugstore or on dermstore.com for about $19.99 for 1 floz.


5. Algenist Triple-Action Micropolish & Peel

With all the dry skin you experience in the winter, moisturizing isn’t the only answer. You must exfoliate! This microdermabrasion peel by Algenist contains a 10 percent acid duo - patent-pending alguronic acid and glycolic acid.  That, in combination with a 10 percent fruit enzyme complex and micro polishing crystals helps to transform your skin from dull winter to bright and clear. The formula exfoliates and resurfaces, improving texture and tone for smoother, brighter, more radiant skin. I think I’ve found my favorite exfoliator in this tube. It is so powerful, and yet doesn’t irritate my skin at all. I use it in the shower twice a week or so and am thrilled with the result. Algenist Triple-Action Micropolish & Peel is available at Sephora and on sephora.com for $75 for 2 oz.


Well, there you have it. A few products to keep your winter skin from drying and dulling-out. Stay vigilant and you’ll last through till spring, I promise you.


Winter Lovely!


See more from Beth at Beauty Junkie in SF

Feel Good for Fall

by Alexandra Machover November 5, 2012

Getting out of bed in the morning can be a much more challenging task as the seasons change during this time of year.  In order to avoid dreading the day, I’ve made it my goal to figure out how to look and feel as warm as possible even as the weather gets cold.  So without further ado, let me show you how to keep your mind, body, and soul fabulous all year round:


1. Keep your summer glow in the healthiest way possible


The first thing that always reminds me summer has come to an end is when I see the glorious tan, which I worked so hard to achieve, fade right before my eyes. If you’re like me and prefer to maintain some sort of color (sans tanning bed), then you’d probably appreciate this first tip.  Here are some of the products I have found mimic tans most successfully.


LORAC’s TANtalizer is the perfect product for those of you who realize you’re looking particularly translucent right before going out.  This make up instantly bronzes with tanner for those skin tones that tend to become orange with a more long-lasting product.  Since this is a makeup, it washes right off at the end of the night and won’t leave you with any unexpected bronzing malfunctions a lightweight formula that doesn’t streak and looks completely natural.  It is the ideal self-tanner. 


For those of you who think ahead of time, ST. TROPEZ’s Everyday Gradual Tan is the product for you.  You can slowly build your tan over time, without worrying about becoming orange.  This advanced formula creates the most natural tan I’ve witnessed.  Not only does it nourish your skin with aloe vera, but also it has barely any self-tan odor, which is always a plus in my book. 

This next product is on the top of my “cannot live without” list.  I posted Benefit’s Moon Beam on my own blog to publically exclaim its excellence, and felt the need to endorse it one more time.  This iridescent highlighter instantly enhances your complexion in the most glorious way possible.  Use it with or without powder to add the perfect amount of sheen to any skin tone.  


2.  Energize your wardrobe


Recycle your summer neons for fall to keep a fresh, fun wardrobe.  Pair a chiffon neon shirt (like this one from nastygal.com) with your favorite cargo pants for a vibrant take on a fall classic.  A bright pink clutch adds a summer flare to any outfit.  Wear it with skinny jeans and a leather jacket to remind yourself that just because the summer is over, doesn’t mean you’re limited to wearing shades of brown.   A more subtle pop of color can be achieved with a neon belt.  Wear it with trousers and a silk blouse to amp up your work attire and shine some light into your office.


Another summer trend that won’t be fading too quickly is bold floral patterns. Wear these from your head to your toe, add some leather accents, and voilà, you have the perfect juxtaposition of two seasons.   


3. Accessorize with statement necklaces


Go big or go home with your accessories.  Take risks with what you choose to embellish your outfit with.  Statement necklaces are one accessory that can add visual interest instantly.  They are arguably the easiest solution to turning an “okay” outfit into something extraordinary.  Just because it’s fall doesn’t mean your outfits need to be drab and dull!


See more from Alexandra at Spur of the Moments


How To Stay Chic While Traveling

by Dana Fox October 29, 2012


With the cold weather creeping up, vacation season is in full force! The most difficult task can sometimes be trying to decide what to take with you on your journey and how to stay fashionable at the same time. So how can you stay chic while traveling without packing a trunk load of items? 


Organize your outfits ahead of time


Try to choose items that can be worn multiple times in different ways. Your shoes can make or break an enjoyable experience, so I suggest starting with your feet! Choose two pairs that can be styled easily with your clothing, and don't forget to pop a bottle of nail polish into your purse, especially if one of your choices is a cute pair of sandals! 


Dresses to impress


Dresses are the easiest and most versatile pieces of clothing ever! They can transition from day to night with just a swap of your shoes and accessories. Choose dresses that can be dressed up or down, and alternate from patterns to solids. 


Sunglasses


Not only are they a necessity when visiting a sunny location, but sunglasses are a great accessory for hiding jet lagged eyes! Instant chic!


Scarves, your new best friend


Accessories barely take up any space in your luggage bag, so go all out! Scarves can be worn so many different ways, the options are pretty much endless. They are perfect for your hair, worn around your neck, or attached to a purse!


Hobo bags


You're going to need some place to stuff all of your finds and carry-on items into. Make it big and chic! A hobo bag is the perfect vacation accessory, and when paired with simple pieces like a dress, sandals, and sunglasses, you'll feel like the most stylish traveler on the sand!


Swim wear 


Packing your favourite swim suit for the beach can be easy, but what about the journey from the beach to the bar, or from day to evening? Take along a cute coverup or maxi skirt and some beach friendly accessories like a sun hat!


Don't neglect your hair


Traveling to different countries can mean unexpected surprises when it comes to hair. Don't let the heat turn your gorgeous locks into a frizzy fiasco. You don't want to spend all of your vacation time fussing over your mane, so why not make things a little easier and take along some tools of the trade? The Remington Wet 2 Straight flat iron would be perfect for taming unruly locks after a swim! If you're lounging near the sea, you can even give your head a dip in the water, scrunch, and let dry for an instant beachy wave!


How do you stay chic while traveling? You can read more from me on my blog, Wonder Forest 


Halloween Makeup Tips and Tricks

by Erica Jones October 22, 2012


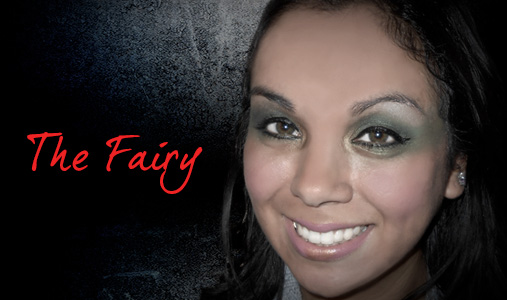
The Fairy!


Anytime I do a fairy, I love to take the shadow out onto the temple.  It gives an illumination to the eyes that looks like the perfect supernatural lighting!  Also, don’t be afraid to take the shadow pretty high, so that it connects naturally with the color on the temple.  Lastly, I love to use a super shimmery color in the inner corner and under the brow.


Mix up the type of fairy just by changing the colors.  This green would work for a woodland fairy or Tinkerbell, but switch it up with a purple or pink to match your outfit.  In this case matching your eye color to your outfit is recommended rather than frowned upon!


Products used: Urban Decay Primer Potion, NYX liner in 920 Lime Green, Urban Decay Matte Shadow in Chronic and Bender and Midnight Cowgirl from the Book of Shadow IV, Urban Decay Powder Blush in Quickie, and Loreal Voluminous Carbon Black.
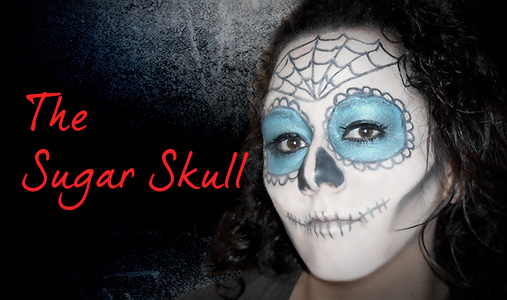


The Sugar Skull


I’ve noticed a lot of sugar skulls around this year for Halloween.  Technically the sugar skull is part of the Dia De Los Muertos Celebration, in which Mexican families celebrate family members that has passed away through alters.  This is a popular makeup worn during the celebration, but since it looks like a skull has become a popular look for Halloween this year also and is generally paired with traditional looking Mexican outfits.


My best tip for this look is to mix some very light colored foundation with the white cream makeup, as I have found it impossible to blend shadow over the white cream makeup alone.  Also, to get a vibrant color on the eye, I used a Cream Shadow pencil to prep the area.  The best thing about this is that once you get the basic shape, you can use whatever colors or elaboration that you want!


Products Used: White cream makeup from the Halloween section, Revlon Photoready Foundation in 004 Nude, Too Faced Liquid Lava Gloss Super Black Liner pencil, Urban Decay Hijack and Crystal from the Book of Shadows IV, Rimmel Matte Black shadow, and Loreal Voluminous Carbon Black.
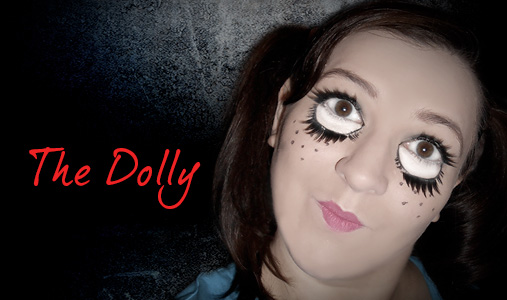


The Dolly


Another popular look with the Dolly or baby doll.  For this look, the key is to make your eyes look unnaturally large!  I started with making my face look as flawless as possible, porcelain like.  I used a ton of concealer to cover all the redness in my cheeks.  Everyone does the extension of the lower lid a bit different, but I just follow the orbit of my eye on the bottom to ensure they’re even.  I then took large lashes and placed then on the new lower lashline and upper lashline, added freckles and pink lips, and of course pigtails!


Products used: IT Cosmetics Bye Bye Undereye Concealer, Revlon Photoready foundation in Nude, Revlon Colorstay liner pen, generic costume lashes, NYX lip liner in Pinky, and Loreal Voluminous Carbon Black.
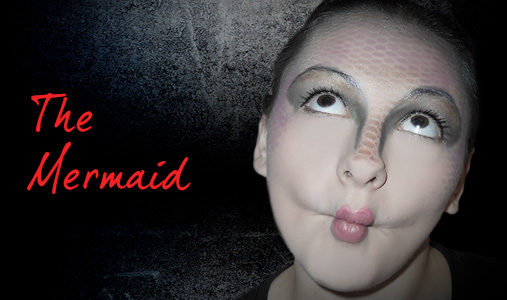


The Mermaid


There are all kinds of mermaid looks out there, but I wanted mine to look as fish-like as possible.  I used a liner to draw out the shape of the eye and then used aquatic-themed colors to create the look.  The most attention grabbing part is, of course, the scales on the forehead!  To achieve this I used a fishnet stocking pulled over the face and stippled my shadow over it so that what was left when you removed the stockings was a scale-like design.


Products used: Revlon Photoready foundation in Nude, Revlon colorstay pen liner, Urban Decay shadows in Blue Bus, HiJacked, and Baked from the Book of Shadows IV, NYX liner in Lime Green, Loreal Voluminous Carbon Black, and a generic pair of fishnets.


The Zombie


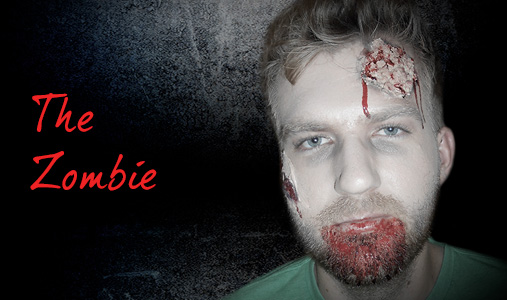
This was my favorite of the looks, and I actually think I convinced my handsome model here to change his own costume to this, because it came out so well.  I started with getting the woulds together.  I had decided that he would have an open ash on his cheek and his brains coming out on his forhead.  For the would I used toilet paper (which was a little thick – I think next time I’ll use tissue) and saturated it in face-safe glue.  As I placed the tissue I wrinkled it up so it looked like slashed skin and I pulled a hole in the middle.  For the brains, I barley wet some unflavored, unsweetened oatmeal just enough to make it sticky and mushy.  I then glued that to the forehead and allowed everything to dry.  Once it was all dry I used a light colored foundation and put a matte dark shadow under the eyes, following the natural lines of the eye.  I also used the same shadow to shade the outer edges of the gash and around the brain spillage.  I took a peach shadow and put that over the brains.  Then it was blood time – I placed blood dripping out of the wounds and all down Travis’ chin, so it looked like he had been feeding.  A note with the blood, it will stain, skin, clothes, everything, so be careful.


Products used: Toilet paper, oatmeal, lash glue or liquid latex, Revlon photoready, Manly palette, generic blood gel from Halloween store.


These are a few of the look I’ve created this year and I hope you can take these tricks and apply them to make your own spooky, sexy or just plain fun looks!


A quick word of thanks to all my lovely models, Christina - my fairy, Lauren - my sugar skull, Alyssa – my mermaid (and sister) and Travis – my zombie!  You guys were awesome to let me paint you up for the evening.


Until Next Time, Happy Spooky Primping!


See more from Erica Jones at EricasPrimpandPolish

Steal Mila Kunis' Smoky Eye Look

by Adina Zilberman August 6, 2012


Ukranian bombshell and Hollywood Starlet Mila Kunis is a stunner, to say the least. With her flawless skin, impeccable bone structure, and naturally exotic beauty, her face is a canvas that takes any beauty look beautifully. During a recent premiere event for her new movie, “Ted”, Mila stepped out with one of the most flawless looks that I have seen to date, executing a perfect smoky eye and pale lip combo that any beauty girl can get behind. Keep reading to learn how you can achieve Mila’s classic smoky look, all on your own.


Smooth, even-looking skin is easy to achieve, if you know the proper tricks. Get a flawless, airbrushed-quality complexion, like Mila’s, by using a duo fiber foundation blending brush to apply natural (read: dewy) liquid foundation to the entire face. Paint the product on using short, rounded strokes, and always be sure to blend in the direction of your facial hair. To contour, simply grab a fluffy powder brush, dip it into a powdered foundation that is 1 to 2 shades darker than your own complexion, and apply along the cheekbones, temples, and below the jawline. Then, apply just a hint of rose blush to the apples of the cheeks, blending upward toward the temples, and a sprinkling of a soft, sheer highlight on the bridge of the nose and on the forehead.


To get Mila’s show-stopping smoky eyes, start first with an application of shadow primer on the eyelids. Next, apply a soft golden beige eye shadow from the lash line to the crease, focusing on the inner corner of the eye. Grab a pencil-shaped eye shadow brush, and dip it into a blackened-brown eye shadow (preferably matte). Starting at the outer corner of your eye, proceed to draw an angled line from outer corner to the inner. Adjust the shape to fit the natural curve of your eye, exaggerating the angle slightly at the outer corner of the eye, and underneath the lash line. Blend with a fluffy shadow brush, to diffuse harsh lines. Follow this up with black liner, smudged into the waterline and the lower lash line, and two coats of volumizing mascara, to complete the look.


Keep the lips simple, so as not to overwhelm. A soft, pink lipstick was Mila’s choice, and should be yours as well. The effect is soft femininity to the eye’s rockstar quality.


And there you have it, the quick and easy on how you can look like Mila Kunis. What do you think? Will you try the look?


by Adina Zilberman of Kraseybeauty.com


How a San Francisco Beauty Junkie Preps for Summer

by Beth Hamilton May 21, 2012


San Francisco does not have your stereotypical California summers. We often have nicer winters and falls than we do summers, as Mark Twain famously pointed out, it can get down right cold and foggy here in the summer. But you never really know. Starting in about April, it could be 75 degrees one day and 55 the next.  It sounds frustrating, but it is also exciting in some ways. I am always on my toes…and always wearing layers.


Being a self-professed product whore, there are a few items I reach towards and keep on hand as the weather heats up and then randomly cools back down, in this fair city of mine.


1. ME! Bath Shower Sherbet Exfoliating Sugar Scrub:
This body scrub is perfect for sloughing off my dead skin cells that winter left behind to reveal a smoother, sweeter me. I love the scent Summer Rain, it is very fresh and clean.  It is hard to describe really, a bit citrusy I guess. It is one of those sugar body scrubs that leaves a bit of oil behind on the skin, which I love. It leaves my skin feeling super soft and subtle. Plus, it comes in an adorable little sherbet pint container and looks good enough to eat… but I recommend sticking to eating ice cream flavors at Bi-Rite.

READ MORE read more

Shamrockin’ it: How to Wear Green With Style for St. Patty’s Day

by Kelly Glenn March 12, 2012

It’s almost St. Patrick’s Day--are you planning on wearing green?


Dress in Style for St Patrick's Day


Erin go Bragh! I love St. Patrick’s Day--I mean, how can you not when there are so many hunky men with Irish accents. Think Colin Farrell or Gerard Butler--who’s actually Scottish but have you SEEN P.S. I Love You. So sexy, right?


Anyway, now that I’ve graduated college I have decided that my normal St Patrick’s Day style (drinking green beer and Irish car bombs--which I highly DON’T recommend, and throwing on whatever I could find that happens to have green in it) could use some amping up. What better way to celebrate the luck of the Irish than to embrace the green--here’s how to do St. Patty’s Day chic-ly:


A Pop Of Green

I picked 3 different outfits to show how you can rock the green anywhere, whether you’re going for green at the office or headed for a lucky cocktail hour after work.

I chose to go with one bold green piece in each outfit then pairing it with neutrals, because really--no one wants to look like an extra from the movie Leprechaun no matter what day it is.

Jewelry is a great way to add some subtle fun to the outfit, above I picked a clover key necklace, a gold coin necklace and a Claddagh ring; each subtle pieces that have Irish charm, yet can be worn any day of the year.


Add Some Neon

If you’re feeling a little more daring, St. Patty’s Day is THE perfect time to add some neon (one of spring’s hot trends) into your wardrobe. The key with neon, again, is to pair it with neutrals like nude so as not to over do it.


Minty Pale Pastel Nails

We all know how much I love painting my nails for each upcoming holiday. My favorite greens for the occasion are minty pale pastel greens like MAC’s Peppermint Patty and Essie’s Mint Candy Apple.

You could also go for a bolder green like OPI’s Fresh Frog from the Muppet’s collab. It practically SCREAMS St. Patrick’s Day.


Finishing Touch

Lastly, to finish of the perfect chic St. Patty’s Day outfit, I recommend a spritz of one of my favorite “green” scents like Demeter’s Clover--a scent that elicits the rugged and untamed nature of the Irish countryside with grassy notes and a hint of Irish spring soap.


Got any fab plans for St. Patty’s Day? Let us know! xo

Kelly

Back to Basics: Brushes

by Remington Ready March 5, 2012

Back to Basics

Sometimes everyone needs a 101 course on beauty basics, because let’s face it, bits of information slip through the cracks. So the main lesson today will be that, like makeup brushes, not all hair brushes are created equal.


1. Cushion Brush: Create smooth touchable hair or use with your blow dryer for a punch of volume. These brushes are best for detangling dry hair (remember – it is always best if wet hair is detangled with a wide toothed comb!)as it conforms to the shape of the scalp and its cushion helps absorb some of the shock that can damage delicate hair.


2. Paddle Brush: Similar to the cushion brush, this fella is a great detangler, especially for long hair. Because the brush head is so wide, it can penetrate thick hair and its bristles provide a gentle massage and spreads hair’s natural oils, leaving you with a smooth and shiny finish.


3. Vent Brush: This brush is a beginner’s bff. It’s basic and can help you dry your hair quickly if used with a blow dryer. The large holes, or vents, running through its back help hair circulate when blow drying.


4. Round Brush: Perfect for adding va-va-volume or for a DIY blow-out. The barrel is specially designed to allow air to pass through helping to accelerate your drying time, while its large size allows you to lift the roots, giving hair more body.


5. Grooming Brush: Last minute touch-ups are dominated by this little gem! The grooming brush is designed to add a shiny smooth finish to hair and rejuvenate any hairstyle throughout the day.


What brush do you use every day?


♥ Remington Ready