Index Background

Coachella Inspired Hairstyle

by Alex Gaboury April 22, 2016


Hi my name is Alex, (just Alex, my parents kept it short and sweet) and I have a channel here on Youtube where I share my love for hair, beauty, and my pup named Sophie. Since festival season is amongst us I thought I would share with you a simple Coachella inspired braided hairstyle that can be easily personalized to reflect your style with fun hair accessories. Now this hairstyle would not be possible without the help of my Wet2Dry straightener which has easily become one of my favourite hot tools for my hair. I would love to hear which hair accessory was your favourite, or even better, if you will be attending any festivals this year, let me know in the comments below.
xo Alex


See more from Alex on her Youtube Channel


Learn more about the Wet2Straight Straightener

Easy Flat Iron Curls

by Lauren April 12, 2016

Hi my name is Lauren and I am obsessed with beauty, all kinds of beauty not just skin deep but all of it. Today I show you how I style shoulder length hair, more commonly known these days as the lob. What I will be doing is a messy look using the Remington UV Ceramic Flat Iron to achieve very effortless curls. I hope you guys like it and are inspired to try it.


See more from Lauren on her blog Lauren O Lauren

Straightening Natural Hair Tutorial

by Naomi March 28, 2016


Hey Everyone! I'm Naomi from the YouTube channel liveloveGlam and I'll be showing you how I flat iron my natural hair. I have super curly hair and getting it straight has been a trial and error process. So it's nice to have found a method and products that work really great! I hope you enjoy this video and find it to be helpful! xo


Learn more about the UV Ceramic Flat Iron


Elegant Updo Tutorial

by Tiffany Lee February 1, 2016


I’m Tiffany Lee, a celebrity hairstylist and makeup artist, taking a moment as a Remington Ready Guest Blogger! On my channel, you will find anything beauty related such as makeup tutorials, hair tutorials, swatches and reviews, and fashion related videos! Today, I’m sharing the how to create a Romantic Loose Updo using the Simply Wrap n Go Curling Wand.


See more from Tiffany on her Youtube Channel


Learn more about the T|Studio Silk Curling Wand


Bohemian Curls Tutorial

by Busola January 15, 2016


Happy New Year everyone! My name is Busola Coutts and i am a guest blogger today on Remington. It is a new year and that always marks a time for new beginnings, new changes or just an excuse to have something new.
Hair is always one of those things i consider when i want a significant change, especially with my look. So today, i will be sharing a few quick and easy steps of how i went from straight hair to medium shag curls with a bohemian touch to it.


What you need:
1. Remington 2-in-1 Curling Iron
2. Remington Hair Clips. This is a complete set with two different hair clips and bobby pins in gold and silver.


Step 1: First, turn on the curling iron to start getting hot while you work on your hair. Pull out a few strands of hair on both sides and braid. Hold up hair that may be in the way while you braid by using the Remington bobby pins in the hair clip pack.


Step 2: You can either start from the sides or the back twisting a few strands of hair together. Then curl the twist with Remington curling iron set on 30 degrees.

Continue with this step by working your way to the top. Remember to leave out the fringe if you have one and if you don't you can easily get one by trimming your hair in front (only if you are comfortable with that) or you may just leave it as is.


Step 3: Once you have curled the entire hair except for the fringe start taking the curled up twists apart with your fingers. If you don't have a fringe you can always curl your entire the same way.

Then simply run your fingers downwards through your hair to loosen the curls to achieve that shag do. For more loose curls, gently brush it out with a wide comb hair brush.


Step 4: Time to pin down the individual braids on both sides to the back of the hair. You can have the braids slightly below the center of the back of your head which I prefer...

Or you can pull it even further down low. It depends on how long and how far your braids can go to meet in the middle.

After securing the braids in place, I pulled out a little bit of hair over the point where the braids meet and I locked them down with the Remington triangle hair clip for a trendy and stylish look.


The Final Result


The shag hairstyle has been and will always be a hot and trendy hair-do especially now. It is easy to maintain, very daring and great for a night out with friends or for that every day chic look. For more helpful hair tips, check out my blog in www.thefashionstirfry.com


Learn more about the 2-in-1 Curling Iron

The hair clips are available at Target


Elegant Updo Tutorial

by Isabel Victoria January 7, 2016


Hello everyone, I'm Isabel and in this video I am showing you how to create a super simple, yet elegant and chic, side-swept up do! First step is to curl all of your hair using Remington's 1/2-1 inch T Studio Silk Ceramic slim curling wand! You should end up with bouncy, tight, and fun spiral curls! Then, taking the Simple Twist styling pin, you will create the simple side twist! Add a braid or two, curl some loose pieces, and you're done! This hairstyle is so simple, yet looks intricate enough to be professionally done! This is the perfect look for you sophisticated girls out there to sport at this season's holiday parties! I know you will all feel gorgeous wearing it!


See more from Isabel on her Youtube Channel


Learn more about the T|Studio Silk Curling Wand


Learn more about the Simple Twist Styling Tool

#SmokeySleek Tutorial

by Evie December 16, 2015


Hey Everyone! This Evie from LongHairPrettyNails and I'm today's guest blogger for Remington. In this video, I'm going to show you how I created this #GlamorousMe sultry smokey eye makeup look with nude lip. I'm also going to show you guys I achieved this side braid sleek hairstyle using the T|Studio Protect Straightener. It's easy and perfect for the holidays! I really hope you guys enjoy this tutorial. To see more beauty content and tutorials, head over to my blog LongHairPrettyNails and my YouTube channel LongHairPrettyNails


Learn more about the T|Studio PROtect Flat Iron


#GlamBlowOut Tutorial

by Kim December 11, 2015


Hello everyone and welcome!

I am introducing my self to you all as Remington's Guest Blogger, Kimberly from the youtube channel, Kimkreations P. This look features the Glamorous Me #GlamBlowOut hairstyle, a vibrant red lip and a classic winged liner that will suit everyone! It's definitely what I like to consider a staple look for any occasion whether it be festive or even casual! Hope you enjoy and have fun recreating this look! Happy Holidays! xoxo


Learn more about the T|Studio Silk Dryer


#SmokeySleek Tutorial

by Sonja December 7, 2015


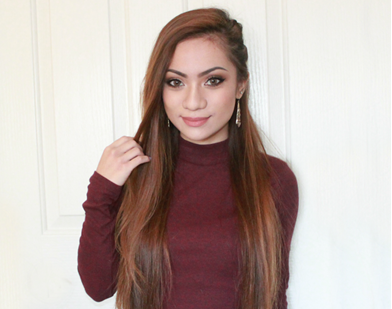
I partnered with Remington once again as part of their Glamorous Me campaign for the holidays! This campaign is all about getting glammed up for the season, so I came up with an edgy, sleek hairstyle and smokey makeup look for you guys to rock at Christmas parties and New Year's Eve, so keep reading for a quick hair and makeup tutorial, as well as my thoughts on Remington's Ultimate Finish Straightener!


The Remington Ultimate Finish Straightener® has double the tourmaline, which combines with the ceramic plates to reduce frizz and keep your hair soft and healthy. The plates provide heat protection as well and enhanced shine with micro-conditioners that transfer to your hair during straightening. 


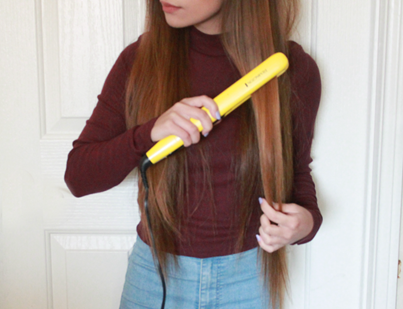
I've been using Remington flat irons way before this collaboration, but this one definitely beats all the ones I've owned. It heats up super quickly and really does leave my hair soft and shiny, which is difficult to achieve with heating tools given how damaged my hair is. As you can see, my natural hair is incredibly dry and frizzy, but the straightener makes it look as if I applied an oil-replenishing product!


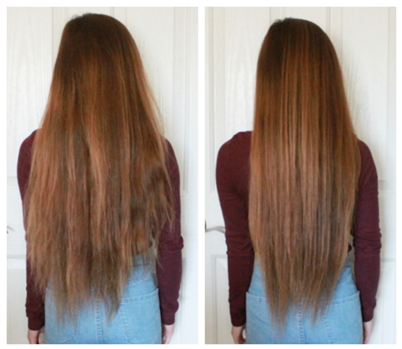
Since I didn't want to just keep my hair straight for such a special occasion, I did a little side twist-braid to add an edgier touch to the look. You simply take 3-4 small sections on either side of your hair and twist each section as tightly as you can to achieve a faux side shave. Now onto the makeup!


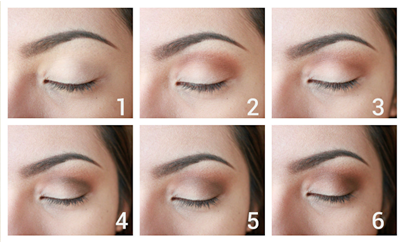
1. Start with a skin-toned base eyeshadow and apply it all over the lid and brow bone.


2. Use a fluffy brush to apply a burgundy eyeshadow all over the crease.


3. Blend harsh edges using another clean eyeshadow brush.


4. Define the crease with a dark brown shade.


5. Blend harsh edges, making sure to stay right on the crease.


6. Apply the same burgundy eyeshadow previously to intensify the color.


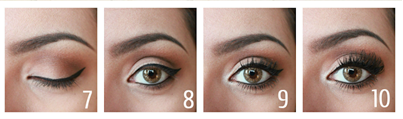
7. Draw your usual winged eyeliner.


8. Apply gel eyeliner on the top and bottom waterline and add the same dark brown eyeshadow right under the lash line.


9. Curl and apply mascara to lashes and add a highlight shade on the inner corners and brow bone.


10. Apply your favorite set of falsies (optional).


I also went for a matte nude lip color (NYX Matte Lip Cream in Stockholm) to draw attention more to the smokey eyes.


And there you have it - a smokey & sleek look that's perfect for the holidays! Feel free to try it out for whatever special occasion you'll attend this month, and most definitely have a great time during this season with loved ones! If you haven't already, check out my previous collaboration with Remington here.  


'Til next time!

xoxo,


http://simplestylings.blogspot.com/

Fall Hair and Makeup Tutorial

by Becca Leah November 23, 2015


Hi everyone!

I'm Becca and I'm a guest blogger here on the Remington Channel. I create beauty and fashion videos over on my Youtube channel (Becca Leah). In this video I show you how I get ready for a Fall day by using my 2-in-1 Curling Iron by Remington. For this look, I created a smoky eye with a bold dark purple lip to add some fall colors into my normal makeup routine. This 2-in-1 Curling Iron is so easy to use and it leaves my hair looking voluminous. The curls last all day!


Buy your own 2-in-1 Curling Iron here