Index Background

DIY Ombre Manicure

by Danielle Arsenault July 21, 2014


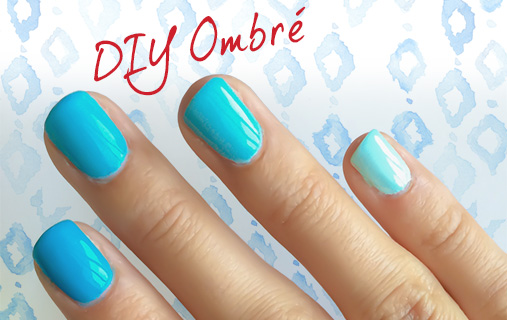
Hi there!  I'm Danielle from For the Love of Leopard, a Fashion Blog that chronicles my daily outfits.  I'm so excited to be guest blogging here at Remington Ready.  Today I'm going to show you how to achieve an ombre manicure at home.  And let me tell you, it is as easy as can be!


Here's what you'll need:

*  Base coat (I like Gelous - you can get it on Amazon)
*  Bright summer hue (I'm using Essie "I'm Addicted")
*  Any white nail polish
*  Wax paper
*  Bobby pin
*  Fast dry topcoat (my absolute favorite is Seche Vite)


1.  First thing you want to do is create the perfect canvas for your nail polish, so give them a quick swipe with nail polish remover to remove any oils so the polish really sticks.


2.  Start with a thin coat of your base and allow it to fully dry. 


3.  Apply your bright summer hue (in my case, Essie "I'm Addicted") to both of your thumbs.  This is going to be the darkest shade of your manicure.


4.  Using the nail brush place about 5-6 drops of your bright hue onto the wax paper.  Then add one drop of your white polish to the bright hue and mix thoroughly using your bobby pin.  You will now have a slightly lighter shade of your bright hue.  Apply to both of your pointer fingers


5.  Place another drop of the white polish into the existing polish on the wax paper and mix thoroughly.  This should be two shades lighter than your original color.  Apply to both of your middle fingers.


6.  And so on and so forth - keep adding drops of white and mixing into the existing polish, creating a slightly lighter color with each white drop.  You're most likely going to have to do another coat, so just follow the same process as above, with a new batch of color.


7.  Finish off with a swipe of fast dry topcoat and enjoy all the compliments you will receive on this mani!


To read more of Danielle's beauty and fashion secrets head on over to For the Love of Leopard!

Category: Beauty | Tutorials

Tags: , , ,

7 Days Of Braids

by Remington Ready June 23, 2014


Summer heat, summer festivals, and summer nights-- no matter what's on your agenda for the season, a braid can make your hairstyle complete. Check out these trendy styles and find one that's right for your summer venue!


Makeup Trends For The Summer

by Jessica Fay June 10, 2014


When we think of summer makeup, we think fresh, neutral and natural. That being said—the winged liner look is very in trend right now and just because you want to look natural doesn’t mean you have to cut it out. Today’s tutorial shows you how to keep the skills you have worked so hard to master, as in the wing, but keeping it understated and beautiful! Having such minimal eye shadow actually makes your wing stand out even more! It also tends to look a little bit cleaner! Spice up your neutral look with a bright lip for a pop and your ready to go!


For more makeup and fashion advice, head on over to Lipstick, Heels, and a Baby!


Get Three Styles With One Accessory - The Flower Clip

by Remington Ready April 29, 2014

Today we here at Remington are introducing our new blog segment: 1 Accessory - 3 Ways!  Once a month, we will show you how to style our hair accessories not just one way, but in three uniquely different styles! Why buy multiple hair accessories when you can use the same one, and style your hair differently each time? Make your mornings easier, go easier on your wallet, and create great looks almost effortlessly.


Our first feature is a ribbed, ivory flower for the Spring. Not only are they great for an everyday glam look, but they will finish off any wedding hairstyle beautifully! You can purchase your own flower right here.


How To Create The Perfect Natural Waves

by Jessica Fay March 3, 2014


As a hairstylist for 7+ years I have tried almost every curling iron and wand out there at least once! The Tear Drop Remington Iron has completely blown me away! I closed-mindedly thought that my curls would turn out the same from this wand, as they do most other wands, but thankfully I was very wrong! They had such a beachy and textured effect to them, I absolutely loved it! They steps to achieve this look are as followed:


What you will need:


Tear Drop Remington Wand

Boar Bristle Brush

Teasing Brush (optional)

Small clips


1. Spray a heat protectant all over hair and brush out any product left from the day before.

2. Take the Remington Teardrop Wand to begin curling. Make sure to use glove, to avoid burns. Start in the front of your face and curl one inch sections away from your face.

3. Catch curl as you remove it from the wand in gloved hand and roll back up to your scalp.Use a small clip to secure it in the roll to your scalp until it is completely cool.

4. Remove the pins and brush out the curls with a boar bristle brush.

5. Place your hair where you want it to stay and spray with a medium to strong hold hairspray.

6. Go outside with your beachy curls and enjoy the warm sunshine!


You can see more from Jessica on her blog, Lipstick, Heels, and a Baby

Create Soft Larger Than Life Curls

by Remington Ready February 10, 2014


Introducing … Remington’s Ultimate Stylist Big and Bouncy Air Styler!


The Big and Bouncy Air Styler is one of a kind. With its unique design, you can create sexy, soft curls. Complete with three jumbo rollers and three large rollers, simply apply these self-gripping models up sectioned strands of hair, turn on the styler with controlled airflow, and remove them to get larger-than-life curls.


With multiple speed and heat settings, and a unique cool shot to set hair and reduce frizz, touchable tresses are just seconds away!


How to Get the Best Shave with Hyper Series Rotary Shavers

by RemReadyMan November 20, 2013

Remington is committed not only to providing you with the superior product, but also the superior techniques to employ when using them.


Check out Remington’s newest shaving guide for the our premium XR HyperSeries:  


Category: MAN Style | Tutorials

Tags: , ,

Multistyler Tutorial - 4 Styles 1 Tool

by Hayley Segar November 11, 2013


Hey everyone! Recently I was given the opportunity to play around with the new Remington Multistyler...a tool that allows you to create 4+ looks! I am going to be showing you how I created a smooth and sleek style, a loose curl style, some beachy waves, and tight curls.


The Remington Multistyler is a MUST for girls on the go...most of these styles took me under 15 minutes to complete, not to mention you could throw this single product in your travel bag...no need for a curling wand, flat iron, and a deep waver! The versatility of this product is showcased in my videos. Hope you enjoy!


See more from Hayley on her Youtube Channel - hayleyistcb


Get the T|Studio SILK Multistyler exclusively at Walmart.


Braided Summer Ponytail

by Haley Brindel May 27, 2013

Hey everyone! It's Haley from Dazzlemehay here to show you how to create a fun and cute hairstyle for Summer. This also works great if you are graduating and don't know what to do with your hair when you wear a cap! I hope you find this helpful. Thank you so much for watching!


See more from Haley on her youtube page, DazzleMeHay

How to: Remington Silk Ceramic Heated Clip Setter

by Katie Manwaring May 20, 2013

Hey all! Katie from Katie's Bliss here to show you how I use the Remington Silk Ceramic Heated Clip Setter before getting ready to head out for my day. Prior to doing my makeup or getting dressed, I set the curlers in my hair and then leave them in while I continue my morning routine. When they've completely cooled I pull them out, style my hair with my fingers and add in a little hairspray. To see just how I use these hot rollers check out my tutorial!


To see more from Katie, check out Katie's Bliss