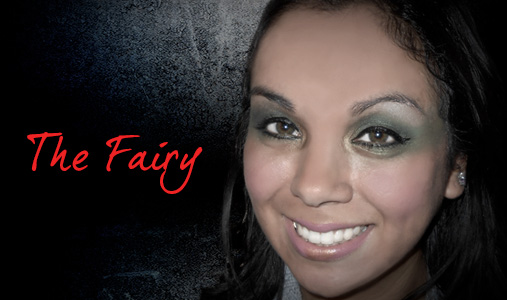
Index Background

Creating a Wearable Orange Eye

by Remington Ready May 13, 2013


If you follow makeup trends you’ve probably noticed that orange is one of the hottest cosmetic colors this spring/summer season. While many color-enthusiasts love working with this fun, eye-catching shade, there are also many out there wondering—is it wearable for me? Personally, I think it is! Whether you’re a little color-shy or simply concerned it won’t work well on your skin tone, I think almost any color can be made wearable through proper application and the right complementary products and colors. I’ve created this “wearable” orange eye look to help anyone that wants to get their feet wet so to speak when it comes to wearing orange on their eyes. In my opinion, if you couple a seemingly “un-wearable” color with neutral, complementary shades you can often make almost any color work for you!


What you’ll need (I’ve included what I used in parentheses): Orange eyeshadow (mixed MAC Pink Opal with Fyrinnae Electro-Koi Medium Chocolate Brown matte eyeshadow (MAC Texture) Dark Brown matte eyeshadow (Make Up For Ever #17) Light Taupe matte eyeshadow (Inglot #358) Ivory eyeshadow (Inglot #395) Black eyeliner (Mirenesse Inside Out 27HR Kohl in Osiris) False lashes and/or Mascara (Faux lashes in Colette and Revlon Grow Luscious mascara in Blackest Black).


I always recommend starting out with a clean, moisturized, and primed eye. I personally like Benefit Stay Don’t Stray for many of the daily eye looks I create unless I’m working with loose pigments, but use whatever works best for you.


Step 1: Pat orange shadow on 2/3 of your upper lid working from the inner corner out. Sweep a little under the inner lower corner as well.


Step 2: Create a “C” shape with a medium chocolate brown shadow that frames the orange shadow by starting at the outer corner of your upper lid with a sweeping motion up and around the crease towards the inner corner.


Step 3: Use a dark brown shadow to darken the outer “V” of your upper lid and create more depth. With a light hand, sweep this shade under your lower lashline as well.


Step 4: Using a super light brown or light taupe, blend out the edges of the crease color up towards your orbital bone. Sheer it out as you blend upwards towards your brow.


Step 5: Using a cream or ivory colored eyeshadow, highlight right below your brow and the inner corner of your eye with a light hand.


Step 6: Make sure you blend in the ivory eyeshadow so it catches the light, but doesn’t create a stark contrast.


Step 7: Tight-line or line your upper lashline in a manner that best defines your eye and line your lower lashline.


Step 8: Curl your upper lashes and apply mascara and/or falsies. Remember to apply mascara to your lower lashes as well.


Voila! A wearable orange eye look! If this is your first time working with orange eyeshadow don’t worry if you’re not completely thrilled with your first attempt! Practice makes perfect and half of perfecting how to apply shadow in general to your eye is simply doing it over and over. Good luck!


By Doria Murphy Freelance Makeup Artist and Beauty Blogger at BeautyPopStop.com Beauty Blog


A Daily Hair and Make-Up Routine

by Melissa Uy May 6, 2013

What’s an ideal hairstyle & makeup look for everyday? Neutral eyes & a simple hair look is ideal when you’re on the go and don’t have the time to do complicated looks. I love eye palettes because they are compact and really easy to use on the go.


In this video I did a Taupe eye makeup look applying: a light eyeshadow on the brow bone, light taupe color all over the lid and a dark brownish eyeshadow on the outer crease.


Products used in this video: Flower Cosmetics Foundation “All About Face” mixed with Kat Von D Lock it Foundation. Rimmel Eyebrow pencil in black brown. Sonia Kashuk Spooly to brush the eyebrows. For the eyes I used the E.l.f. Tantilizing Taupe Eye Palette. Maybelline The Rocket Mascara in Waterproof formula. Milani lipstick in Teddy Bear. Benefit Cosmetics Hoola Bronzer.

 
Check out more videos from Melissa on her YouTube channel, here.

Halloween Makeup Tips and Tricks

by Erica Jones October 22, 2012


The Fairy!


Anytime I do a fairy, I love to take the shadow out onto the temple.  It gives an illumination to the eyes that looks like the perfect supernatural lighting!  Also, don’t be afraid to take the shadow pretty high, so that it connects naturally with the color on the temple.  Lastly, I love to use a super shimmery color in the inner corner and under the brow.


Mix up the type of fairy just by changing the colors.  This green would work for a woodland fairy or Tinkerbell, but switch it up with a purple or pink to match your outfit.  In this case matching your eye color to your outfit is recommended rather than frowned upon!


Products used: Urban Decay Primer Potion, NYX liner in 920 Lime Green, Urban Decay Matte Shadow in Chronic and Bender and Midnight Cowgirl from the Book of Shadow IV, Urban Decay Powder Blush in Quickie, and Loreal Voluminous Carbon Black.
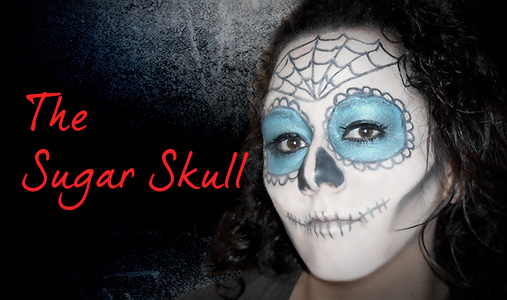


The Sugar Skull


I’ve noticed a lot of sugar skulls around this year for Halloween.  Technically the sugar skull is part of the Dia De Los Muertos Celebration, in which Mexican families celebrate family members that has passed away through alters.  This is a popular makeup worn during the celebration, but since it looks like a skull has become a popular look for Halloween this year also and is generally paired with traditional looking Mexican outfits.


My best tip for this look is to mix some very light colored foundation with the white cream makeup, as I have found it impossible to blend shadow over the white cream makeup alone.  Also, to get a vibrant color on the eye, I used a Cream Shadow pencil to prep the area.  The best thing about this is that once you get the basic shape, you can use whatever colors or elaboration that you want!


Products Used: White cream makeup from the Halloween section, Revlon Photoready Foundation in 004 Nude, Too Faced Liquid Lava Gloss Super Black Liner pencil, Urban Decay Hijack and Crystal from the Book of Shadows IV, Rimmel Matte Black shadow, and Loreal Voluminous Carbon Black.
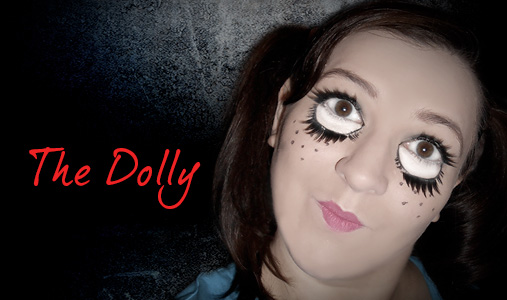


The Dolly


Another popular look with the Dolly or baby doll.  For this look, the key is to make your eyes look unnaturally large!  I started with making my face look as flawless as possible, porcelain like.  I used a ton of concealer to cover all the redness in my cheeks.  Everyone does the extension of the lower lid a bit different, but I just follow the orbit of my eye on the bottom to ensure they’re even.  I then took large lashes and placed then on the new lower lashline and upper lashline, added freckles and pink lips, and of course pigtails!


Products used: IT Cosmetics Bye Bye Undereye Concealer, Revlon Photoready foundation in Nude, Revlon Colorstay liner pen, generic costume lashes, NYX lip liner in Pinky, and Loreal Voluminous Carbon Black.
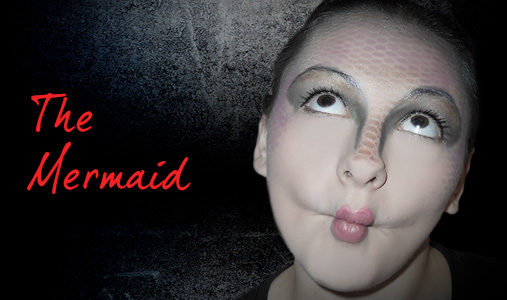


The Mermaid


There are all kinds of mermaid looks out there, but I wanted mine to look as fish-like as possible.  I used a liner to draw out the shape of the eye and then used aquatic-themed colors to create the look.  The most attention grabbing part is, of course, the scales on the forehead!  To achieve this I used a fishnet stocking pulled over the face and stippled my shadow over it so that what was left when you removed the stockings was a scale-like design.


Products used: Revlon Photoready foundation in Nude, Revlon colorstay pen liner, Urban Decay shadows in Blue Bus, HiJacked, and Baked from the Book of Shadows IV, NYX liner in Lime Green, Loreal Voluminous Carbon Black, and a generic pair of fishnets.


The Zombie


This was my favorite of the looks, and I actually think I convinced my handsome model here to change his own costume to this, because it came out so well.  I started with getting the woulds together.  I had decided that he would have an open ash on his cheek and his brains coming out on his forhead.  For the would I used toilet paper (which was a little thick – I think next time I’ll use tissue) and saturated it in face-safe glue.  As I placed the tissue I wrinkled it up so it looked like slashed skin and I pulled a hole in the middle.  For the brains, I barley wet some unflavored, unsweetened oatmeal just enough to make it sticky and mushy.  I then glued that to the forehead and allowed everything to dry.  Once it was all dry I used a light colored foundation and put a matte dark shadow under the eyes, following the natural lines of the eye.  I also used the same shadow to shade the outer edges of the gash and around the brain spillage.  I took a peach shadow and put that over the brains.  Then it was blood time – I placed blood dripping out of the wounds and all down Travis’ chin, so it looked like he had been feeding.  A note with the blood, it will stain, skin, clothes, everything, so be careful.


Products used: Toilet paper, oatmeal, lash glue or liquid latex, Revlon photoready, Manly palette, generic blood gel from Halloween store.


These are a few of the look I’ve created this year and I hope you can take these tricks and apply them to make your own spooky, sexy or just plain fun looks!


A quick word of thanks to all my lovely models, Christina - my fairy, Lauren - my sugar skull, Alyssa – my mermaid (and sister) and Travis – my zombie!  You guys were awesome to let me paint you up for the evening.


Until Next Time, Happy Spooky Primping!


See more from Erica Jones at EricasPrimpandPolish

Braided Homecoming 2012 Hairstyles

by Vanessa Barone September 24, 2012

There’s no denying that braids have been at the forefront of hair trends for some time now. Equal parts casual and romantic, woven wonders are taking the world of hair by storm; be it three or five strand, fishtail or waterfall, creativity is the name of this mane game. Celebrate homecoming and complete your look for the big night with one of these brag-worthy braided ‘dos created by Hair on the Avenue stylist, Kelly Araujo. 


‘Up, up and Away!’ Planning on dancing the night away? Does your hair hold a history of being unpredictable? A braided updo might be just the right option for you! Get your braid on and watch stylist Kelly Araujo create the look- yes, you can do it.


‘Swept Away’ For the girl who prefers to show off her natural texture (or has become well acquainted with her curling iron), a side swept ‘do is the perfect in-between style. Use a French braid technique to secure hair from one side to the nape of the neck and pin in place. This look is incredibly easy to recreate at home. Tip: Amp up the glam factor with a statement earring. 


‘Pony up!’ Pair your ponytail with a slight pompadour and braided accents. Complete the chic and wrap the base with a strand of hair or better yet, a lace ribbon/printed fabric. This toned-down style offers plenty of room to accessorize.


‘Big & Boho’ Abundant braids are the perfect accompaniment to bohemian dress. Extensions will provide added length and bulk and weaving colored strands/ribbon into the mix creates a personalized look. Pssst… If your attempt at ‘Side Swept’ didn’t go as planned, salvage your hard work and continue braiding to one side!


‘Half n’ Half’ A half-up-half-down style will allow you the best of both worlds- romantic, long locks while keeping your hair away from your face. Incorporate different braiding techniques for a show-stopping style!


Follow @hairontheavenue and @KellyAnnAraujo

How to Get Perfect Curls

by Erin Timony September 10, 2012


Hello everyone! I'm so excited to share with you how to create these gorgeous, loose curls using the new Style Solutions Curl Perfect Iron by Remington! Whether you're headed to school, work, or a fun night out, these curls are classic, and give you a care-free yet glamorous look. I hope you'll enjoy, and thanks so much for watching!


See more from Erin at youtube.com/freshblush


Steal Mila Kunis' Smoky Eye Look

by Adina Zilberman August 6, 2012


Ukranian bombshell and Hollywood Starlet Mila Kunis is a stunner, to say the least. With her flawless skin, impeccable bone structure, and naturally exotic beauty, her face is a canvas that takes any beauty look beautifully. During a recent premiere event for her new movie, “Ted”, Mila stepped out with one of the most flawless looks that I have seen to date, executing a perfect smoky eye and pale lip combo that any beauty girl can get behind. Keep reading to learn how you can achieve Mila’s classic smoky look, all on your own.


Smooth, even-looking skin is easy to achieve, if you know the proper tricks. Get a flawless, airbrushed-quality complexion, like Mila’s, by using a duo fiber foundation blending brush to apply natural (read: dewy) liquid foundation to the entire face. Paint the product on using short, rounded strokes, and always be sure to blend in the direction of your facial hair. To contour, simply grab a fluffy powder brush, dip it into a powdered foundation that is 1 to 2 shades darker than your own complexion, and apply along the cheekbones, temples, and below the jawline. Then, apply just a hint of rose blush to the apples of the cheeks, blending upward toward the temples, and a sprinkling of a soft, sheer highlight on the bridge of the nose and on the forehead.


To get Mila’s show-stopping smoky eyes, start first with an application of shadow primer on the eyelids. Next, apply a soft golden beige eye shadow from the lash line to the crease, focusing on the inner corner of the eye. Grab a pencil-shaped eye shadow brush, and dip it into a blackened-brown eye shadow (preferably matte). Starting at the outer corner of your eye, proceed to draw an angled line from outer corner to the inner. Adjust the shape to fit the natural curve of your eye, exaggerating the angle slightly at the outer corner of the eye, and underneath the lash line. Blend with a fluffy shadow brush, to diffuse harsh lines. Follow this up with black liner, smudged into the waterline and the lower lash line, and two coats of volumizing mascara, to complete the look.


Keep the lips simple, so as not to overwhelm. A soft, pink lipstick was Mila’s choice, and should be yours as well. The effect is soft femininity to the eye’s rockstar quality.


And there you have it, the quick and easy on how you can look like Mila Kunis. What do you think? Will you try the look?


by Adina Zilberman of Kraseybeauty.com


Girly Summer Updo How Tos

by Melissa Angert June 25, 2012


Summer is full of fun times, big events and high temperatures! It's the perfect time to try some updo hairstyles on your little girls. With two girls in my house, we can hardly turn around without tripping over a hair accessory. (How do rubber bands end up in such random places?) And to keep them cool and looking cute for every occasion, I have a few easy updos we use all the time.


Girly Summer Updo: Pool Day
Swimming can really take a toll on little girls’ hair.  On top of the drying effects of chlorine, the tangles can be ruthless! Tight french braids are the perfect solution.  They last through all sorts of hijinks, even meeting a dolphin!


READ MORE read more

10 Moves to Get You in Shape like a Fitness Model!

by Emily Loftiss April 30, 2012


We asked our friend and fitness model, Emily Loftiss, to put together a simple and impactful workout to whip our winter bodies into summer shape. She sent us these 10 moves that are great for people at any fitness level.  The best part is you can do these exercises ANYWHERE.  No Gym required, so No Excuses allowed :)


Here are Emily's Tips for her work out:


"Everyone is on a different fitness level. I suggest doing 10 of each movement. Arms back - 20 reps and hold plank position for 30 seconds. If you can repeat this entire series one to two more times YOU ARE A ROCKSTAR!!!!! Just remember to listen to your body! GOOD LUCK!" - Emily Loftiss


Emily Loftiss is a TV Host and Image Consultant in NYC. Emily's blog is Loftiss Says where she discusses Fashion, Beauty Tips, Celebrity Events and Pop Culture. Please follow her on Twitter and Facebook. And as always "TAKE RISKS! THAT'S THE BEAUTY IN BEAUTY!"


The Topknot

by Keltie Colleen April 23, 2012


Some people would say that the topknot is my "signature" hair style. I promise you it is not because I am trying to be fashion forward or chic (although topknots ARE both!) I wear topknots because I look better with my hair up, and I hate washing my hair.


Topknots are wonderful for a variety of reasons: they make you look taller, they make your cheekbones stand out, they make you look effortless, they make you look trendy, they take 5 minutes to do, even if you suck at doing hair you can make a topknot, you never have to wash your hair, they stay nice in the rain and snow, did I mention wearing your hair up makes you look taller and thinner!


I wanted to share with you how I made my perfect topknots, and all the fun accessories that you can play around with to make your knot unique!


Happy Knotting!


Keltie Colleen is a blogger/author. You can check out her blog on Buzznet and you can "Like" her Facebook page for a free chapter of her book Rockettes, Rockstars and Rockbottom

Richard Marin Question of the Week: Most desired Styles of Spring

by Richard Marin April 6, 2012

Feather hair extensions are on their way out along with ombre hair color. So what's the next big thing?  Richard Marin tells us what his A list clients have been requesting for Spring 2012:  


Ask Richard a Question:


Richard Marin is one of the top hair stylists in the hip, competitive world of hair styling. His remarkable work has graced the pages of some of the most elite fashion magazines, including Vogue, Allure and Vanity Fair.