Index Background

Fall 2012 Trends that Withstand the Test of Time

by Marta Tryshak September 17, 2012

With New York Fashion Week behind us, the fashion industry has already introduced what they have planned for Spring/Summer 2013. Meanwhile, the rest of us are just beginning our quest to plan and shop for our fall wardrobe. With the fashion cycle always three seasons ahead, it is no wonder trends come and go in a blink of an eye.


No worries though, since with a little research of runway shows from Fall/Spring 2013 and a few glossy magazines, a girl can not only create her perfect fall shopping list but also ensure that it will withstand the test of time. In fashion terms these days, standing the “test of time” may even simply means that you will be able to stay on trend for a full season!


After much consideration, here’s my top 5 list of Fall 2012 must-have pieces. They are not only on trend now, but should surely withstand the test of time. Such as this season’s brooch trend might be sizzling for fall’13, but it will surely make a big comeback in future years.


1. Classic Lady-Like Purse
The hobo purse may be comfortable, but a classic purse with a box shape will never go out of style.


2. Brooch
Yet another classic that made a strong comeback this season. With a retro look, a brooch is the prettiest finishing touch for any occasion.  Why not substitute that cocktail ring for a statement brooch?


3. Pointy-Toe Heels
Seen on the fall runways of Stella McCartney and Jil Sander, this office staple is back in business.


4. Over the Knee Boots
Seen at Givenchy and Calvin Klein, this risqué over the knee look is back!


5. Pant-Suit
The biggest trend for fall, the pant suit is a must. Wear it with a simple blouse or as separates, this look is here to stay.


See more from Marta Tryshak at withlovegabrielle.com


Must Have Fall Accessories

by Remington Ready September 3, 2012

While we hate to admit that summer is quickly coming to a close we can’t help but get (excessively) excited about slipping back into a cozy fall wardrobe.  While fall fashion can pretty much be summed up in “layers” here are our favorite accessories that make a fall look fabulous.


Cozy Scarf: Having a great scarf (or many) this season is the biggest must-have of them all! They’re great to accent an outfit or just to keep you warm. You can go with a standard thin scarf or a thicker infinity scarf for those cooler days. If you have a neutral colored coat, try out a cool pattern or floral scarf to make your outfit more fun! 


Splurge: Fritillary Ruffle Loop, Anthropology  $38

Steal: Textured Knit Snood, Asos.com  $20.44


Vintage Jewelry: Start off your fall with some new jewelry that will make your outfit pop! Think big pieces and warm colors. If you look hard enough you will be able to find some great things that will transform a boring outfit into something fantastic. Try looking at your local farmer’s market or thrift store! Finding these pieces here will truly make them one of a kind!


Splurge: Gold Natural Gemstone Necklace, Rubylane.com  $325
Steal: Layered Stone Necklace, Banana Republic   $39.50


Leather Bag: Try getting a nice warm brown leather bag for this upcoming fall! The leather is a great material to get you through this cold season and is resistant to wear and tear. Take one of your mom’s old neck ties and secure it to the bag strap for a cute personal touch!


Splurge: New Leather City Willis, Coach $298
Steal: Meadow Top Handle Flap Crossbody, Nicole Miller $35


Boots: You can’t start fall without a great pair of boots (I supposed can, but it isn’t nearly as fun).  Boots are a staple. Dress them up for work or dress them down for a casual weekend! We suggest looking for something versatile and leather to get you through those slushy days as fall turns to winter. Make sure you use leather or suede spray before you wear them to ensure the boots stay looking great throughout the seasons!


Splurge: Paige Tall Riding, The Fry Company  $358

Steal: Ciao Bella Tabby Wide Calf Riding Boot, DSW.com  $99.95


Category: Fashion

Tags: , , ,

Secrets to Shopping a Thrift Store: Part 2

by Maddie Richardson August 14, 2012


Well well well. Welcome back! I am so glad that you have made it to part 2 of the "How to Shop at a thrift store" series. Today, we are getting to the fun stuff. Today, we talk about the PROJECTS and TRANSFORMATION . Oh yea...


Now, in the world of clothing and accessory shopping, it is a little bit easier. The main thing to think about is spending TIME looking for the right things. Knowing which sections to hit (clutches, belts, scarves, jackets, vests). The areas where you can COMPLETE an outfit, but they may not fin the WHOLE outfit. 


For example, check this outfit out.
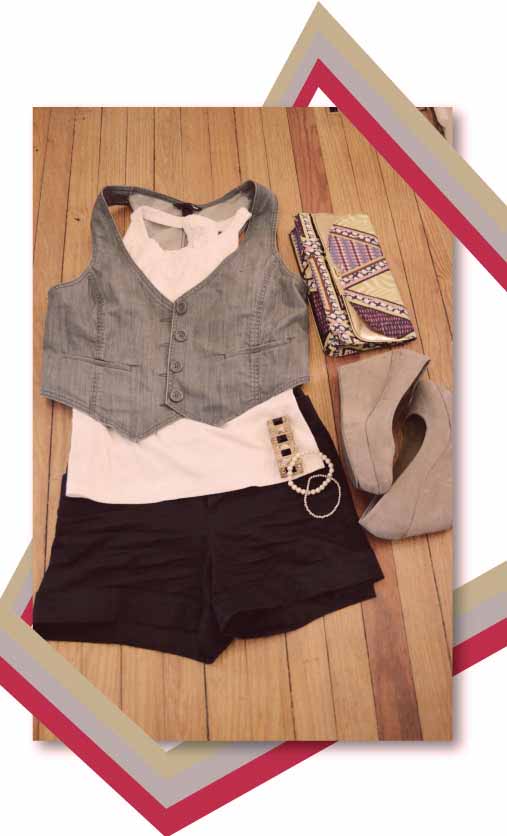


Guess what I thrifted here? This sweet vest. I wear it ALL the time. Just ask my friends. So this vest has COMPLETED so many outfits for me, even though it is not the WHOLE outfit.


Now check this outfit out:
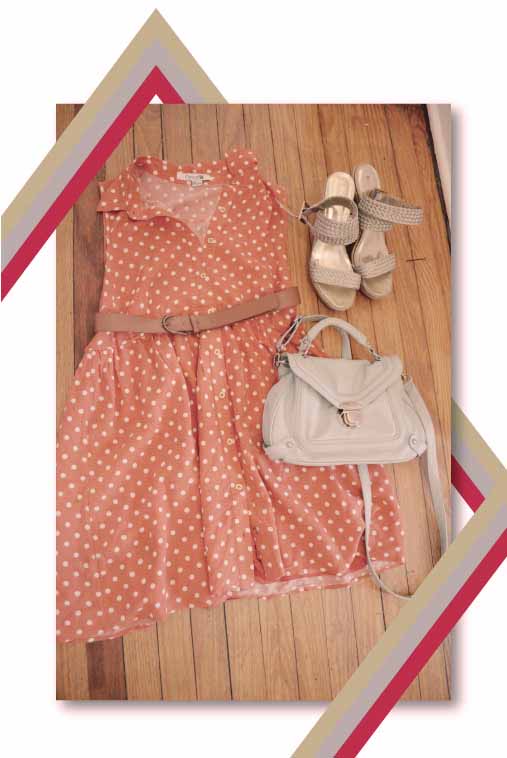


What do you think I thrifted here? OK, I’ll tell you. It’s the belt and the shoes! The shoes were an AMAZING find, because I’m pretty sure they are this season’s at Target! Haha. Some people just give up so quickly… needless to say, these two accessories have COMPLETED a zillion outfits of mine, though they are not the WHOLE outfit.


You get my drift here?


Quick Sidenote: Every now and then it is absolutely possible to find an amazing vintage dress at the thrift store, so don’t give up looking for the WHOLE or COMPLETE outfit (I still do a quick walk through of the dress section every time I go), but don’t make that your only goal.


OK, moving on.


In the world of accessorizing your home, things get a bit more sticky.


The main tip I will give you, before we dive into the meat and potatoes, is to keep an open mind. If you have "fabric" on your list to find, and you have a certain project in mind, keep your eyes open to a pattern or color scheme that you weren't planning on, or didn't know you even liked! You may surprise yourself. If you are looking for certain glassware, or certain color frames, don't back yourself into a wall. There is always spray paint people! And if you have never ever shopped at a thrift store and you don't know where to start... That is awesome. I am glad you're here. And remember to keep an open mind.


So without further ado, here are some projects that I have worked on, where the raw beginnings all happened to come from a thrift store!


We’ll start with the small stuff.
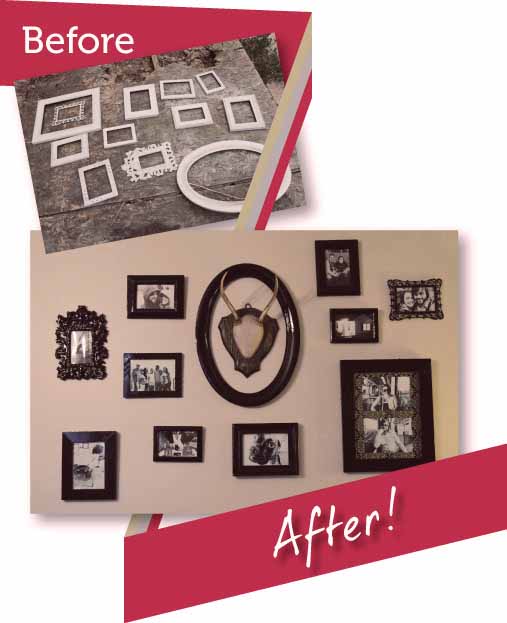


These guys were collected from thrift stores over the course of seriously, SERIOUSLY years. I didn’t know what I was collecting them for, until I found that amazing set of tiny antlers at an antique store… And then it all came together. BAM. One of my favorite projects to date. High gloss spray paint and a few nails, and it is one of the projects in my house that gets the most compliments!


Next up are these vintage silver and teacup candles.
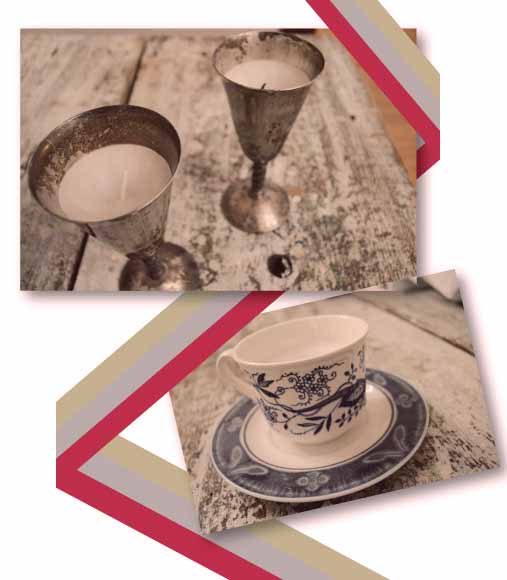


I went through a phase where I made candles for every occasion. I put them all over my house. I gave them out as gifts. I fell in love with them. So I would pick up little cups and glasses every time I went thrifting (one time I even snagged a fish bowl), and then would fill them up with wax and a wick. They are such an amazing and useful gift.


Next up is the furniture. Dun dun dun…


Just recently, I found this awesome old drink cart at a thrift store near my house. It was rusty and had some badly stained glass.
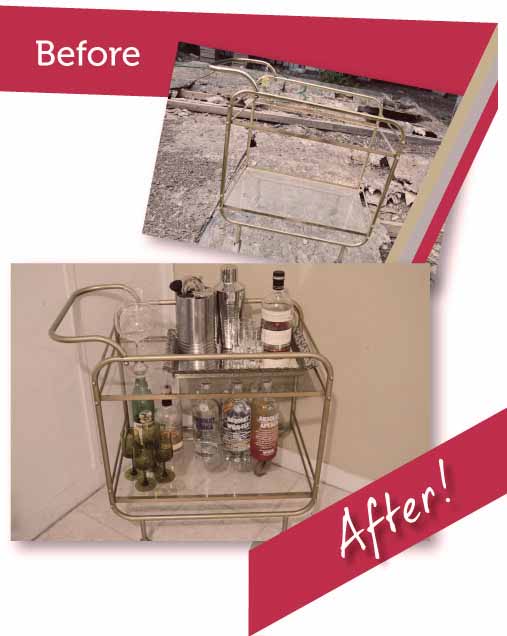


But now, after some spray paint, goo gone, and TLC, it sits in the back room of my house, and makes me feel super fancy. 


I also picked up this desk (which is actually an old sewing table that no longer had a sewing machine in it) for $25 at a Goodwill. I painted it canary yellow and antiqued it with some glaze and BAM. It is one of my favorite furniture re-dos to date!


Lastly, there are some things that you may purchase just because you love them the way they are.


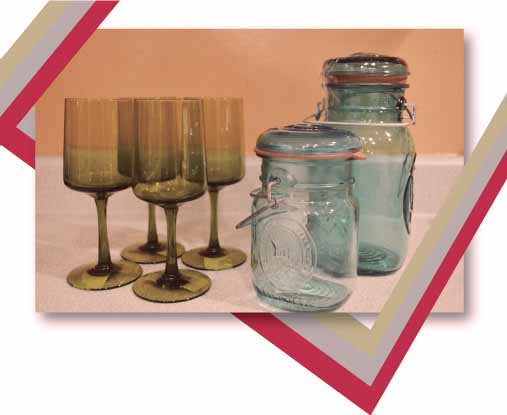
These green glasses were the perfect addition to my drink cart, just the way they are.  And the blue mason jars are still sitting on my kitchen counter, with nothing in them yet, just because I think they are the prettiest shade of blue. And I won’t spray paint them or change them ever. At least I don’t plan to right now :)


And that’s all folks!


It has been really wonderful to be here and share my thoughts on how to prep and execute the best thrift store shopping experience ever. I hope you learned something! To continue following along on my thrift store adventures, please feel free to drop by WWW.THRIFTARY.COM and check out some of these projects in detail, and more!


TTFN,


Secrets to Shopping a Thrift Store: Part 1

by Maddie Richardson August 13, 2012


Well hello there! I am so so SO excited to be here today at Remington Ready, to chat with you about my top secret tips and tricks for making your thrift store shopping experience, the absolute best! Over at Thriftary, I often talk about my insane passion for finding something out of nothing. So needless to say, this is quite an honor.


I have broken the secret world of successful thrifting into a two part series. We will cover the ever-so-important preparation phase today, and then next time, we'll brain storm some amazing projects, all inspired by some really common thrift store finds.


Here is an awkward and embarrassing introduction to today's topic. This is also video proof that I am SO much better in writing.


I wasn't lying. There is one huge part of thrift store shopping that I think most people unfortunately forget. And that is what I am going to focus on today. The preparation.


If you are like me, preparation may not be your thing. I like to get inspired and then puruse a project all within the same 15 minute time period. I then love to execute a project as fast as I can, because I get SO PUMPED about seeing the final product. BUT. HOWEVER. In the world of thrift store shopping, preparation is KEY in order to have successful trips.


Here are a few practical ways that you can focus on prepping for your thrift store shopping days:


MAKE A LIST
Seriously. Not just in your head. Keep a list on the fridge. Keep a list in your planner. Write it on your hand for crying out loud! But please, right it down. As you walk around the house, as you clean up your kids room, as you brush your teeth in the bathroom. Any moment those thoughts hit you, like "Man, this  blank wall really could use a photo gallery" or "Gosh I wish I had a cuter dish to put this soap in" ... Write it down! This step will not only ensure that you don't forget the things you need when heading to the thrift store, but it will help you not leave with a buggy full of stuff that you will eventually give back to the thrift store, because you didn't even need it in the first place!


Here is an example of what my list looks like today:


 - Liquor Decanter (Maybe rocks glasses too?)
 - Mason Jars (bathroom, toothbrushes)
 - Fabric (curtains for office)
 - Luggage (good suitcase?)
 - Bike Basket
 - Mirror with orange frame? (acid wash)
 - desk for Burley?


So not only do I list out the items that I am looking for, I make sure that I note what I originally intended it for. Otherwise. I seriously... would just forget all of it. Not proud. Just telling the truth.


When you are specifically looking for clothes, it is most important to ensure that you check the hot spots of any thrift store. My list goes like this:


 - Accessories (Purses/Clutches), Scarves, belts
 - Shoes
 - Dresses (nothing current, usually only looking for vintage)
 - Coats/Vests
 - Skirts


Those are the areas that I find the most luck, in that order. It is important to look for pieces that will work well with OTHER items you already own. That's when you have the most success in the clothing arena of the thrift store. We will talk more about this next time as well.


KNOW THE DATES
Every thrift store (at least that I have ever frequented) has a specific day each week that they restock most of their product. They will also rotate out old product to keep frequenters like us, happy. KNOW THOSE DATES. If you hit your local thrift store on these dates, you will be more likely to have the pick of the litter. Just give them a call and ask when they normally restock.


MAKE IT FUN - BRING A DATE
So, not that I think that a thrift store shopping spree would be a great idea for a first date (unless you are dating a superhero... don't let that one out of your sight!), but you SHOULD commit to making your thrift strore trip a blast. I am not normally an "I love to shop with my friends" girl, but the thrift store is different. You have to be dedicated to shopping and searching a LOT. You have to be willing stay out for a while, taking time to search for treasures. This is SO much more fun when you have a buddy by your side. So plan ahead, invite your friend, grab an ice coffee to go, and enjoy your day. Trust me. It is so much better this way.


TAKE YOUR TIME
This is super important. I know I say that a lot. But it is a lot true! Thrift store shopping takes time. Don't give up. You have to pass by 1 million pieces of trash before you find your 1millionthand1 treasure. This takes planning ahead to have a good chunk of your day to browse, take a lunch break, browse again, take a coffee break, and browse again.


I hope you find this helpful. I PROMISE that if you follow these tips, you will not only leave the thrift store with EXACTLY what you need, but you will have a blast doing it, and you will get home a carload of things that you actually have intentions for. I promise. I promise.


Make sure you tune in for the next part of the series, where I will share some AMAZING transformation ideas for all of the goodies you find while you are out!


TTFN,


Category: Fashion | Lifestyle

Tags: , , ,

DIYStyle Instant Swim Cover-Up

by Cindy Cummins July 30, 2012

How often have you wished for a cute and sexy cover-up….something fitting for both poolside as well as grabbing a nice lunch, dining inside? At this time of year with all of us headed out for beach vacations, this “In an Instant” wrap style cover-up is just the thing. Inspired by a similar style at our fav lingerie boutique, our DIY version can be customized to match YOUR style and swimsuit.


Best of all, there are no complicated sewing skills involved, as there are only a couple of edges to turn under and stitch (straight stitch on a sewing machine or by hand). With the right knit fabric this drapey wrap has the front and hem edges left unfinished—knits do not ravel! Or, if you want to make a similar version from a beach towel (great for the littler girls) the towel edges are already pre-finished.


Supplies Needed:
¾ yard of soft polyester or rayon knit fabric, 60” wide
1 1/2 yard of 3/8” wide ribbon or cord for “straps”
Matching sewing thread


Instructions:

1. Measure the distance between your arms outstretched (get a friend to help with a tape measure). This is how wide you will cut your fabric. This is the part that will wrap around you. Trim off any excess fabric from the 60” width to match this measurement. Example: Allyce measured 58”” with her arms outstretched. So we trimmed 2” off of our 60” wide fabric to be 58” wide.


2. Measure the length from right above your bust (where a strapless dress or top would hit) to the length you want the wrap to be. We did ours so it hit about 6” above the knee. Trim off any excess from the 27” or ¾ yard length so that it is the desired finished length. Our trimmed fabric was 58” x 26”.


3. Grab a 7-8” saucer from the kitchen cabinet to use as the armhole template. On upper right and left corner, mark 5” in on top and 7” down on side. Place saucer over the upper right and upper left corner. Using about ¼ of the saucer edge, align the saucer with the top and side markings and trace an arc. Trim following the markings, creating the armhole area. (Photos 1 & 2)


4. Using the same saucer as template, place saucer over the lower right and left corners and use saucer to mark and round the bottom edges. Trim following the markings. Note: trim as neat as possible—this IS your finished hem edge! (Photos 3 & 4)


5. On armhole edges, turn under ¾” and pin in place, stretching fabric as needed to make a casing or tunnel for the straps to thread into. (Photo 5)


6. Using the straight stitch on your sewing machine stitch close to the unfinished edge, secure both ends with backstitching. If you do not have a sewing machine you can stitch this part by hand, taking small running stitches, and knot the threads at each end. (Photo 6)


7. Create the straps from ribbon, cable cord or other strap type trims and cord—use your creativity here! Cut the trim into two equal pieces. Using a safety pin, thread the trim thru the casing tunnels you just stitched for the arm holes. Tie the trim ends together in an overhand knot, trim the ends close to the knot. Turn the strap so that the knot is hidden back into the casing and adjust the gathers. Note: You can adjust the straps shorter if you need them after trying on, just knot again and trim. (Photo 7)


8. To wear, hold cover-up behind you, arms outstretched. Bring one side around to your front slipping arm into strap. Bring opposite side across front, slipping other arm into strap. Adjust gathers and draping, and Viola! Instant cover-up!


Cindy Cummins of DIYStyle.net has been designing, sewing, creating and crafting for what seems like forever! As the “Mother Hen” to the group of DIYStyle’s Creative Chicks, she leads the flock in whipping up easy, fun,  and on-trend fashion DIY projects. Check out DIYStyle on Facebook.


Summer 2012 Wedding Hair Trends

by Vanessa Barone July 23, 2012

Your big day is just around the corner and you’re starting to hear those wedding bells chime. Next on your to-do list is a trip to the salon! Get ready for the mane event with a recap of this season’s wedding hair trends from Hair On The Avenue stylist Kelly Araujo.


Retro Glam: Old Hollywood hairstyles continue to dominate on both the runway and red carpet, all the way to the aisles of love. “Soft and sultry, retro ‘do’s truly epitomize femininity and glamour” notes hairstylist, Kelly Araujo. And dare we say they ooze a little sex appeal?


Boho Queen: Channel your inner flower child and adorn your principle part with a crown of nature’s blossoms. Paired with a loose curl, this understated look completes an outdoor wedding atmosphere and serves as a great alternative to jeweled accessories.


Textured Tresses: Give your soft, textured updo a braid boost. Woven strands are a summer cornerstone and can add a subtle hint of individuality to your I-do hairdo.


Ballerina Bun: For the fashion savvy bride who wants to incorporate her trendy tendencies, the high bun is a safe bet for the big day. “This twist on a traditional style maintains modernity without going overboard”.


Keep it Classic: Chignon’s have withstood the test of time as they provide a simple, streamlined look. However ladies, do not underestimate their reliability: “Chignon’s are incredibly versatile, suiting a wide array of bridal looks. While the front is typically polished, there is room to accessorize and modify the back of the style”.


Above all, stick to a style that best represents you. Trends may come and go, but the album is here to stay!


By Venessa (Hair styled by Kelly Araujo, Hair On The Avenue)


Embrace your Geekness Week: Geek Fashion

by Remington Ready July 9, 2012

There was a time not so long ago when geeks had nothing to do with fashion (and a time even before that when they were mainly associated with carny acts, but we won't go back quite that far today!). Just a decade or so ago, the term identified an individual who was extremely intelligent, whose employment was likely associated with computers, and who was probably a touch socially awkward. Style in relationship to geeks was a non starter. No one cared much about what they wore, except to make fun of an errant zipper or tape holding together a pair of black-framed glasses.


Today, geeks have claimed an important place in our culture, and what they wear does not go unnoticed. But geeks approach style in a completely different way from the average fashionista. From Steve Jobs to Mark Zuckerberg, making a single sartorial statement is their fashion strategy. They make a choice and stick with it: black turtleneck and jeans, hoodie and  cargo shorts, respectively. It's about practicality, efficiency, and consistency. And as much as they might deny it, it's also about style.


The clothing you—or anyone else from your mom to Bill Gates—wears has an inherent style, because you chose it. You observed it, you summed up how you would feel in it and how people would perceive you in it, You decided weather you liked the color, if you needed maybe a smaller size, and if you identified with the logo or the label. For sure some folks--those who have more than two principal items of clothing in rotation--spend more time deciding such things. But in all cases, a style is communicated. Even the geeks of yore exhibited a style, even if it was one that most people considered to be generally bad.


Silicon Valley angel investor Chris Sacca is my favorite example of the singular geek fashion phenomenon. He wears a fancy cowboy shirt every day of the week. That way, he says, he saves time deciding what to wear. It's always a cowboy shirt! And he looks darn good in them. Efficiency might be his main goal, but you can be sure Mr. Sacca is making a fashion statement—an unwavering and consistent one—in his investor meetings.


by Kristen Philipkoski, Stylenik.com


Sunglasses That Flatter Your Face

by Remington Ready June 10, 2012


Buying sunglasses is a tricky task!  Which style do you want to rock this year? Aviators, Cat-eyes, or maybe some Wraparounds?  Before you grab the first pair on the rack (to avoid the tedious process of trying them on and attempting to access your reflection in a less than adequate mirror), make sure you’re aware of your face shape.  Just like you pick an outfit that suits your body type, you want to get sunglasses that compliment your face shape. Here are a few quick tips on what styles will flatter your face:  


1. Oval Face:
If you have an oval shaped face you’re in luck! For the most part almost any shape will work on an oval face.  Look for a pair of frames that are wider than the broadest part of your face. A square frame with gently rounded edges would be perfect. You could also try a pair of wraparounds or shields.


2. Round Face:
Go for a rectangular or geometric shaped frame. You can add definition by getting angular frames, by doing this it will help make the face look longer and thinner! Try a cat eye frame!


3. Square Face:
We suggest going for cat eye or round frames in contrast to the face. By doing this it will help reduce angels with soft curves and give the face definition.


4. Oblong Face:
Going with a round or square frame would be your best bet to play down the length of your face. You are able to widen and shorten the face with sunglass styles that do not extend beyond the widest part of your face.


Don’t waste valuable summer time searching for the perfect pair. Use these tips to make your decision a cinch!


Category: Fashion

Tags: , , ,

Top 4 Fuss-Free Summer Hair Trends

by Barb Quinn June 4, 2012


Every year about this time, salons heat up with clients searching for the latest, cutest, quickest and easiest hairstyles they can manage. It's a balancing act to find a hairstyle that will hold up to both a busy summer social calendar and summer's heat and humidity. But who wants to spend the time straightening, smoothing or curling only for it to fall out the minute you step out the door? This year's hottest summer hair trends reflect the laid-back look that defines summer. Summer is not the time for showy, gaudy or glitzy looking hairstyles. Soft braids, loose buns, ponytails of all shapes and sizes, pixie cuts, crop cuts  . . . these are the hair trends this summer and they all work great with busy schedules.   


Braids
Braids have been stirring up a whirlwind for a while now and are the IT hairdo for summer. And, what's perfect is we have about a gazillion different ways to wear them. Braids are only as limited as the imagination of the braider. Quick, easy and fun, casual, sophisticated or zany. . . learn how-to do a braid or two, and eliminate blow-drying, curling irons and straightening irons . . . ughhh . . . give it a rest! Side braids are so easy and look great everywhere; at the beach, pool party or any dressy summer event. The key to these looks are their textured, casual, beachy flair.  Nothing is structured here.


If you need to use a dryer, just rough dry it, with fingers, fluffing it upside down. Brush to the side and braid loosely with even tension and secure with a clear elastic. Try a messy boho hairstyle, brushed to the side and pinned up with three random strands of fishtail braids. Let some strands hang out around your face for a relaxed, carefree, spur-of the-moment style. Are you all left thumbs when it comes to braiding? No worries, there should be a variety of salons now in your area who can do some creative braiding for you. Bring in pictures or let them have at it  . . . either way . . . your braid will be a new look that will last for days!   


Short Bobs, Pixies and Crop Cuts
The classic short bob is a quick wash-n-wear style for ladies with straight hair (just add pink or blue and you've got a Katy Perry do) For lift on top, brush it in the opposite direction while drying. Create a deep side part and tuck behind your ear. Shifting your part to the opposite side occasionally will also create natural lift on top. A short crop pixie cut is adorable . . . and it doesn't get any easier than this. Consider going platinum if you like to jump on the color trend bandwagon, but take note that it requires monthly or bi-monthly upkeep for most.


Ponytails
Ponytails are fun all year round, but summertime gives you even more reasons to wear one when temps get hot and muggy. Ponytail varieties are endless; smooth, curly, braided, high, low or to the side and in this summer, the messier the better. You can wear a ponytail even if you don't have long hair. The faux-ponytail can be clipped into short and medium length hair. Look for these faux-ponytails at kiosks in shopping malls where the sales ladies will show you how to work with them, or you can find them at beauty supply stores.


Buns
The messy bun is another style to wear for any summer occasion. The low messy bun worn slightly off to the side has been a top hairstyle trend on red carpets this year and it's a simple style to recreate. There's no wrong way to wear a bun, so experiment and see what suits you.


Add some bling with a sparkly pin. Brush hair back into a low ponytail and secure with an elastic. Separate into two strands and wind around the base securing with pins. For a secure hold, pin into the base of the ponytail and let some pieces fall out for a messy look. Finish bangs or soft wispy curls to frame your face.


Barb Quinn is also known as Hairstyle Blog
Guest author has been a professional hair stylist for over 30 years and has established herself as a nationally recognized hair designer, educator, and freelance writer. Barb has been chosen by her peers to serve on the advisory panel of Cosmos C International the global hair stylist network. Thousands of women each day follow Barb's hair styling wit and wisdom on her highly successful blogs Hairstyle Blog and Visual Makeover. In 2011 The Hairstyle Blog was selected as Top Beauty Blog by BeautySchool.com.


Get the Right Swimsuit for Your Body

by Emily Loftiss May 28, 2012


Swimusit season is here!!!! Even if you have a great body you still want to pick the perfect swimsuit to flaunt your assets (and hide your problem areas!). Here are the 5 body types to ensure you choose the best swimsuit for you! Happy Shopping!


Emily Loftiss is a TV Host and Image Consultant in NYC. Emily's blog is Loftiss Says where she discusses Fashion, Beauty Tips, Celebrity Events and Pop Culture. Please follow her on Twitter and Facebook. And as always "TAKE RISKS! THAT'S THE BEAUTY IN BEAUTY!"