Index Background

Hat Hairstyles: Braided Pigtails

by Remington Ready January 16, 2015


Braided pigtails aren’t just for little girls anymore; it’s actually a super cute boho-chic braided style! It’s easy to do and the braids start low, so no need to worry about the hat getting in the way!


Style Tip: If you have a lot of layers, start the braids a little higher than right under the ear and keep it tighter as you braid. 


Tools: Double Knit Elastics 


    1.  Start with natural hair, and divide hair down the back of your head into two                    sections.


    2.  Begin on one side, dividing hair into three uneven sections. It’s best to have the            smallest section be from the back.


    3.  Braid the strands, keeping it tight for now. You can loosen them up later!


    4.  Repeat steps one and two on the other side.


    5.  Loosen up the braid to desired look. They may loosen up throughout the day, so            don’t make it too loose!


    6.  You’re all finished with this boho braid style! Just add finishing spray as needed            and top off with your winter hat. Pull it down so that it ends right where the braids          begin! 


Hat Hairstyles: Messy Waves

by Remington Ready January 16, 2015


Hats are natural teasers, so try this look to let the hat work for you! The natural messy waves are a perfect pair with the hat-teased roots.


Style Tip: Use root booster product or hairspray once the styling is finished. This will keep volume in the roots, while not letting the hat mess get too out-of-hand!


Tools: TStudio Pink Silk Waving Wand


    1.  Start with natural hair, adding texture spray if needed.

 
    2.  Gather hair into ponytail on top of head.

 
    3.  Curl a 1” section of hair with the TStudio Pink Silk Waving Wand. Remember to             not wrap the hair all the way to the end, leave the ast 1-2” end straight.


    4.  Continue curling until the whole ponytail is curled. 


    5.  Spray hair with hairspray, and then take out pony tail as gently as possible.


    6.  Separate curls and tease as needed. Do not tease too much, since the hat will             do a lot of that for you during the day! 


    7.  Your messy waves are ready to go! Just add finishing spray as needed and your           favorite winter hat. Enjoy the all-day messy look without a worry!


New Years' Hairstyles

by Remington Ready December 29, 2014


You may have your New Year’s Eve outfit planned, but what about something special for your hair? Try one of these new styles to complete your look for a fun night out celebrating the New Year. You’ll make an elegant statement without too much work— just follow the steps below!


Braided Twist


Braids are all the rage and they can even create a classy up-do! It will look like you spent all morning doing your hair, but it only takes a few minutes.


Style tip: create this style on first-day hair, then let the braids down on day two for some fun waves!
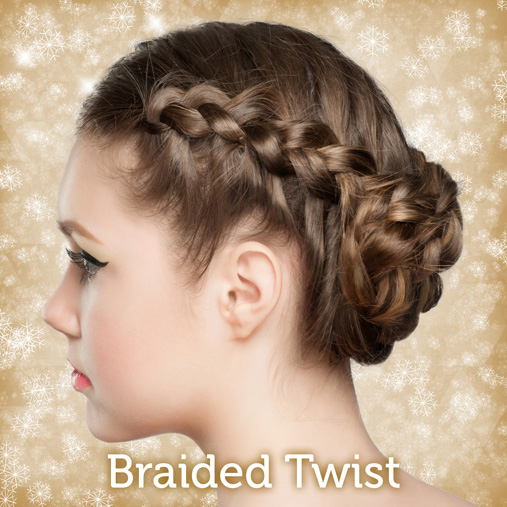


Tools: ElasticsBobby Pins


    1.  Create a center part and divide the hair in two sections.


    2.  Starting on one side near the forehead, French braid hair by crossing each                    section under the other, instead of over the other like normal braiding. Secure                end of braid with an elastic.


    3.  Repeat step one on the other side section of hair.


    4.  Wrap the braids around each other into a low bun, tucking the ends in and                    securing with bobby pins. 


    5.  Set the style with finishing spray to complete this braided twist!


Side Sweep Curls


The side sweep look is gorgeous with curls, but elastics and bobby pins can’t quite handle the task. The Simple Twist pin makes it easy to create this elegant look and will securely hold it all day long!


Style Tip: dress up this look even more by adding a decorative headband!
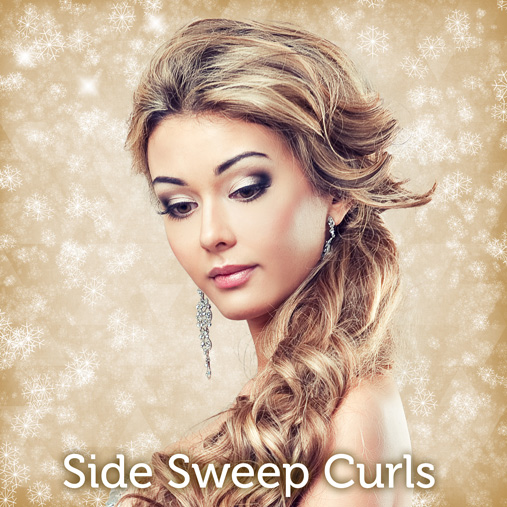


Tools: TStudio Silk Oval Wand, Simple Twist 


    1.  Section hair and curl 1-2” sections with the TStudio Silk Oval Wand.


    2.  Tease hair lightly around the crown, adding hair spray. 


    3.  Gather hair to the side and twist hair towards the ear.


    4.  Push the Simple Twist pin through and twist towards the ear, then flip it back into          the twist to secure. Pin should be close to the scalp when pushed back in.


    5.  Loosen a few curls around the face and set with finishing spray to complete                  these side sweep curls!


Headwrap Ringlets


This headwrap look works with any style or party! Use a boho braided headwrap for casual occasions or a beaded headwrap to really dress it up.


Style Tip: just like the braided twist, this look can be let down on day two hair for awesome curls!


Tools: TStudio Silk Oval WandBraided HeadwrapBeaded Headwrap


    1.  Section hair and curl 1-2” sections with the T|Studio Silk Oval Wand.


    2.  Slide a skinny headwrap over the head, so it is across or right above the                      forehead.


    3.  Starting on one side, loop a 2” section of hair around the headwrap until it creates          a ringlet, then secure the end of the strand in the headwrap band. 


    4.  Continue looping sections until all hair is secured around the headwrap. 


    5.  Add bobby pins as needed and set with finishing spray for this headwrap ringlet            style!


Get this Iconic Look: Classic Low Bun

by Remington Ready December 10, 2014


Whether it’s a casual work day or a night out, this up-do is simply perfect. Get this classic style with the steps below!


Tools: TStudio Silk Oval Wand, TStudio Slim Straightener, Beaded Headwrap, and The Simple Twist 


    1.  Add mousse or hairspray to hair to add texture


    2.  Section hair and curl a 1-2” section of hair with Oval wand.


    3.  Continue curling the sections, alternating the direction of the curl each time.


    4.  Leaving bangs down, gather hair to back of head and twist into low bun 


    5.  Push Simple Twist pin up into bun, then flip pin and push back down towards                nape of neck. Pin should be close to scalp when pushed back down, to better              secure look.


    6.  Sweep bangs to the side and add a slight flip with a straightener.


    7.  End Look 1: Add a beaded headwrap across the forehead to dress it up.


    8.  End Look 2: Just put on your favorite pair of earrings for a more classic look. 


Get this Iconic Look: Elegant Up-Do

by Remington Ready December 8, 2014


Turn heads at your next holiday party with this chic and elegant hairstyle. Follow the steps below to get the look!


Tools: Simple Twist, Bobby Pins


    1.  Start with your natural hair and add hairspray. If you have straight or fine hair add          volume by curling or teasing. 


    2.  Section bangs from hair and tease. Then comb back bangs and pin, smoothing            the top while keeping volume.


    3.  Gather hair at nape of neck and twist hair, guiding it upwards while keeping hair            tight and smooth.


    4.  Tuck ends of hair back down into twist. Push pin up into the twist, then flip pin              and push back down. Pin should be close to scalp when pushed back down, to            better secure look.


    5.  Set the style with finishing spray and your elegant look is ready for any occasion!  


Get this Iconic Look: Wild Waves

by Remington Ready December 8, 2014


Loose and free-flowing waves are a fun way to spice up average curls and show off your wild side. Try them out yourself with the steps below!


Tools: TStudio Silk Slim Wand


    1.  Add mousse or hairspray to hair to build texture.


    2.  Separate hair into 1-2” sections and curl with the TStudio Silk Slim           Wand, wrapping it around the widest part of the wand.


    3.  Continue curling the sections, alternating the direction of the curl             each time.


    4.  Tease hair at the roots around the crown and bangs.


    5.  Set the style with finishing spray to rock this wild wave look!


The Braided Crown

by Remington Ready November 3, 2014


Braided Crown:


1. Part hair to the side and separate 3 small sections from the front of the part.


2. French Braid hair by crossing each section under the other, instead of over the other like normal braiding. To French Braid hair, add small sections of hair every time the braid crosses. It is best to start by adding sections from the part and hair line.


3. Continue French Braiding hair across forehead, around the back of the head, and to the other side, so that braid wraps around head like a headwrap.


4. Once you reach the end, secure with a Double Knit elastic.


5. Tuck/cover up the end of the braid into the hair behind/above the ear and secure with bobbies.


Category: Beauty | Fashion | Hair Care | Tutorials

Tags:

How To Get The Perfect Top Knot Hairstyle

by Remington Ready October 21, 2014


Top knots are all the rage this season. They look great for any occasion, from dressy events to casual outings, the top knot is a great go-to hairstyle! To get this trendy look, use the simple directions below all while using our Double Knit elastics to make your style last all day!


1. Use a Double Knit elastic to create a high pony on the top/back side of the head.


2. Pull ponytail through the slit of the Perfect Bun tool, leaving the ends of pony out.


3. Roll Perfect Bun up toward the base of your pony.


4. Twist ends of the tool around your ponytail elastic.


5. Spread hair out to create the perfect top knot!


Tips and Tricks For Organizing Your Closet

by Danielle Arsenault October 13, 2014


Hi there!  I'm Danielle from For the Love of Leopard, a personal style blog.  I'm honored to be guest blogging on Remington Ready today, and to bring you some of my favorite tips for keeping your closet organized, functional, and looking beautiful. 


• Keep it organized.  No matter how big or small your closet is, it is important that every item has a home.  You will be more likely to put things away if you know where each item is supposed to live.  It takes some time upfront but makes life so much easier when you are looking for something specific.  I have separated my hanging clothes in the following sections, and then organize them by color:


◦ Tank tops
◦ Tee Shirts
◦ Long Sleeve Shirts
◦ Blazers
◦ Button Downs
◦ Skirts


• Everything should be visible! If you are unable to see something, you most likely are going to forget about it and not wear it.  Items that are in sight are more likely to be worn. 


◦ Roll tank tops so you can easily see and grab what you need
◦ Hang tights and nylons on a hanger for easy access
◦ Stack sweaters and pants vertically on shelves


• Fold your sweaters! I cannot stress this one enough. We've all experienced the dreaded shoulder nipples you get from hanging your sweaters, and once those babies are there, they are nearly impossible to remove.  Fold your sweaters, people.


• No orphan hangers. Set up an area for empty hangers.   When you take an item of clothing off it's hanger, move the hanger to the designated space.  If you leave bare hangers amongst all of your clothes, not only does it look sloppy but it also makes it that much harder to find a hanger when you need one.


• Invest in matching hangers.  Much like orphan hangers, mismatched hangers can look sloppy and take away from the real focus - the clothes.  Figure out how many hangers you need, and then order a matching set in bulk.  These hangers are my absolute favorite for several reasons. #1, they are non-slip, so your clothes stay in place.  #2 they are super slim, so you can fit more clothes on each rod.


• Use vertical space  In my opinion, closets are never big enough - but a lot of times the space above the clothing rods goes unused.  This is a great space to store items that aren't in season.  Or use cute baskets, like these Martha Stewart ones, to corral smaller items like scarves or belts.


To see more of Danielle's fabulous work, head over to her blog For The Love of Leopard!

Transitioning to Fall on a Budget

by Remington Ready August 28, 2014


Fall is fast approaching and chock-full of my favorite things… college football, haunted houses, and pumpkin spice lattes. While many of us are ready to go back-to-school shopping for the inevitable drop in temperatures, try transitioning your summer pieces into fall with these money-saving tips.


Fall Trend 1: Plaid


How to transition? Window-pane print has been popular all summer long with no plans to slow down heading into fall. The black and white pattern makes the perfect backdrop to showcase your accessories and matches almost everything in your closet. Tory Burch loves this print, but Windsor Store makes a fabulous printed peplum top for only $22.90.


Fall Trend 2: Structured Bags


How to transition? A Celine purse is chic year-round, but you won’t break the bank carrying this almost identical $35 alternative from Windsor Store.


Fall Trend 3: Matte Red Lips


How to transition? Tone down the bright red lip by opting for a more crimson color as the weather cools. Stila makes an amazing no-smudge liquid lip-stick, but for only $2.99 Elf makes an awesome substitute.


Fall Trend 4: Pendant Necklaces


How to transition? Kendra Scott’s token bright necklaces have been seen all over the blogosphere this season, but Purple Peridot put a spin on her iconic shape in jewel tones for fall… and for only $15.99.


Fall Trend 4: Wide-Brimmed Hats


How to transition? Floppy hats can be found all over the beach during the summer months, but swap the straw for felt heading into fall. Free People makes the perfect wide-brimmed hat, but for only $24, ASOS’s version is on-trend as well.


To see more of Cortney's fabuouls style and tips head on over to her blog, Cort In Session!

Category: Beauty | Fashion | Tutorials

Tags: