Index Background

How To Stay Chic While Traveling

by Dana Fox October 29, 2012


With the cold weather creeping up, vacation season is in full force! The most difficult task can sometimes be trying to decide what to take with you on your journey and how to stay fashionable at the same time. So how can you stay chic while traveling without packing a trunk load of items? 


Organize your outfits ahead of time


Try to choose items that can be worn multiple times in different ways. Your shoes can make or break an enjoyable experience, so I suggest starting with your feet! Choose two pairs that can be styled easily with your clothing, and don't forget to pop a bottle of nail polish into your purse, especially if one of your choices is a cute pair of sandals! 


Dresses to impress


Dresses are the easiest and most versatile pieces of clothing ever! They can transition from day to night with just a swap of your shoes and accessories. Choose dresses that can be dressed up or down, and alternate from patterns to solids. 


Sunglasses


Not only are they a necessity when visiting a sunny location, but sunglasses are a great accessory for hiding jet lagged eyes! Instant chic!


Scarves, your new best friend


Accessories barely take up any space in your luggage bag, so go all out! Scarves can be worn so many different ways, the options are pretty much endless. They are perfect for your hair, worn around your neck, or attached to a purse!


Hobo bags


You're going to need some place to stuff all of your finds and carry-on items into. Make it big and chic! A hobo bag is the perfect vacation accessory, and when paired with simple pieces like a dress, sandals, and sunglasses, you'll feel like the most stylish traveler on the sand!


Swim wear 


Packing your favourite swim suit for the beach can be easy, but what about the journey from the beach to the bar, or from day to evening? Take along a cute coverup or maxi skirt and some beach friendly accessories like a sun hat!


Don't neglect your hair


Traveling to different countries can mean unexpected surprises when it comes to hair. Don't let the heat turn your gorgeous locks into a frizzy fiasco. You don't want to spend all of your vacation time fussing over your mane, so why not make things a little easier and take along some tools of the trade? The Remington Wet 2 Straight flat iron would be perfect for taming unruly locks after a swim! If you're lounging near the sea, you can even give your head a dip in the water, scrunch, and let dry for an instant beachy wave!


How do you stay chic while traveling? You can read more from me on my blog, Wonder Forest 


Halloween Makeup Tips and Tricks

by Erica Jones October 22, 2012


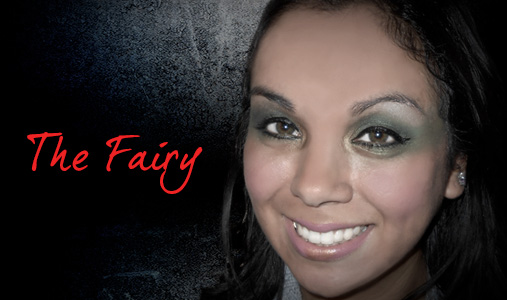
The Fairy!


Anytime I do a fairy, I love to take the shadow out onto the temple.  It gives an illumination to the eyes that looks like the perfect supernatural lighting!  Also, don’t be afraid to take the shadow pretty high, so that it connects naturally with the color on the temple.  Lastly, I love to use a super shimmery color in the inner corner and under the brow.


Mix up the type of fairy just by changing the colors.  This green would work for a woodland fairy or Tinkerbell, but switch it up with a purple or pink to match your outfit.  In this case matching your eye color to your outfit is recommended rather than frowned upon!


Products used: Urban Decay Primer Potion, NYX liner in 920 Lime Green, Urban Decay Matte Shadow in Chronic and Bender and Midnight Cowgirl from the Book of Shadow IV, Urban Decay Powder Blush in Quickie, and Loreal Voluminous Carbon Black.
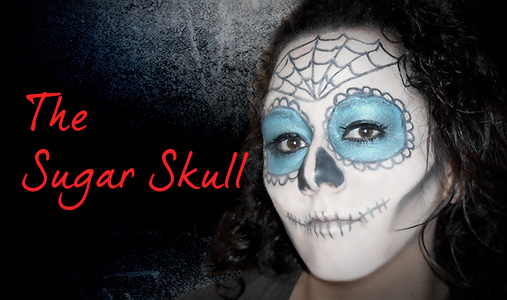


The Sugar Skull


I’ve noticed a lot of sugar skulls around this year for Halloween.  Technically the sugar skull is part of the Dia De Los Muertos Celebration, in which Mexican families celebrate family members that has passed away through alters.  This is a popular makeup worn during the celebration, but since it looks like a skull has become a popular look for Halloween this year also and is generally paired with traditional looking Mexican outfits.


My best tip for this look is to mix some very light colored foundation with the white cream makeup, as I have found it impossible to blend shadow over the white cream makeup alone.  Also, to get a vibrant color on the eye, I used a Cream Shadow pencil to prep the area.  The best thing about this is that once you get the basic shape, you can use whatever colors or elaboration that you want!


Products Used: White cream makeup from the Halloween section, Revlon Photoready Foundation in 004 Nude, Too Faced Liquid Lava Gloss Super Black Liner pencil, Urban Decay Hijack and Crystal from the Book of Shadows IV, Rimmel Matte Black shadow, and Loreal Voluminous Carbon Black.
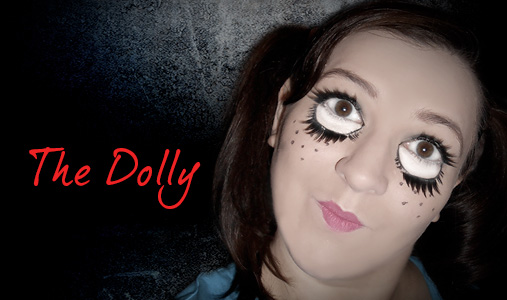


The Dolly


Another popular look with the Dolly or baby doll.  For this look, the key is to make your eyes look unnaturally large!  I started with making my face look as flawless as possible, porcelain like.  I used a ton of concealer to cover all the redness in my cheeks.  Everyone does the extension of the lower lid a bit different, but I just follow the orbit of my eye on the bottom to ensure they’re even.  I then took large lashes and placed then on the new lower lashline and upper lashline, added freckles and pink lips, and of course pigtails!


Products used: IT Cosmetics Bye Bye Undereye Concealer, Revlon Photoready foundation in Nude, Revlon Colorstay liner pen, generic costume lashes, NYX lip liner in Pinky, and Loreal Voluminous Carbon Black.
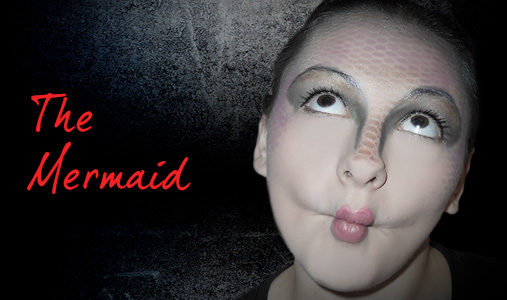


The Mermaid


There are all kinds of mermaid looks out there, but I wanted mine to look as fish-like as possible.  I used a liner to draw out the shape of the eye and then used aquatic-themed colors to create the look.  The most attention grabbing part is, of course, the scales on the forehead!  To achieve this I used a fishnet stocking pulled over the face and stippled my shadow over it so that what was left when you removed the stockings was a scale-like design.


Products used: Revlon Photoready foundation in Nude, Revlon colorstay pen liner, Urban Decay shadows in Blue Bus, HiJacked, and Baked from the Book of Shadows IV, NYX liner in Lime Green, Loreal Voluminous Carbon Black, and a generic pair of fishnets.


The Zombie


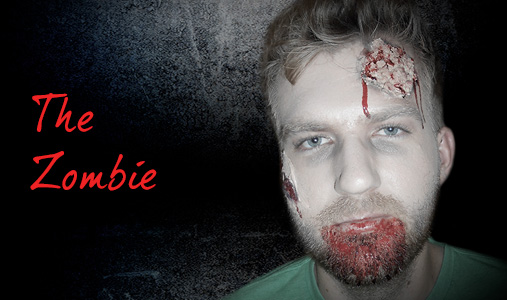
This was my favorite of the looks, and I actually think I convinced my handsome model here to change his own costume to this, because it came out so well.  I started with getting the woulds together.  I had decided that he would have an open ash on his cheek and his brains coming out on his forhead.  For the would I used toilet paper (which was a little thick – I think next time I’ll use tissue) and saturated it in face-safe glue.  As I placed the tissue I wrinkled it up so it looked like slashed skin and I pulled a hole in the middle.  For the brains, I barley wet some unflavored, unsweetened oatmeal just enough to make it sticky and mushy.  I then glued that to the forehead and allowed everything to dry.  Once it was all dry I used a light colored foundation and put a matte dark shadow under the eyes, following the natural lines of the eye.  I also used the same shadow to shade the outer edges of the gash and around the brain spillage.  I took a peach shadow and put that over the brains.  Then it was blood time – I placed blood dripping out of the wounds and all down Travis’ chin, so it looked like he had been feeding.  A note with the blood, it will stain, skin, clothes, everything, so be careful.


Products used: Toilet paper, oatmeal, lash glue or liquid latex, Revlon photoready, Manly palette, generic blood gel from Halloween store.


These are a few of the look I’ve created this year and I hope you can take these tricks and apply them to make your own spooky, sexy or just plain fun looks!


A quick word of thanks to all my lovely models, Christina - my fairy, Lauren - my sugar skull, Alyssa – my mermaid (and sister) and Travis – my zombie!  You guys were awesome to let me paint you up for the evening.


Until Next Time, Happy Spooky Primping!


See more from Erica Jones at EricasPrimpandPolish

Back to Basics: Cleaning Your Styling Tools

by Remington Ready October 15, 2012

Listen up lovely ladies (and gents)! When you stop and think of how funky and gross some of your styling tools can get and all of the dust, oils, and germs that accumulates, you’ll start looking at those hairballs differently. No worries – we’re here to help! Cleaning your styling tools will not only give you more control while styling, but also smoother, shiner hair. No germs and shiny hair? WIN!  


NOTE: Make sure your styling tools are unplugged and cooled before cleaning!!!


Hair Dryer – Simply remove the air vent (circular area located in back) and clean lint off the filter with an old toothbrush. Replace the filter and put the air vent back on! Lastly, wipe down the exterior of your dryer with an anti-bacterial wipe. Voila! Remember to clean the vent area about once a month to help with air circulation through your blow dryer. It also extends the life of your blow dryer by preventing it from overheating!


Straightener – Take a damp washcloth and gently wash off the plates from any build-up. If the straightener has floating plates, take a small pin and gently run it under the plates to remove any build-up. If you still have stubborn, try using rubbing alcohol on a soft rag. Make sure that you squeeze out the excess alcohol from your rag before cleaning your flat iron to prevent alcohol from getting inside. 


Brush Grab a pen or pencil and slide the pointed end under the hair build-up from the bottom of the brush to the top. Pull up until the hair starts to loosen. Then take a scissors and carefully cut straight down the middle. Pull the clumps apart and discard any hairballs. To clean the rest of the brush, use shampoo on a toothbrush with warm water to scrub the base of the brush between the bristles. Rinse the brush, and then lay it face down to dry.


Curling Iron/Wand Wipe the barrel and handle with a damp cloth. To remove heavy build-up, use rubbing alcohol instead of water. Another secret tip is to mix 1 part warm water with 1 part liquid fabric softener and put mixture on a cloth or q-tip. Wipe down your curling iron with the cloth or use a q-tip to get those small, hard to reach areas. 


Wig Out This Halloween

by HalloweenCostumes.com October 8, 2012

Do you wish there were a way to get a totally different hairstyle for Halloween, without doing anything that might make your boss look at you funny the next day? Are you sick of Manic Panic turning your bathroom purple? Well, my friend, have you considered a wig? They're not just for Lady Gaga and Honey Boo Boo, they're for anyone who wants to try out a new look. Here are some fun wigs to try out for this Halloween!


Snow White Wig


Pick your poisoned apple--Kristen Stewart? Lily Collins? Whoever voiced Snow White in the original Disney movie? Whatever your take on the fairy tale princess, you're gonna need hair as black as coal.


Marie Antoinette Wig


Marie Antoinette is a fun, sexy costume that gives you an excuse to eat cake all night. That hairstyle is a nightmare, though. Just get a wig and be done with it.


"Rapsalicious" Wig


I'm guessing they only called this wig that because they didn't want a certain rapper whose last name rhymes with "Triage" to sue. You should totally wear this if you're going to a Halloween party on "Pink Friday," or if you're arriving at a party by "Starships."


"Pop Star" Wig


What a fun wig! This would be perfect if you have a great "Poker Face" and want to "Just Dance" all night on Halloween. PS don't kid yourself into thinking you're talented enough to craft your own hair into a bow. Yoü and I both know that's not true.


Cotton Candy Wig


You're gonna need to make up a costume to go with this. Mermaid? Fairy? Spirit of cotton candy? Who cares, your hair will look super sweet.


Cruella DeVille Wig


Cruella DeVille, Cruella DeVille, if dying half your hair white doesn't scare you, no evil thing will.


Afro Wig


Ease on down the road to your next Halloween party, because this sexy Afro wig is perfect for all your disco inferno needs.


Marilyn Monroe Wig


Is it true that gentlemen prefer blondes? Get a blonde wig and find out. (That is, if you prefer gentlemen. If you don't, you can find out if ladies also prefer blondes.)


Pin Up Girl Wig


Maybe you've already conducted experiments and concluded that gentlemen do not, in fact, prefer blondes. Channel your inner Bettie Page in this sexy brunette wig is perfect for a 50s pin-up girl costume that'll be sure to turn heads.


Sexy Hollywood Star Wig


Okay, you've considered blonde and brunette... but what about redhead? This wig is perfect if you're not bad... you're just drawn that way. Don't forget to add plenty of purple eyeshadow.


And don't forget--whichever awesome wig you choose, you'll need a wig cap to go under it. Trust us.


Renata Sancken is a staff writer for HalloweenCostumes.com, where you can purchase a wide variety of high-quality wigs for men and women. 

Organizing Hair Tools & Accessories

by Remington Ready October 1, 2012

I am so excited to be stopping by this week from IHeart Organizing! As a gal, I am a huuuge fan of hair products. Hair dryer, curling iron, flat iron, oh my. Not to mention all of the super fabulous bobby pins, hair ties, flower clips and headbands that decorate my locks on a daily basis. Love it all. But what I don’t love, is that without any storage or systems in place, all of those hair goodies can quickly take over the entire bathroom. Jumbled cords and accessories strewn about the counter can happen in a flash and pretty soon I am left wondering where my toothbrush is. Not cool.


I have done a lot of inspiration searching and I am really excited to stop by today to share some of my favorite ways to keep all of those hair supplies under control, allowing the bathroom to remain nice and tidy happy place.


When it comes to hair supplies, utilizing the insides of drawers is one of the best ways to neatly tuck away those cords and supplies, yet also giving you quick and easy access.


{ 1 / 2 / 3 }


If you don’t have the luxury of built in drawer storage {and it would be a total luxury}, then another great option is to utilize the inside of a cabinet door.  


{ 1 / 2 }


Many online organizing sites carry over the door organizers, which make a solid solution to wrangling countertop clutter.  


{source}


No drawer or cabinet space? How about an organizer that neatly hooks onto a towel bar?


{source}


Or sits on the counter/vanity top?


{source}


If you have the DIY gene, or know someone that does, a few PVC pipes cut to size is a quick, easy and inexpensive solution to corralling those hair care items.


{source}


And if you a really ambitious and want to move up on the DIY scale, how incredible is this storage bench/towel holder option? It gives me happy butterflies!


{source}


So many great ideas! But what about those itty bits; hair ties, bobby pins and clips?


I personally love to use small dishes found at thrift stores to wrangle the different sized hair accessories:


{source}


And since I am always a fan a using everyday items from around the home for organizing, how about a muffin pan?


{source}


Or a pretty paper covered tin container or a photo frame adorned with ribbon?


{ 1 / 2 }


Of course, there are great items available on the market for purchase as well, acrylic is always a great way to go since you can always get a quick visual of the contents.


{source}


Or how about some magnetic spice tins, which can be placed within a medicine cabinet!  Simply charming yet practical!


{source}


Speaking of magnets, did you know they actually make magnetic bobby pin holders? Never loose those itty bitties again, so fabulous!


{source}


I am over the moon for the new Remington organizing products! Drawer dividers to keep everything separate and simple to find, and a wall mount storage board which is the perfect solution to display and store hundreds or accessories in one place!  


 { 1 / 2 }


Whether you love to DIY, thrift or shop, there are a variety of great solutions to wrangle and conceal your favorite hair care items! Say goodbye to countertop clutter and hello to delightful mornings!


Happy organizing!  


Jen