Index Background

Beard Tamers: Review of 3 New Remington Electric Shavers

by Christian Zaguirre August 27, 2012


The only times in life that we do genuinely desire a close shave is when we're talking non-metaphorically. Just about every brand out there promises to shave us back to pre-puberty smoothness, but Remington is one of the few names that we know we can usually trust. So here at GearCulture, much to our wives and girlfriends' consternation, we allowed our facial hair to go wild in order to test three of Remington's latest electric offerings to see if they cut the mustard – and facial hair, obviously.


Remington F3 ($30)


The Smooth: Like cell phones, electric shavers have thankfully come a long way in terms of size and not to mention maneuverability. The F3 boasts an independent flexing foil and pivoting neck which should ensure that it covers every contour of your face, and the speedy motor means a cleaner shave with less passes. Less passes means less irritation, which is not only great for those with sensitive skin, but it'll save you a fortune in moisturizer too.


The Stubble: Though the flex and pivot feature should have covered each and every contour, it didn't. Points are lost because it struggled around the neck and jaw lines, and there were a few stragglers left behind. The battery takes 16 hours to recharge too, which is not ideal if you're late for work.


The Final Verdict: For 30 bucks, you can't fault the F3 too much. Even though there were a few missed whiskers, the shave was close and smooth.


Remington F4 ($40)


The Smooth: All the features of the F3, with a cherry on top, the Remington F4 comes equipped with a pair of independent floating cutting heads which are extremely precise and hold the lines of the face admirably, definitely out-performing the F3 around the jaw.


The Stubble: The battery only lasts for a half hour which means lots or recharging, and though the shaver handled shorter whiskers well, it did miss a few of the longer hairs about the neck.


The Final Verdict: It's better than the F3, but personally we'd rather splash that extra bit of cash on the F5 (below). Ten dollars gets you a whole lot more.


Remington F5 ($50)


The Smooth: The F5's battery is by far the best of the three, and even Remington has undersold themselves here. They claim it takes a couple of hours to fully charge, but we always hit optimum energy in less than two. The built-in Interceptor Shaving Technology – that's the trimming blade for longer hair – ensured that no hairs were missed and that the shave was without a doubt the smoothest out of the three.


The Stubble: There's a five minute quick charge which is ideal for touch-ups, but needs to be longer for that motor to be whizzing at full capacity.


The Final Verdict: The absolute daddy of the Remington F series, even with a few days' worth of beard growth, the F5 delivers a smooth shaving experience and doesn't miss a hair. Fully charged, it'll even run for a whole hour which makes it ideal for those always on the go. F5? High Five!


Christian Zaguirre is the founder and curator of GearCulture, an online gear magazine for guys.

Update Your Look for Back to School

by Hayley Segar August 20, 2012


It's that time of the year again when everyone goes back to school and is left with that lingering question…how do I get ready to make an impression on the first day? Hopefully my video will give you some tips on a few simple updates that can change your look just in time for back to school.


See more from Hayley at youtube.com/hayleyistcb


Secrets to Shopping a Thrift Store: Part 2

by Maddie Richardson August 14, 2012


Well well well. Welcome back! I am so glad that you have made it to part 2 of the "How to Shop at a thrift store" series. Today, we are getting to the fun stuff. Today, we talk about the PROJECTS and TRANSFORMATION . Oh yea...


Now, in the world of clothing and accessory shopping, it is a little bit easier. The main thing to think about is spending TIME looking for the right things. Knowing which sections to hit (clutches, belts, scarves, jackets, vests). The areas where you can COMPLETE an outfit, but they may not fin the WHOLE outfit. 


For example, check this outfit out.


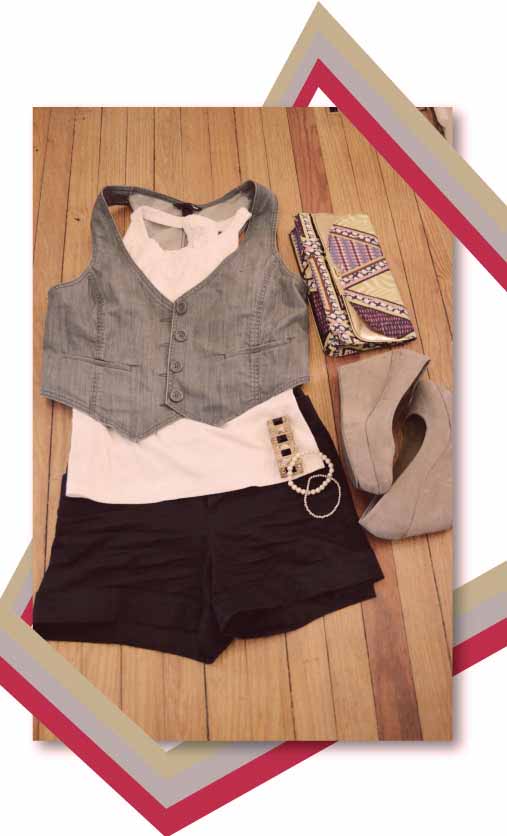
Guess what I thrifted here? This sweet vest. I wear it ALL the time. Just ask my friends. So this vest has COMPLETED so many outfits for me, even though it is not the WHOLE outfit.


Now check this outfit out:


What do you think I thrifted here? OK, I’ll tell you. It’s the belt and the shoes! The shoes were an AMAZING find, because I’m pretty sure they are this season’s at Target! Haha. Some people just give up so quickly… needless to say, these two accessories have COMPLETED a zillion outfits of mine, though they are not the WHOLE outfit.


You get my drift here?


Quick Sidenote: Every now and then it is absolutely possible to find an amazing vintage dress at the thrift store, so don’t give up looking for the WHOLE or COMPLETE outfit (I still do a quick walk through of the dress section every time I go), but don’t make that your only goal.


OK, moving on.


In the world of accessorizing your home, things get a bit more sticky.


The main tip I will give you, before we dive into the meat and potatoes, is to keep an open mind. If you have "fabric" on your list to find, and you have a certain project in mind, keep your eyes open to a pattern or color scheme that you weren't planning on, or didn't know you even liked! You may surprise yourself. If you are looking for certain glassware, or certain color frames, don't back yourself into a wall. There is always spray paint people! And if you have never ever shopped at a thrift store and you don't know where to start... That is awesome. I am glad you're here. And remember to keep an open mind.


So without further ado, here are some projects that I have worked on, where the raw beginnings all happened to come from a thrift store!


We’ll start with the small stuff.


These guys were collected from thrift stores over the course of seriously, SERIOUSLY years. I didn’t know what I was collecting them for, until I found that amazing set of tiny antlers at an antique store… And then it all came together. BAM. One of my favorite projects to date. High gloss spray paint and a few nails, and it is one of the projects in my house that gets the most compliments!


Next up are these vintage silver and teacup candles.


I went through a phase where I made candles for every occasion. I put them all over my house. I gave them out as gifts. I fell in love with them. So I would pick up little cups and glasses every time I went thrifting (one time I even snagged a fish bowl), and then would fill them up with wax and a wick. They are such an amazing and useful gift.


Next up is the furniture. Dun dun dun…


Just recently, I found this awesome old drink cart at a thrift store near my house. It was rusty and had some badly stained glass.


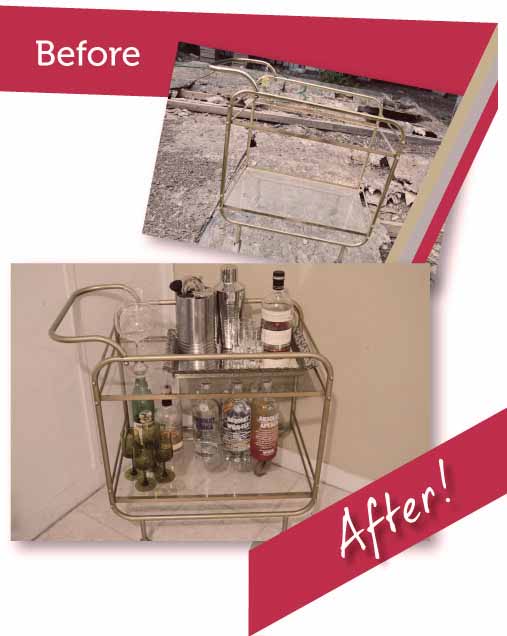
But now, after some spray paint, goo gone, and TLC, it sits in the back room of my house, and makes me feel super fancy. 


I also picked up this desk (which is actually an old sewing table that no longer had a sewing machine in it) for $25 at a Goodwill. I painted it canary yellow and antiqued it with some glaze and BAM. It is one of my favorite furniture re-dos to date!


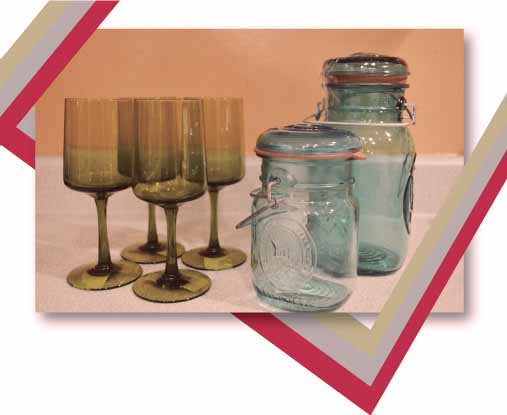
Lastly, there are some things that you may purchase just because you love them the way they are.


These green glasses were the perfect addition to my drink cart, just the way they are.  And the blue mason jars are still sitting on my kitchen counter, with nothing in them yet, just because I think they are the prettiest shade of blue. And I won’t spray paint them or change them ever. At least I don’t plan to right now :)


And that’s all folks!


It has been really wonderful to be here and share my thoughts on how to prep and execute the best thrift store shopping experience ever. I hope you learned something! To continue following along on my thrift store adventures, please feel free to drop by WWW.THRIFTARY.COM and check out some of these projects in detail, and more!


TTFN,


Secrets to Shopping a Thrift Store: Part 1

by Maddie Richardson August 13, 2012


Well hello there! I am so so SO excited to be here today at Remington Ready, to chat with you about my top secret tips and tricks for making your thrift store shopping experience, the absolute best! Over at Thriftary, I often talk about my insane passion for finding something out of nothing. So needless to say, this is quite an honor.


I have broken the secret world of successful thrifting into a two part series. We will cover the ever-so-important preparation phase today, and then next time, we'll brain storm some amazing projects, all inspired by some really common thrift store finds.


Here is an awkward and embarrassing introduction to today's topic. This is also video proof that I am SO much better in writing.


I wasn't lying. There is one huge part of thrift store shopping that I think most people unfortunately forget. And that is what I am going to focus on today. The preparation.


If you are like me, preparation may not be your thing. I like to get inspired and then puruse a project all within the same 15 minute time period. I then love to execute a project as fast as I can, because I get SO PUMPED about seeing the final product. BUT. HOWEVER. In the world of thrift store shopping, preparation is KEY in order to have successful trips.


Here are a few practical ways that you can focus on prepping for your thrift store shopping days:


MAKE A LIST
Seriously. Not just in your head. Keep a list on the fridge. Keep a list in your planner. Write it on your hand for crying out loud! But please, right it down. As you walk around the house, as you clean up your kids room, as you brush your teeth in the bathroom. Any moment those thoughts hit you, like "Man, this  blank wall really could use a photo gallery" or "Gosh I wish I had a cuter dish to put this soap in" ... Write it down! This step will not only ensure that you don't forget the things you need when heading to the thrift store, but it will help you not leave with a buggy full of stuff that you will eventually give back to the thrift store, because you didn't even need it in the first place!


Here is an example of what my list looks like today:


 - Liquor Decanter (Maybe rocks glasses too?)
 - Mason Jars (bathroom, toothbrushes)
 - Fabric (curtains for office)
 - Luggage (good suitcase?)
 - Bike Basket
 - Mirror with orange frame? (acid wash)
 - desk for Burley?


So not only do I list out the items that I am looking for, I make sure that I note what I originally intended it for. Otherwise. I seriously... would just forget all of it. Not proud. Just telling the truth.


When you are specifically looking for clothes, it is most important to ensure that you check the hot spots of any thrift store. My list goes like this:


 - Accessories (Purses/Clutches), Scarves, belts
 - Shoes
 - Dresses (nothing current, usually only looking for vintage)
 - Coats/Vests
 - Skirts


Those are the areas that I find the most luck, in that order. It is important to look for pieces that will work well with OTHER items you already own. That's when you have the most success in the clothing arena of the thrift store. We will talk more about this next time as well.


KNOW THE DATES
Every thrift store (at least that I have ever frequented) has a specific day each week that they restock most of their product. They will also rotate out old product to keep frequenters like us, happy. KNOW THOSE DATES. If you hit your local thrift store on these dates, you will be more likely to have the pick of the litter. Just give them a call and ask when they normally restock.


MAKE IT FUN - BRING A DATE
So, not that I think that a thrift store shopping spree would be a great idea for a first date (unless you are dating a superhero... don't let that one out of your sight!), but you SHOULD commit to making your thrift strore trip a blast. I am not normally an "I love to shop with my friends" girl, but the thrift store is different. You have to be dedicated to shopping and searching a LOT. You have to be willing stay out for a while, taking time to search for treasures. This is SO much more fun when you have a buddy by your side. So plan ahead, invite your friend, grab an ice coffee to go, and enjoy your day. Trust me. It is so much better this way.


TAKE YOUR TIME
This is super important. I know I say that a lot. But it is a lot true! Thrift store shopping takes time. Don't give up. You have to pass by 1 million pieces of trash before you find your 1millionthand1 treasure. This takes planning ahead to have a good chunk of your day to browse, take a lunch break, browse again, take a coffee break, and browse again.


I hope you find this helpful. I PROMISE that if you follow these tips, you will not only leave the thrift store with EXACTLY what you need, but you will have a blast doing it, and you will get home a carload of things that you actually have intentions for. I promise. I promise.


Make sure you tune in for the next part of the series, where I will share some AMAZING transformation ideas for all of the goodies you find while you are out!


TTFN,


Category: Fashion | Lifestyle

Tags: , , ,

Steal Mila Kunis' Smoky Eye Look

by Adina Zilberman August 6, 2012


Ukranian bombshell and Hollywood Starlet Mila Kunis is a stunner, to say the least. With her flawless skin, impeccable bone structure, and naturally exotic beauty, her face is a canvas that takes any beauty look beautifully. During a recent premiere event for her new movie, “Ted”, Mila stepped out with one of the most flawless looks that I have seen to date, executing a perfect smoky eye and pale lip combo that any beauty girl can get behind. Keep reading to learn how you can achieve Mila’s classic smoky look, all on your own.


Smooth, even-looking skin is easy to achieve, if you know the proper tricks. Get a flawless, airbrushed-quality complexion, like Mila’s, by using a duo fiber foundation blending brush to apply natural (read: dewy) liquid foundation to the entire face. Paint the product on using short, rounded strokes, and always be sure to blend in the direction of your facial hair. To contour, simply grab a fluffy powder brush, dip it into a powdered foundation that is 1 to 2 shades darker than your own complexion, and apply along the cheekbones, temples, and below the jawline. Then, apply just a hint of rose blush to the apples of the cheeks, blending upward toward the temples, and a sprinkling of a soft, sheer highlight on the bridge of the nose and on the forehead.


To get Mila’s show-stopping smoky eyes, start first with an application of shadow primer on the eyelids. Next, apply a soft golden beige eye shadow from the lash line to the crease, focusing on the inner corner of the eye. Grab a pencil-shaped eye shadow brush, and dip it into a blackened-brown eye shadow (preferably matte). Starting at the outer corner of your eye, proceed to draw an angled line from outer corner to the inner. Adjust the shape to fit the natural curve of your eye, exaggerating the angle slightly at the outer corner of the eye, and underneath the lash line. Blend with a fluffy shadow brush, to diffuse harsh lines. Follow this up with black liner, smudged into the waterline and the lower lash line, and two coats of volumizing mascara, to complete the look.


Keep the lips simple, so as not to overwhelm. A soft, pink lipstick was Mila’s choice, and should be yours as well. The effect is soft femininity to the eye’s rockstar quality.


And there you have it, the quick and easy on how you can look like Mila Kunis. What do you think? Will you try the look?


by Adina Zilberman of Kraseybeauty.com