Index Background

How to Wear White Jeans

by Remington Ready June 10, 2013

White jeans are a summer staple. They are a versatile item that every girl needs in her closet. White jeans can be easily dressed up for a night out, dressed down for days out in the sun, or used to put together a classy outfit for work. As we make our way into June, it is the perfect time to invest in a pair, or try to incorporate them into more outfits for these summer months!


Look 1 - Dressed up white jeans for a night out: Because of their simplicity, white jeans can become edgy enough for a night out easily. With the simple addition of a leather jacket, a pop of color, and heeled boots, they are instantly taken from a daytime item, to nighttime. If you like more of a preppy look, white jeans can be accessorized with pumps or open-toed heeled sandals for a night out.


Look 2 – Dressed up white jeans for the office: With a flared style, white jeans are perfect for a more casual summer day at the office. Paired with a bright blazer and pumps, this look is sophisticated and work appropriate, while still letting your personal style shine through. These flared pants could also be styled with a striped button up shirt for a more tailored look.


Look 3 – Dressed down white jeans for a summer day: When paired with a graphic tank top and flat sandals, white jeans are easily transitioned for a summer day. This outfit could be worn with ballet flats and a loose sweater for cooler summer days, too!


As you can see, white jeans can be worn in so many different ways this summer. Find a pair that flatters your body and challenge yourself to wear them in all kinds of ways!


How to: Remington Silk Ceramic Heated Clip Setter

by Katie Manwaring May 20, 2013

Hey all! Katie from Katie's Bliss here to show you how I use the Remington Silk Ceramic Heated Clip Setter before getting ready to head out for my day. Prior to doing my makeup or getting dressed, I set the curlers in my hair and then leave them in while I continue my morning routine. When they've completely cooled I pull them out, style my hair with my fingers and add in a little hairspray. To see just how I use these hot rollers check out my tutorial!


To see more from Katie, check out Katie's Bliss

Creating a Wearable Orange Eye

by Remington Ready May 13, 2013


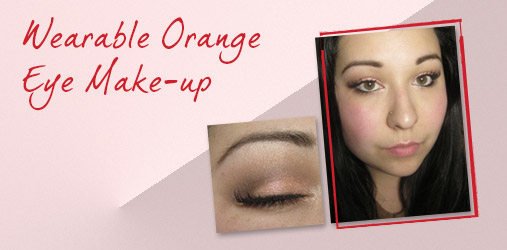
If you follow makeup trends you’ve probably noticed that orange is one of the hottest cosmetic colors this spring/summer season. While many color-enthusiasts love working with this fun, eye-catching shade, there are also many out there wondering—is it wearable for me? Personally, I think it is! Whether you’re a little color-shy or simply concerned it won’t work well on your skin tone, I think almost any color can be made wearable through proper application and the right complementary products and colors. I’ve created this “wearable” orange eye look to help anyone that wants to get their feet wet so to speak when it comes to wearing orange on their eyes. In my opinion, if you couple a seemingly “un-wearable” color with neutral, complementary shades you can often make almost any color work for you!


What you’ll need (I’ve included what I used in parentheses): Orange eyeshadow (mixed MAC Pink Opal with Fyrinnae Electro-Koi Medium Chocolate Brown matte eyeshadow (MAC Texture) Dark Brown matte eyeshadow (Make Up For Ever #17) Light Taupe matte eyeshadow (Inglot #358) Ivory eyeshadow (Inglot #395) Black eyeliner (Mirenesse Inside Out 27HR Kohl in Osiris) False lashes and/or Mascara (Faux lashes in Colette and Revlon Grow Luscious mascara in Blackest Black).


I always recommend starting out with a clean, moisturized, and primed eye. I personally like Benefit Stay Don’t Stray for many of the daily eye looks I create unless I’m working with loose pigments, but use whatever works best for you.


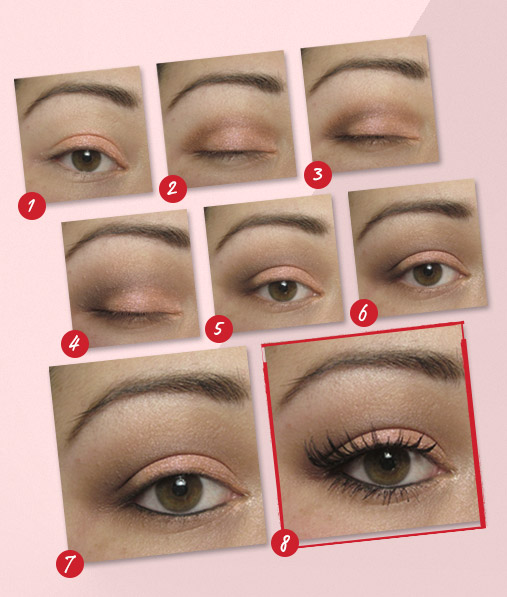
Step 1: Pat orange shadow on 2/3 of your upper lid working from the inner corner out. Sweep a little under the inner lower corner as well.


Step 2: Create a “C” shape with a medium chocolate brown shadow that frames the orange shadow by starting at the outer corner of your upper lid with a sweeping motion up and around the crease towards the inner corner.


Step 3: Use a dark brown shadow to darken the outer “V” of your upper lid and create more depth. With a light hand, sweep this shade under your lower lashline as well.


Step 4: Using a super light brown or light taupe, blend out the edges of the crease color up towards your orbital bone. Sheer it out as you blend upwards towards your brow.


Step 5: Using a cream or ivory colored eyeshadow, highlight right below your brow and the inner corner of your eye with a light hand.


Step 6: Make sure you blend in the ivory eyeshadow so it catches the light, but doesn’t create a stark contrast.


Step 7: Tight-line or line your upper lashline in a manner that best defines your eye and line your lower lashline.


Step 8: Curl your upper lashes and apply mascara and/or falsies. Remember to apply mascara to your lower lashes as well.


Voila! A wearable orange eye look! If this is your first time working with orange eyeshadow don’t worry if you’re not completely thrilled with your first attempt! Practice makes perfect and half of perfecting how to apply shadow in general to your eye is simply doing it over and over. Good luck!


By Doria Murphy Freelance Makeup Artist and Beauty Blogger at BeautyPopStop.com Beauty Blog


Mother’s Day Gift Guide

by Remington Ready April 29, 2013

Hopefully you know by now that Mother’s Day is just around the corner. The special woman or women in your life deserve something special, and sometimes finding the perfect gift isn’t the easiest. Here is Remington’s Mother’s Day gift guide to give you some inspiration!


For the Health Nut: Have you ever heard of Nature Box? It’s a monthly subscription box that sends you 5 large samples of different healthy snacks each month in the mail. The samples are pretty big, and it allows you to order more of the snacks if you love them! 


For the Beauty Queen: Why not pick her up Remington’s new T|Studio Silk line? The Silk Curling Gift set comes equipped with a hair dryer, curling rod, and round brush so she can achieve a beautiful blow out right at home. Buy it here now!  


For the World Traveler: Make sure your special woman is always traveling in style with the Vera Bradley Weekender Bag. This bag comes in tons of different prints and is perfect for someone that is always on the go. 


For the Super Mom: Why not give her a way to relax? You can never go wrong with a gift card for a massage, manicure, or spa day! Pick up a gift card for her somewhere in your area; she will love the time to herself to relax. 


For Any Mom: Give her the gift that keeps on giving, the Remington i-Light Pro! She can give herself the ultimate spa day without ever leaving the house. The i-Light Pro delivers professional quality hair removal in the comfort of your own home, and any mom will appreciate that. Pick one up here!


Introducing Remington's Show Stopper Styling Tools!

by Remington Ready March 25, 2013

Introducing Remington’s Show Stopper styling tools, available exclusively at Wal-Mart! The Show Stopper line delivers beautiful tools for beautiful hair. The line consists of a hair dryer and straightener with a trendy design.


The Show Stopper Ionic Hair Dryer has ionic conditioning capabilities stopping excess damage from occurring on your hair. It also has 3 heat settings and 2 speed setting to allow you to create your own drying experience! The Show Stopper 1” Ceramic Flat Iron are perfect for giving your hair that texture and volume you need. The flat iron has a fast speed up, and salon high heat giving you the perfect look every time.


Colors for the Season

by Remington Ready November 26, 2012

As the winter months are officially upon us, many of us are feeling anxious and ready to change up our look. Our skin has lost the rest of our summer glow, and our wardrobe has changed from t-shirts to peacoats, often our hair needs an update, too! Some of you may be feeling adventurous, but if you’re just looking for an update to your existing color – you’re not alone. Below is some advice on how to renew your do’ for winter!


Blonde

For vibrant blondes, you want to avoid those golden tones because they will wash out your complexion that has paled since summer ended. Instead look to incorporate gray or ashy tones. Think Gwyneth Paltrow. These colors will bring a nice winter glow that still complements your fair skin. If the ashy color doesn’t work for your olive skin tone, you should simply add more lowlights to your winter foil. The lowlights can balance your hair and enrich your color to match your winter skin.


Brunette

You’re in luck! The ombre trend is style in for this season, but slightly less drastic. Rather than deep brunette roots with blonde ends, the updated ombre is a dark rich-brown base with slightly lighter brown hues as you move down the length of the hair.  Ask your stylist to incorporate golden brown tones as you move towards your ends, and you’ll have a stylish ‘do that is winter-ready.


Red Head

For you bold beauties, this winter the trend is a more subtle red tone rather than last year’s fire engine red. Look to copper or ginger hews rather than orange or red brights. With red hair, you want an all over color, so avoid highlighting your tresses. If you are looking for a darker mature red, think Julianne Moore. For a lighter more youthful red, look to Emma Stone. 


Back to Basics: Cleaning Your Styling Tools

by Remington Ready October 15, 2012

Listen up lovely ladies (and gents)! When you stop and think of how funky and gross some of your styling tools can get and all of the dust, oils, and germs that accumulates, you’ll start looking at those hairballs differently. No worries – we’re here to help! Cleaning your styling tools will not only give you more control while styling, but also smoother, shiner hair. No germs and shiny hair? WIN!  


NOTE: Make sure your styling tools are unplugged and cooled before cleaning!!!


Hair Dryer – Simply remove the air vent (circular area located in back) and clean lint off the filter with an old toothbrush. Replace the filter and put the air vent back on! Lastly, wipe down the exterior of your dryer with an anti-bacterial wipe. Voila! Remember to clean the vent area about once a month to help with air circulation through your blow dryer. It also extends the life of your blow dryer by preventing it from overheating!


Straightener – Take a damp washcloth and gently wash off the plates from any build-up. If the straightener has floating plates, take a small pin and gently run it under the plates to remove any build-up. If you still have stubborn, try using rubbing alcohol on a soft rag. Make sure that you squeeze out the excess alcohol from your rag before cleaning your flat iron to prevent alcohol from getting inside. 


Brush Grab a pen or pencil and slide the pointed end under the hair build-up from the bottom of the brush to the top. Pull up until the hair starts to loosen. Then take a scissors and carefully cut straight down the middle. Pull the clumps apart and discard any hairballs. To clean the rest of the brush, use shampoo on a toothbrush with warm water to scrub the base of the brush between the bristles. Rinse the brush, and then lay it face down to dry.


Curling Iron/Wand Wipe the barrel and handle with a damp cloth. To remove heavy build-up, use rubbing alcohol instead of water. Another secret tip is to mix 1 part warm water with 1 part liquid fabric softener and put mixture on a cloth or q-tip. Wipe down your curling iron with the cloth or use a q-tip to get those small, hard to reach areas. 


The Easter Bun

by Remington Ready April 2, 2012

On a holiday where there are eggs to find and chocolate bunnies to eat, you most likely want to quick and easy hair style while still looking festive. The Easter bun, also known as the braided bun, has been seen on countless celebrities like Heidi Klum, Lauren Conrad, Sarah Jessica Parker and Kristen Bell. Luckily for those of us who don’t have a team of hair stylists, this high fashion look only takes minutes to create. 


Step 1: Comb out your hair using a flat brush to remove any tangles.


Step 2: Use an elastic hair tie to pull your hair into a low pony tail. Separate the pony tail into three pieces and braid it until you’ve reached the end of your hair. Secure the end with your second elastic hair tie.

 *Tip: A good way to measure where your bun should be located is by line up your pony tail with the top of your ears.


Step 3: Wrap your braided hair around the base of your pony tail to create the bun and make sure the end of your braid is tucked under the bun. Bobby pin the outside of your bun to your head.  


Step 4: Spray with hairspray to secure your bun.


Step 5: Easter is colorful holiday, so don’t be afraid to add an accessory to brighten up your bun like this Turquoise flower clip.


Voilà, you have a beautiful Easter bun in minutes!


Share your braided bun picture by posting it to Facebook.com/RemingtonReady or tweet at us @RemingtonReady.

i-LIGHT Pro Spring Break Contest

by Remington Ready March 1, 2012

i-LIGHT Pro Spring Break Contest


THIS CONTEST IS CLOSED.

Congratulations to the winners:

1st place: Sara Snyder

2nd place: Julie Lawrence

3rd place: Lisa Grassetti


We are so excited for Spring Break that we are starting the celebration early by giving away some pretty amazing loot to help you get ready! But first…we want to hear what you’re dream spring break vacation is!


To enter…

1. Create a board on Pinterest called “i-LIGHT Pro Spring Break Contest”

2. Pin the above image to your board.

3. Pin your dream Spring Break vacation! It can be anything from clothing ideas and hair styles to your dream destination and fun activities.

4. Email your board’s link to remingtonready@gmail.com.

*1 board per person. Limit each board to 25 pins.


Top three boards with the largest combined total of repins and likes wins…

1st place: i-LIGHT Pro Intense Pulsed Light Hair Removal System


2nd place: Keratin Therapy Gift Set including a Keratin Therapy Hair Dryer, Flat Iron, and Cushion Brush


3rd place: TStudio Pearl Gift Set including a TStudio Pearl Hair Dryer, Curling Wand, and Cushion Brush


The contest ends March 7th, so check out the Official Rules here* and start pinning!


*By pinning and/or repinning this image as well as entering the contest via the stipulations above, you are agreeing with the terms and conditions of the contest.


For the latest in hair-spiration and style ideas follow Remington Ready's Pinterest page!


Pin It


♥ Remington Ready

Richard Marin’s 2012 Golden Globe Red Carpet Predictions

by Remington Ready January 12, 2012

Tina Fey - Award Worthy


Sunday marks the official start to award season with the Golden Globes and we couldn't be more excited! The stars, the fashion, the hair - what's not to love? Celebrity stylist, Richard Marin, is making his predictions for the upcoming red carpet - check it out:


We can't wait to what Richard does on Sunday! To create your own award-worthy hair, take a look at this tutorial for Richard's sleek chignon bun worn by our favorite funny gal, Tina Fey, at last year's SAG Awards.


1. Apply a straightening balm to damp hair and blow dry with the Remington T|Studio Pearl Ceramic Professional AC Hair Dryer. Be sure to blow dry bangs at an angle to achieve the swooping effect!


2. Sprits a heat protective spray throughout your hair and curl ends with the Remington T|Studio Pearl Styling Wand, for movement and texture.


3. Backcomb the crown of your head and slowly pull hair back to a low side ponytail.


4. Twist hair around the ponytail base into a bun and place bobby pins. Don't forget the hairspray!


Chic, sleek, and simple! Remember to catch Monday's post for a breakdown of the red carpet looks Richard creates for Tina Fey and Michelle Pfieffer at Sunday's Golden Globes.


What are some of your favorite Golden Globe looks? Follow Remington Ready on Pinterest to see our latest gallery of our top Golden Globe styles.