Index Background

The Perfect Valentine’s Day Curls

by Remington Ready February 6, 2017

It is officially the season of l.o.v.e. Whether you actively participate in Valentine’s Day or not, there are so many ways to get in the holiday spirit! Today I will be showing you my favorite Valentine’s Day inspired hairstyles with curls.


Whenever I think of Valentine’s Day, I think of a classic, elegant style. I think deep reds,and big curls. One of the biggest problems I run into when getting ready is deciding what to do with my hair. I almost always dress up, so I want my hair to compliment my outfit and not take center stage. These three hairstyles are simple enough to do just that, all while still creating a romantic, put together ensemble.


Style 1:

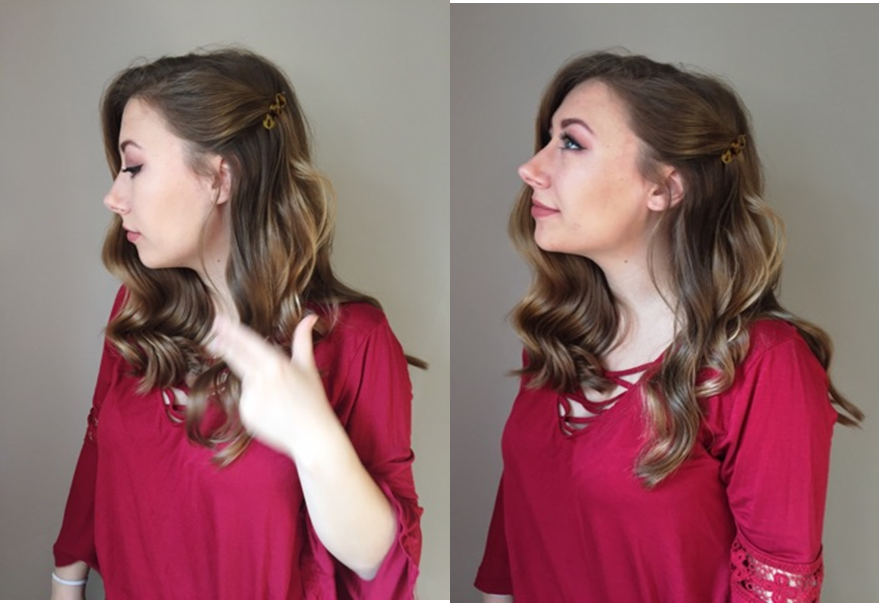
This first style is the quintessential Valentine’s Day look & the best part is that it is beyond easy to create. All you need for this style is freshly curled hair and a hair clip. 


Once you’ve curled your hair, take a section of hair and pin that up to the side and towards the back. I usually twist my hair up and back once to give a little volume and help secure the look.

This asymmetrically look is so simple and romantic! It’s perfect for a fancy Valentine’s dinner or really any formal occasion.  You can dress this look up even more with a delicate barrette or hairpin.


Style 2:

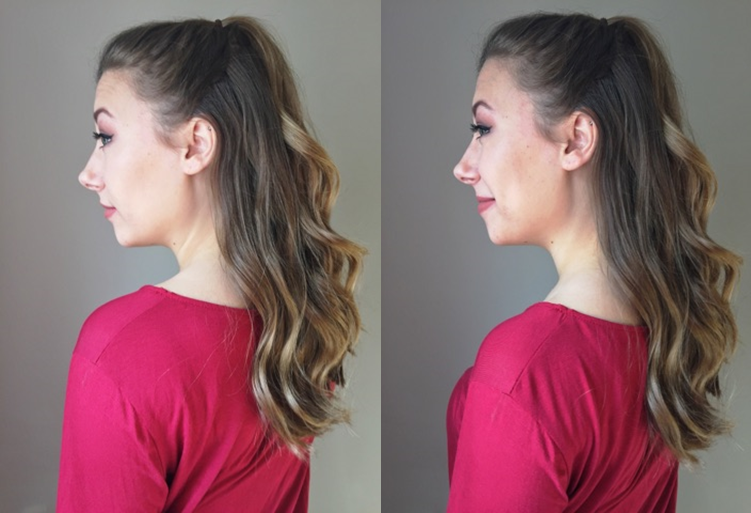
Like I said earlier, I love to dress up and curl my hair for Valentine’s Day, but you never want to be that girl that is clearly going way to hard for dinner or a movie. This second look is casual but still put together—perfect for those more laidback dates.  


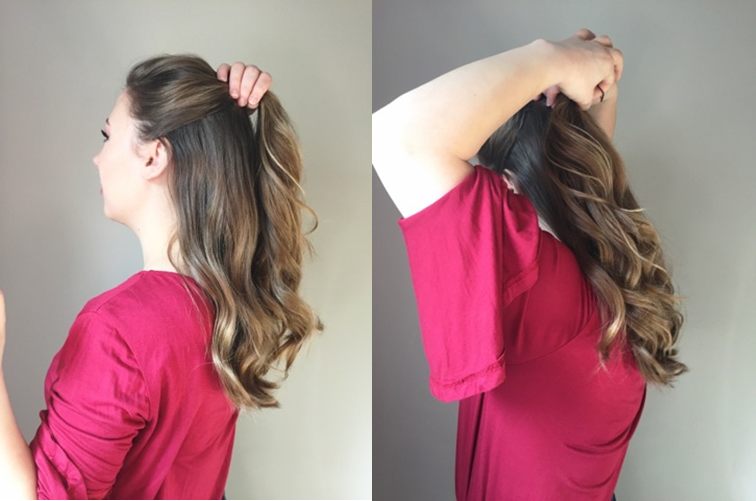
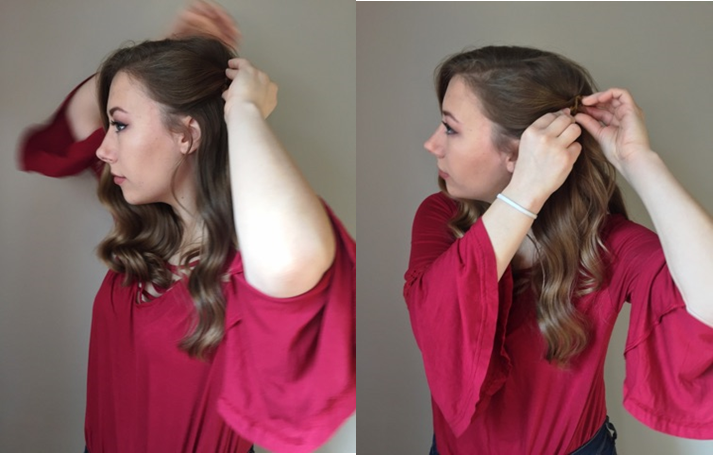
Start by curling your hair in loose waves. Once you have this finished, separate the top half of your hair into a high ponytail. The curled ponytail gives your hair a more textured, waterfall effect.  It is the quintessential “casual, yet chic” look. No one will be questioning your cute curls in this style! 


Style 3:

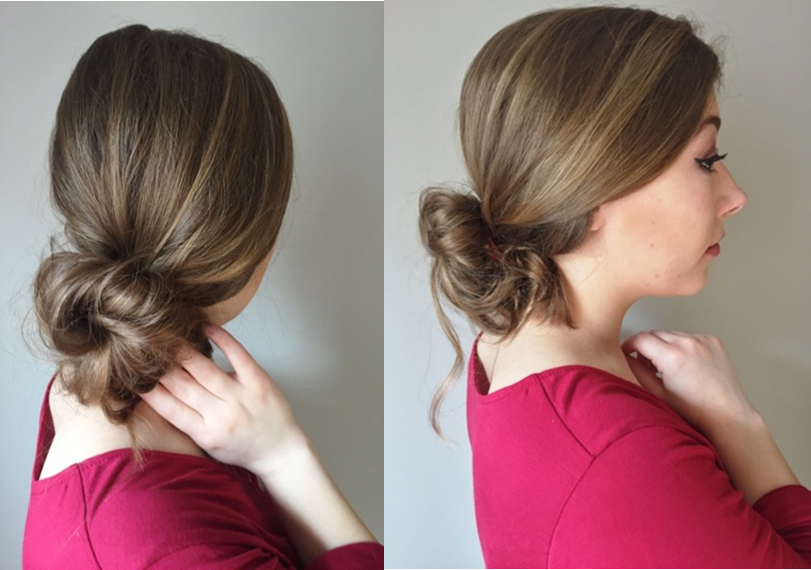
When I was in high school I used to be obsessed with low buns. As I grew up and styles changed, the low, messy bun was replaced by the high sock bun. Recently, the former has been making a comeback and I find myself rocking this style more and more.


I start this off by curling my hair. Now, you can definitely do this without curling your hair, but if you’re going for a romantic, “artfully messy” look, curling your hair first is key! 


Then, I pin back a section of my hair on each side. This allows you to decide how your hair will frame your face. Whether you like it pulled back and tight or loose and teased, this first step allows you to make that decision.


 After the front sections of my hair are secure, I gather my hair up into a relative bun and secure that. I like my low buns to be loose and artfully messy, so after everything is secure I slowly loosen up sections of my bun to give a more textured look. Here is where curling your hair before is particularly important. If a few pieces fall out here and there, they are still curled. This gives the look added elegance, without seeming too manicured!  


Category:

Tags:

Thermaluxe™ Dryer

by Remington Ready August 9, 2016


Had enough of frizzy, dried out hair?

It’s time for Thermaluxe!

The Thermaluxe Hair Dryer optimizes heat levels to dry hair quickly without damaging it. The hair-saving heat protection comes from the ceramic-coated grill, which releases tons of negative ions during drying to prevent heat damage and reduce frizz. You’ll love the range of speeds and heat settings that let you find the perfect performance for your hair type. Plus, Thermaluxe reduces styling times with a powerful airflow that dries hair 50% faster than standard Remington dryers. Here’s what else you’ll get with the Thermaluxe Hair Dryer: concentrator and diffuser attachments, cool shot button, tangle-free fabric cord, removable filter, and a 4-year limited warranty.

Stop drying out your hair and start safely drying it with the Thermaluxe Hair Dryer! It’s the perfect styling tool for creating all-day hairstyles that keep up with your nonstop lifestyle.


Thermaluxe™ Straightener

by Remington Ready July 22, 2016

 
Want styles that last all day?

You need Thermaluxe™
, the all-new collection from Remington.

The Thermaluxe Straightener is a must have for creating gorgeous, healthy-looking styles that keep up with your nonstop day. It contains 10x more ceramic than previous straighteners, and gets the job done with just one pass. Advanced Thermal Technology optimizes heat levels to prevent damage while quickly transforming hair into the all-day, straightened styles you love! The 1” plates are perfect for detailed styling and the 2” plates are great for straightening larger sections of hair quickly. They both include a floating design that keeps them in constant contact with hair for consistent styles. Other features include: 450° high heat, 15-second heat-up, 30 heat settings, 60-minute auto shutoff, and a 4-year limited warranty.

Get the Thermaluxe straightener and discover hair that lasts through your 24/7 lifestyle.


The #1 Tip For Beautiful, Radiant Hair

by Remington Ready July 8, 2016


Want gorgeous hairstyles that last all day? So do we! And for that, there’s Thermaluxe™!

24/7 Lifestyle. 24-Hour Hairstyle.
We know you’re active and always on the run, and you want to depend on your hairstyle to keep up with you. That’s why we made Thermaluxe™. It lets you create styles that stay gorgeous through anything you do with your fast-paced lifestyle. So don’t let the fear of flat hair hold you back! Thermaluxe™ gives you all-day styles!

Advanced Thermal Technology
How does Thermaluxe create these beautiful, long-lasting styles? The secret is the optimized heating technology, which is unique to each of the styling tools. The innovative heat makes curling, straightening, and drying fast and hair-friendly.

Check out the Thermaluxe™ lineup to see what haircare tool can transform your style!


Straighteners
Faster and long lasting! The floating ceramic plates (1” and 2”) maintain even temperatures for fast straightening that lasts all day. And because it works 33% faster than standard Remington straighteners, your hair is exposed to less heat and stays looking awesome!
- 450°F Heat
- 10x More Ceramic than standard Remington straighteners
- 15-second Heat-Up

Curling Wands
Tapered heating is the secret to healthy, long-lasting curls. The ceramic barrel (½”-1” and 1”- 1½”) is hotter at the base to curl your thick roots while the tip of the barrel is cooler and gentle on your ends. The result is beautiful curls and waves that last all day!
- 410°F Heat
- Slip-Free Ceramic Barrel
- 30-Second Heat-Up

Dryer
Hot spots are a problem with most dryers. So Thermaluxe™ fixed it. Even heating combines with ionic technology to dry hair quickly and help prevent annoying frizz. It even has three heat settings and two speeds so you can find the best drying for your hair.
- 50% faster drying than standard Remington dryers
- Ionic-Ceramic Technology
- Lightweight AC, Salon-Quality Motor
- Fabric, Tangle-Free Cord

Setter
Want quick curls? How does 5 minutes sound?! The patented Dual-Heating Technology heats hair from the inside with the roller and from the outside with the clip. Plus, the clips are specially designed to help prevent creases and deliver a secure hold.
- 5-Minute Curls
- Dual-Heating Technology
- 20 Rollers (12 large—1¼”, 8 medium—1”)
- Space-Saving Storage Design

Summer Hairstyles to Beat Frizz

by Remington Ready June 29, 2016


Hi everyone! It’s Diana from 204 Park here again today to talk to you about summer hair. Let’s get real here for a second, in the summer it can be hard with the heat and humidity to keep your locks looking smooth. It’s easy to let frizz take over and ruin your hair but I want to share today how I keep my hair under control during the summer months.


Most of the time I like to wear my hair straight and to keep frizz at bay I use my Remington T|Studio PROtect Straightener. I cannot tell you guys how much of a game changer this straightener has been for me. It uses ceramic plates in combination with a vapor infusion technology that helps not only straighten and smooth your hair but conditions and prevents breakage at the same time! AKA - it’s AMAZING!


The vapor technology works with either distilled water or the Macadamia Conditioning Treatment. When you press the vapor release button, cool vapors are absorbed into the hair, protecting it from damage while you style. How incredible is that?!

Now onto the styling…

Because I wear my hair down most of the time I’m always looking for ways to mix things up a little bit that don’t take too much time. First, I smooth my hair out and detangle with my Remington Glitter Vent Brush to prep for the headwrap. I love my braided headwrap because it’s reversible and can also be worn several ways. For a sleek look, I like to wear it as a headband with my hair either down or in a ponytail or bun. For more of a boho vibe (or hello- summer music festivals!) I wear it as a head wrap. The elastic keeps it from moving around and it’s comfortable all day! Which look is your favorite?


Thanks again for having me, until next time!
Xo, Diana

Effortless Hairstyles with Accessories

by Remington Ready June 24, 2016


Hi! Sonja here and I'm back again with another collaboration with Remington, but this time I'm featuring a handful of their super cute hair accessories for the summer. I actually braided my hair the night before hence the wavy look, but you can style it however you like. Here are just some tips on how to do super easy hairstyles with these dainty accessories that are perfect for festivals, barbecues, or any outdoor events that you plan on having in the summertime!


Remington 5 ct Clips/Barrettes, Remington Flower Headwrap (Available at Target), Decorative Headwrap, Metal Arrow Headband


Hair Extensions Looped Bristle Brush, Teasing Brush

Here are the tools and accessories that Remington sent me to test out, all of which I'll be using for this post except for the Hair Extensions Looped Bristle Brush since I won't be wearing my hair extensions today.


Starting off with the easiest look, I teased the crown of my hair for a little bit of volume using the Remington Teasing Brush. I then took about a 1" section from both sides of my hair, twisted them loosely, and secured them with the triangle clip. If you want a more effortless look, leave little sections in the front to frame your face. The clip won't budge, so you don't have to worry about it falling off when you're rocking out to your favorite bands!


Here's something that requires a little bit more work but still totally simple and doable. I took 1-2" sections right above my ears and did two regular braids. A few inches above those sections, I took another 1-2" sections and did the same thing. I then brought all 4 braids together to the back of my head as centered as possible, and secured them with the infinity clip. This one feels even more secure than the triangle clip, so these little braids surely won't fall apart! If you want, you could loosen the braids for a messier look as well.


Remington Flower Headwrap, Decorative Headwrap, Metal Arrow Headband

For the photos above, I styled a braided crown using three vastly different hair bands that you can use for various occasions. First off, to do this ethereal bohemian hairstyle, start off by braiding pigtails and securing them with elastics. Bring one side of the pigtail all the way around the other side and bobby pin securely. Do the same thing on the other side by positioning the braid however you like - it can be on top of the other braid or right next to it. You may also want to leave thin curled sections in the front to frame your face.

Now you're ready to soak up the sun with your hair looking super chic and summer-ready!

xoxo,

Simple Stylings

Braided Top Knot Tutorial

by Remington Ready May 27, 2016


Hi everyone! Diana from 204 Park here today and I’m really excited to be partnering with Remington to share with you my go-to hairstyle for those hot summer days. As soon as the temperature rises I immediately gravitate towards top knots to stay cool. Today I’m sharing a braided twist on the top knot that’s sweet, simple and seriously elevates your look. Here’s what you’ll need:


Remington Glitter Vent Brush, Remington Teasing Brush, Remington Bow Clip, Bobby Pins, 2-3 Elastics, Hairspray


This hairstyle is easiest on second or third day hair. To start, brush your hair with the glitter vent brush to make sure you’re starting with a smooth base. Then, using the end of the teasing brush, separate the bottom ⅓ of your hair straight across and secure the top portion of your hair with an elastic.


To get a bit of volume, use the teasing brush to add some texture to the bottom ⅓ of your hair. Then, separate the bottom section of hair and begin braiding. You might find it easier to flip your head upside down to do this. Once the braid is complete, secure with an elastic. For a fuller braided look, gently pull the braid with your fingers to make the braid a bit looser and wider.


Once your braid is complete, secure the top portion of your hair into a ponytail, tucking the braid into the elastic. You’ll then create a bun with your ponytail using an elastic or bobby pins or both. To keep any flyaways at bay use a spritz of hairspray.


Lastly, finish the look with a sweet bow clip and your braided top knot is complete! With a bit of practice this look is easy to master and is a major upgrade from your basic topknot. Now you’re ready to look cute and stay cool all summer long! Thanks for having me!


Xo, Diana - 204 Park


Teasing Hair Tutorial

by Remington Ready February 22, 2016


All it takes to tease is a good brush and some hairspray! Teasing (or backcombing) is an awesome way to create texture and build volume for everyday styles or updos. The Remington Teasing Brush features a pointed end that helps with parting and sectioning hair during styling. This is one tool that can do it all!


Steps:

1. Section the hair around the crown of your head using the sectioning end of the teasing brush.

2. Starting with a 2” section, lightly hairspray focusing on the area you will be teasing.

3. Using the teasing brush, gently backcomb the hair while holding the section straight up. You should start about 3-5” above the scalp, depending on your hair length. Then brush the hair down towards your scalp several times until you reach your desired volume.
Tip: To avoid breaking your hair, don’t be too aggressive when backcombing and don’t brush hair quickly.

4. Repeat steps 2-3 on all hair sections around the crown of your head.

5. Once all sections are teased, part your hair as usual and lightly brush top layer of hair, making sure to not flatten out the teased hair underneath.
Tip: To have a smooth finish without brushing, keep a thin layer of hair around your part separate during teasing. Then when you are done teasing, let that section down to be a smooth layer over the teased hair. 

6. Scrunch your hair at the roots with your fingers for additional volume and look for any areas that may need additional teasing.

7. Smooth down your hair again using your hands and a shine serum or hairspray. Now your teasing is complete and it’s on to the styling.

8. Leave your hair down for natural big hair or bring hair up into a bun or ponytail.

Hair Brush Guide

by Remington Ready February 11, 2016


Anyone who’s had a bad hair day (who hasn’t?!) knows the value of owning a good brush. But one brush does not fit all styling needs. Remington has you covered on everything from building volume to drying hair faster. Check out the guide below and find the perfect brush for you!


1. Men’s Brush Set
The ideal set for the man in your life. The cushion brush smooths out short or long hair and the comb works best for detail styling any difficult areas.

2. Mini Brush and Comb Set
This brush and comb are the perfect size to keep in your purse for on-the-go styling. You’ll be prepared for any windy day.

3. Cushion Brush
The cushion brush is essential for medium to long hair. The nylon bristles detangle and smooth out hair and are also great for scalp stimulation.


4. Looped Bristle Brush
The ends of regular brush bristles can snag and pull on wigs, extensions and weaves. This brush has looped bristles, so you can smooth and detangle your hair with no worries!

5. Teasing Brush
This brush is sure to pump up the volume. It was specially designed for backcombing, teasing, and finishing, hair. It also has a special handle for sectioning hair or creating the perfect part.

6. Vented Brush
With a vented base, this brush can actually save you time getting ready. It was designed for use with a blow dryer, speeding up drying times and providing maximum volume.


The Science of Conditioning

by Remington Ready September 24, 2015


Hair goes through a lot. Washing, brushing, drying, curling, straightening—all these things and more can leave hair dry and brittle.


That’s why you use conditioner. It brings hair back to its natural beauty with a full and healthy look. (It smells pretty nice, too.) 


It’s usually easy to see the benefits of using conditioner, but do you know what’s really going on when you work it through your hair? Let’s take a look at the science behind hair conditioner and see how to get the most out of using it.


Here’s a simple explanation about the structure of your hair: Each hair is made up of tiny cuticles. Under a microscope, these cuticles look like overlapping flakes spiraling along the hair from root to tip. Of course, the hair we see on our heads is not actually alive, so these cuticles don’t receive nutrients from the body. That means they can easily become frayed and weakened from heat and styling.


That’s where conditioner comes in handy. Conditioners contain a variety of ingredients that are supposed to smooth out hair and give it that healthy look.


Examples of these substances are: surfactants, oils, humectants, silicones, and proteins.


Different conditioners contain varying amounts of these, but they’re all intended to smooth out cuticles and seal hair to prevent it from future styling damage.


The most important thing to keep in mind is that conditioner needs to be applied completely to all hair strands for it to be effective. That can be hard to do sometimes, especially if you have long, thick hair. But there are ways to make it easier.


The Remington Conditioning Brush is designed to maximize conditioner distribution. It dispenses conditioner as you work the detangling silicon bristles through your hair, leaving nourishment along the entire hair strand.


The brush is proven to be four times more effective than manual application, and it works with any conditioner for all hair types. Make the Remington Conditioning Brush part of your beauty routine and see what science can do for your hair.